Final Report for FNC10-807
Project Information
The focus of my grant FNC10-807 was to design, fabricate and develop a process to produce scaled up quantities of bio char. The grant enabled me to fabricate 3 kilns, purchase a chainsaw, and paid for a month’s worth of labor. I utilized downed wood in windbreaks and sawmill scraps; wood that generally was of little use as firewood.
Some photos have been added to this report, but there are even more photos available online. Copy and paste this link to find more photos from this project.
https://www.dropbox.com/sh/0eleenmuwlptxe9/Za5zar2nwH
Introduction:
I first became interested in bio char application to soils from reading about terra preta, a fertile soil from Brazil which has a large percentage of carbon. Currently there are two reasons for the worldwide interest in bio char. First being the improvement of soils through the addition of bio char. The second is the fact that bio char is a carbon negative phenomenon. The char sequesters carbon for years even decades and could possibly be a candidate for carbon offset credits. Personally I am more interested in the soil improvement aspect because I believe the improvement of soils will be the next Green Revolution and although carbon offset credits will possibly be of some economic benefit, I don’t think they will prove to be especially lucrative. The focus of this study has been the generation of char and its use in soils.
History of Terra Preta
Terra preta is a Portugese term meaning dark earth. Terra Preta first interested western science in 1950’s from the work of Wim Sombroek, a Dutch soil scientist. During his work in the Amazon, areas of dark earth were described that had increased fertility from the surrounding soil. It had been generally believed that tropical soils hold little nutrients and decomposing plant material is quickly recycled into living vegetation. However these areas of terra preta had remarkable fertility over many years, even decades. In fact they are still farmed today and are prized. Some of them are even mined for potting soil. They are believed to be man-made and quite ancient, having been formed by adding bone, manure, and charcoal to the native soil. The presence of large amounts of pottery shards also points to their human origin. There is no definitive answer on how they were produced, but it seems there was a long period of formation which ceased at the European conquest or even before. So they have retained remarkable fertility for hundreds of years. A striking difference between the surrounding soils is the large amount of carbon in the soil, up to 70 times more, which gives it a distinctive dark hue, as opposed to the surrounding soils which are much lighter. The patches of terra preta range from small plots to areas of hundreds of acres and can be several feet thick. Whatever process that generated this soil very likely occurred over hundreds or even thousands of years.
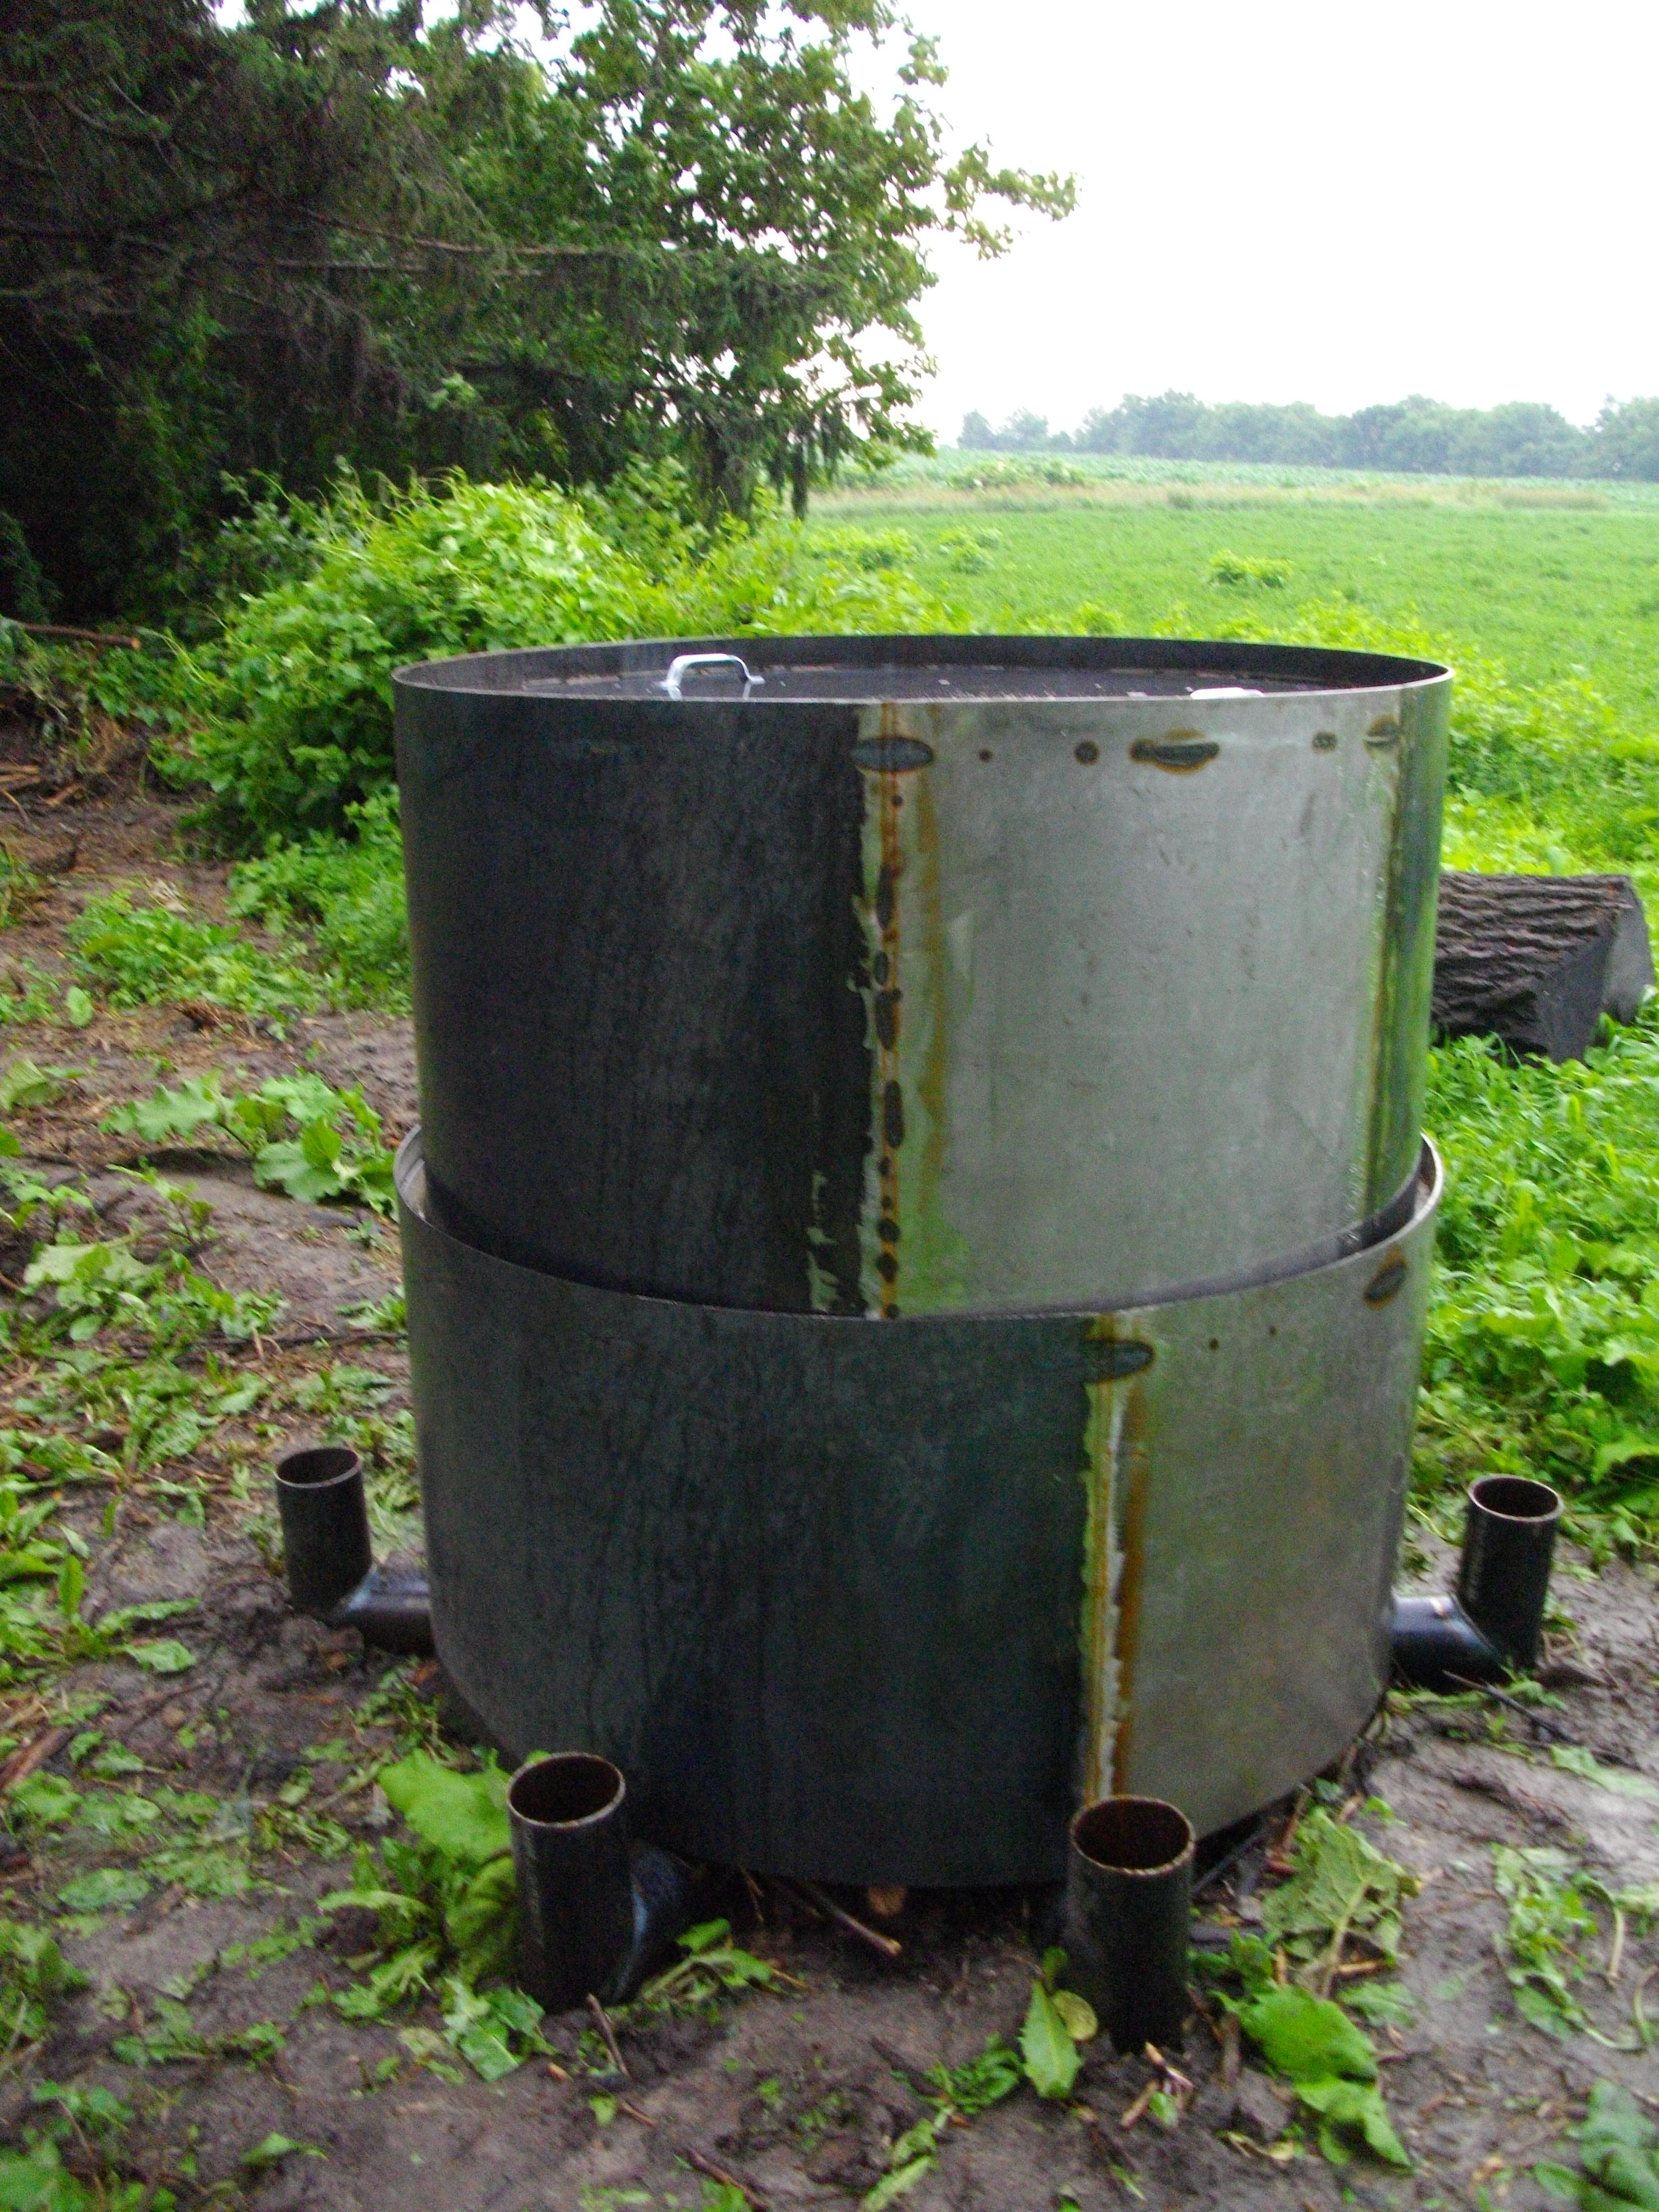
I structured this experiment around a large kiln because the limitation of bio char seems to be the manufacturing of enough of it to actually be of use. The kiln is based on a classic and simple design. My kiln is 50 cubic feet or around a third of a cord and will generate 25 cubic feet of bio char on each firing. The cost of the kiln for the metal and fabrication has been around 500 dollars.
Research
I fabricated 2 different designs, the first being a rolled metal kiln.
A: photo of rolled kiln. (Note 2 nested rings) This requires special equipment to roll a cylinder. Sometimes this is not locally available and I consequently fabricated a kiln with a hexagonal structure.
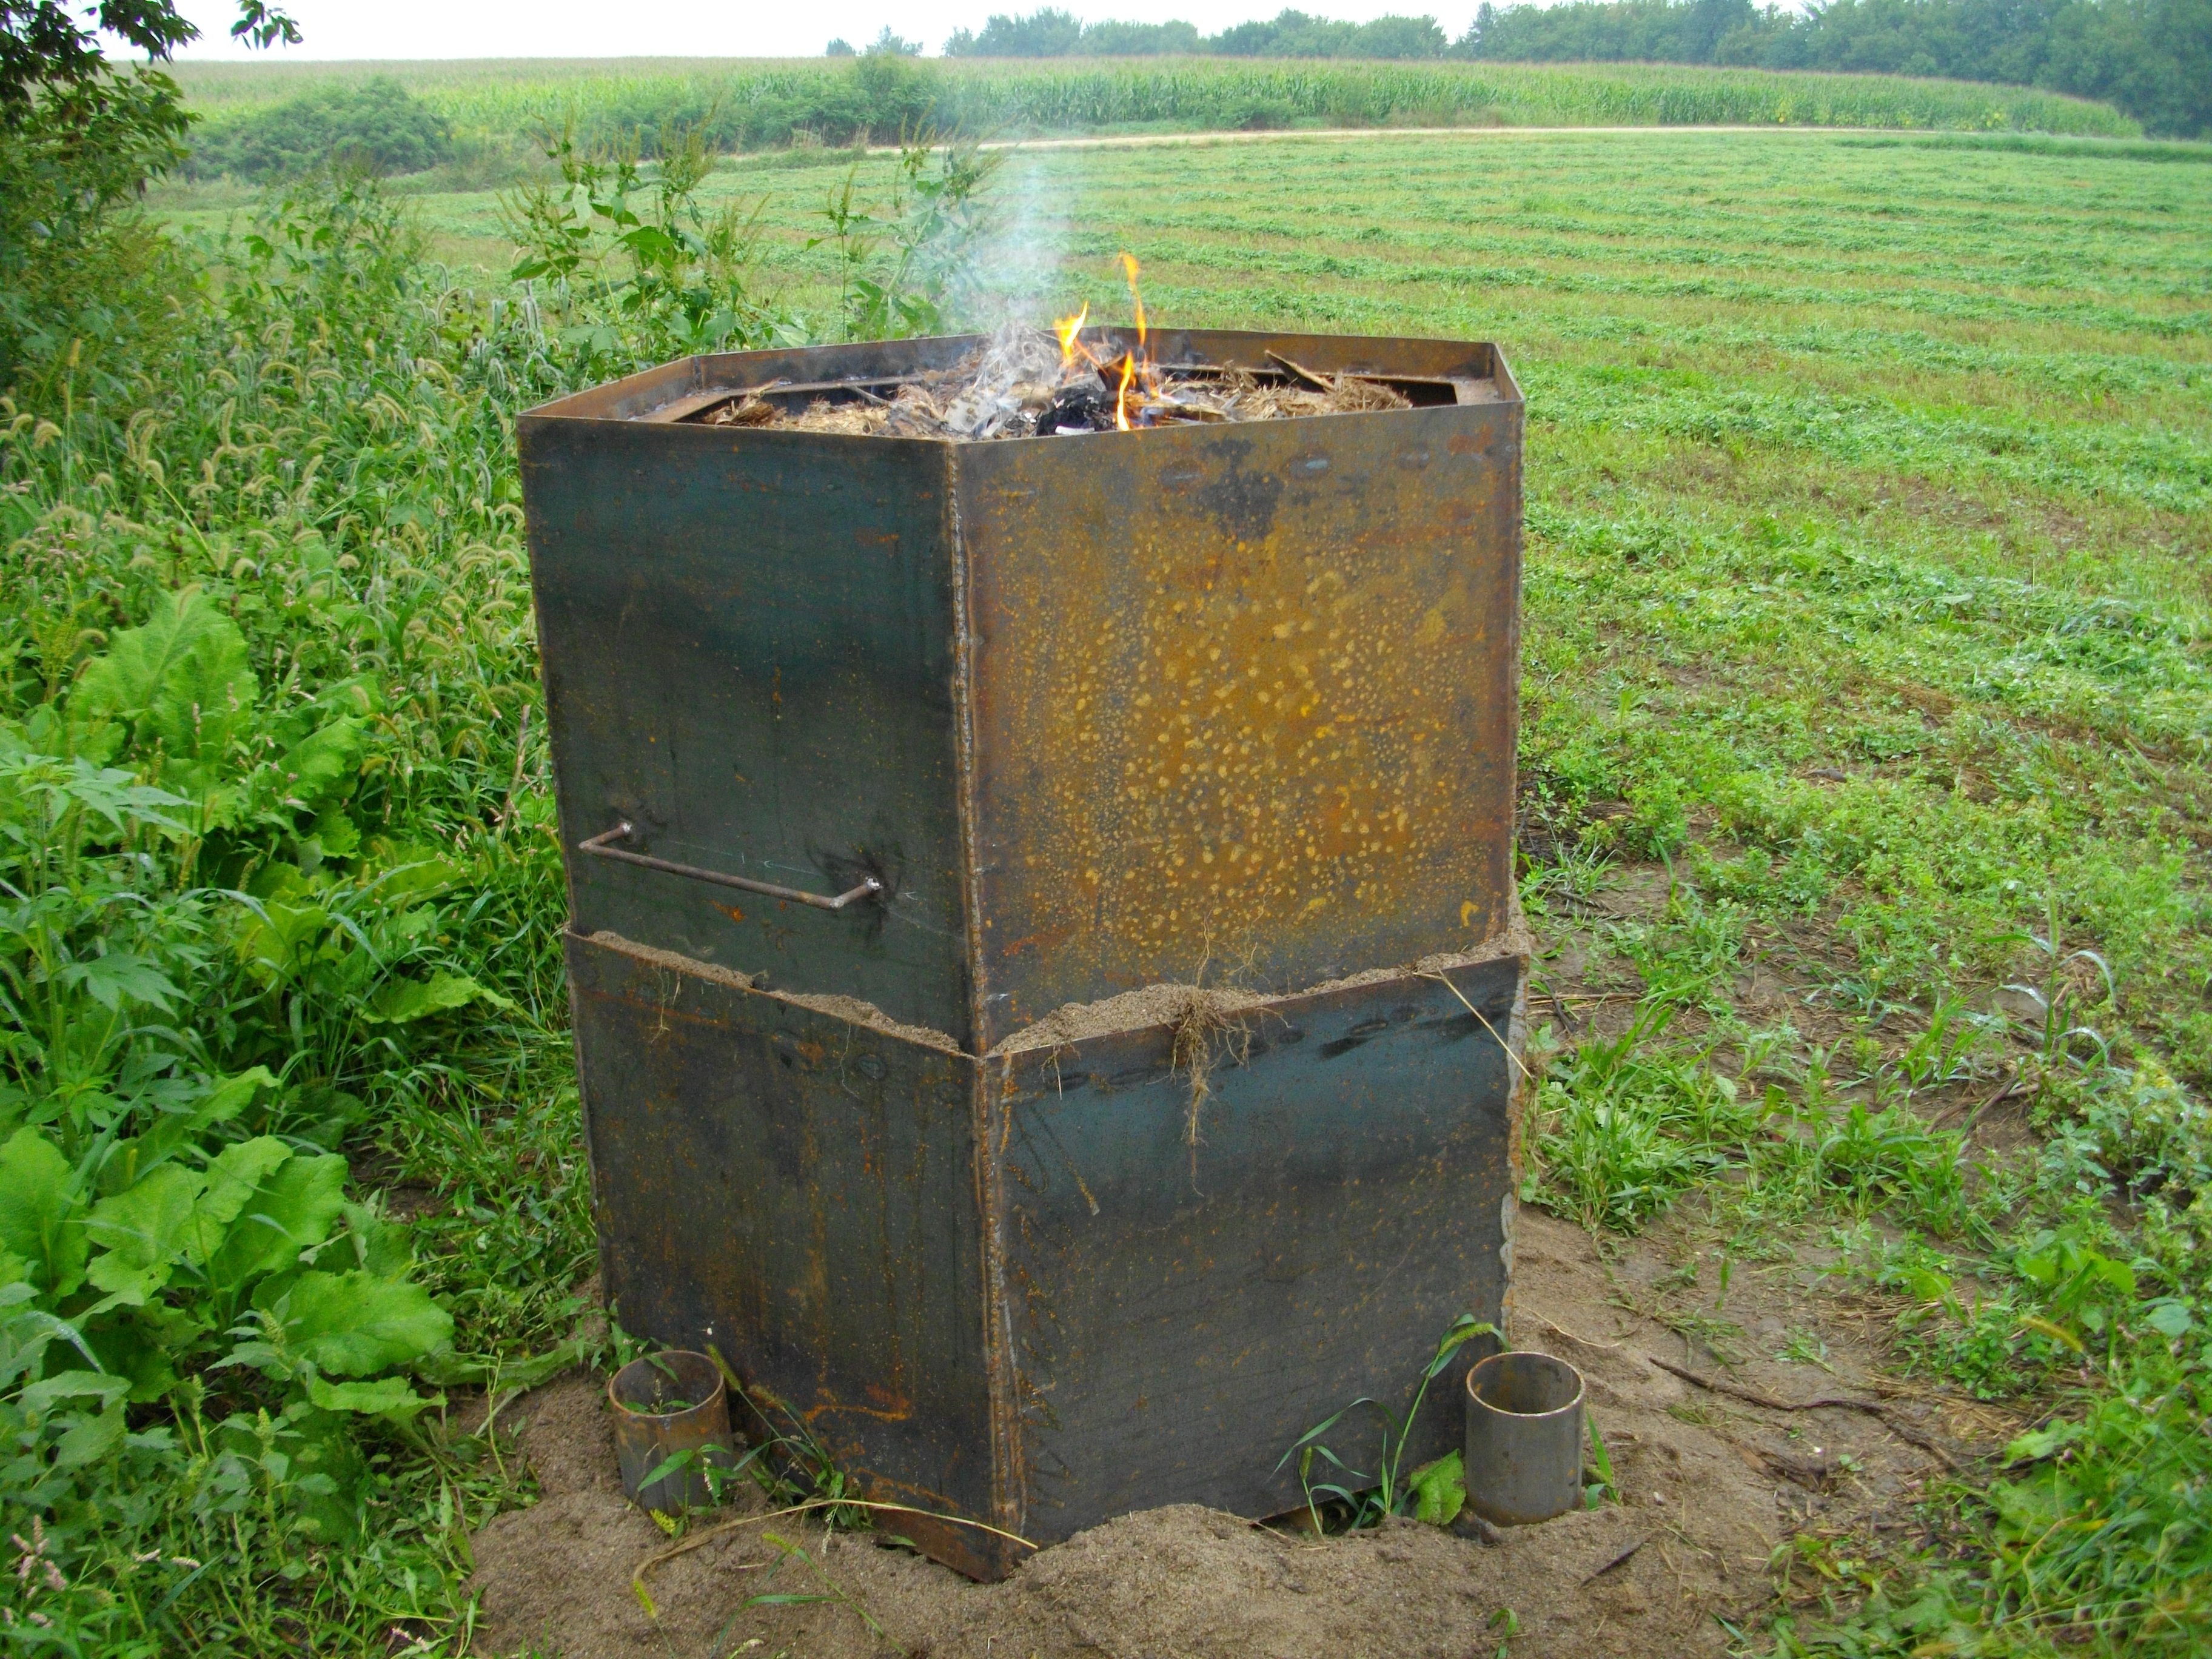
B: photo of hexagonal kiln. (Note that length of side is equal to radius). I find that the rolled metal kiln is easier to load and is very easy to roll from site to site. However the hexagonal kiln is not difficult to move and performs quite adequately. It is not difficult to calculate the dimensions but it does require considerably more welding.
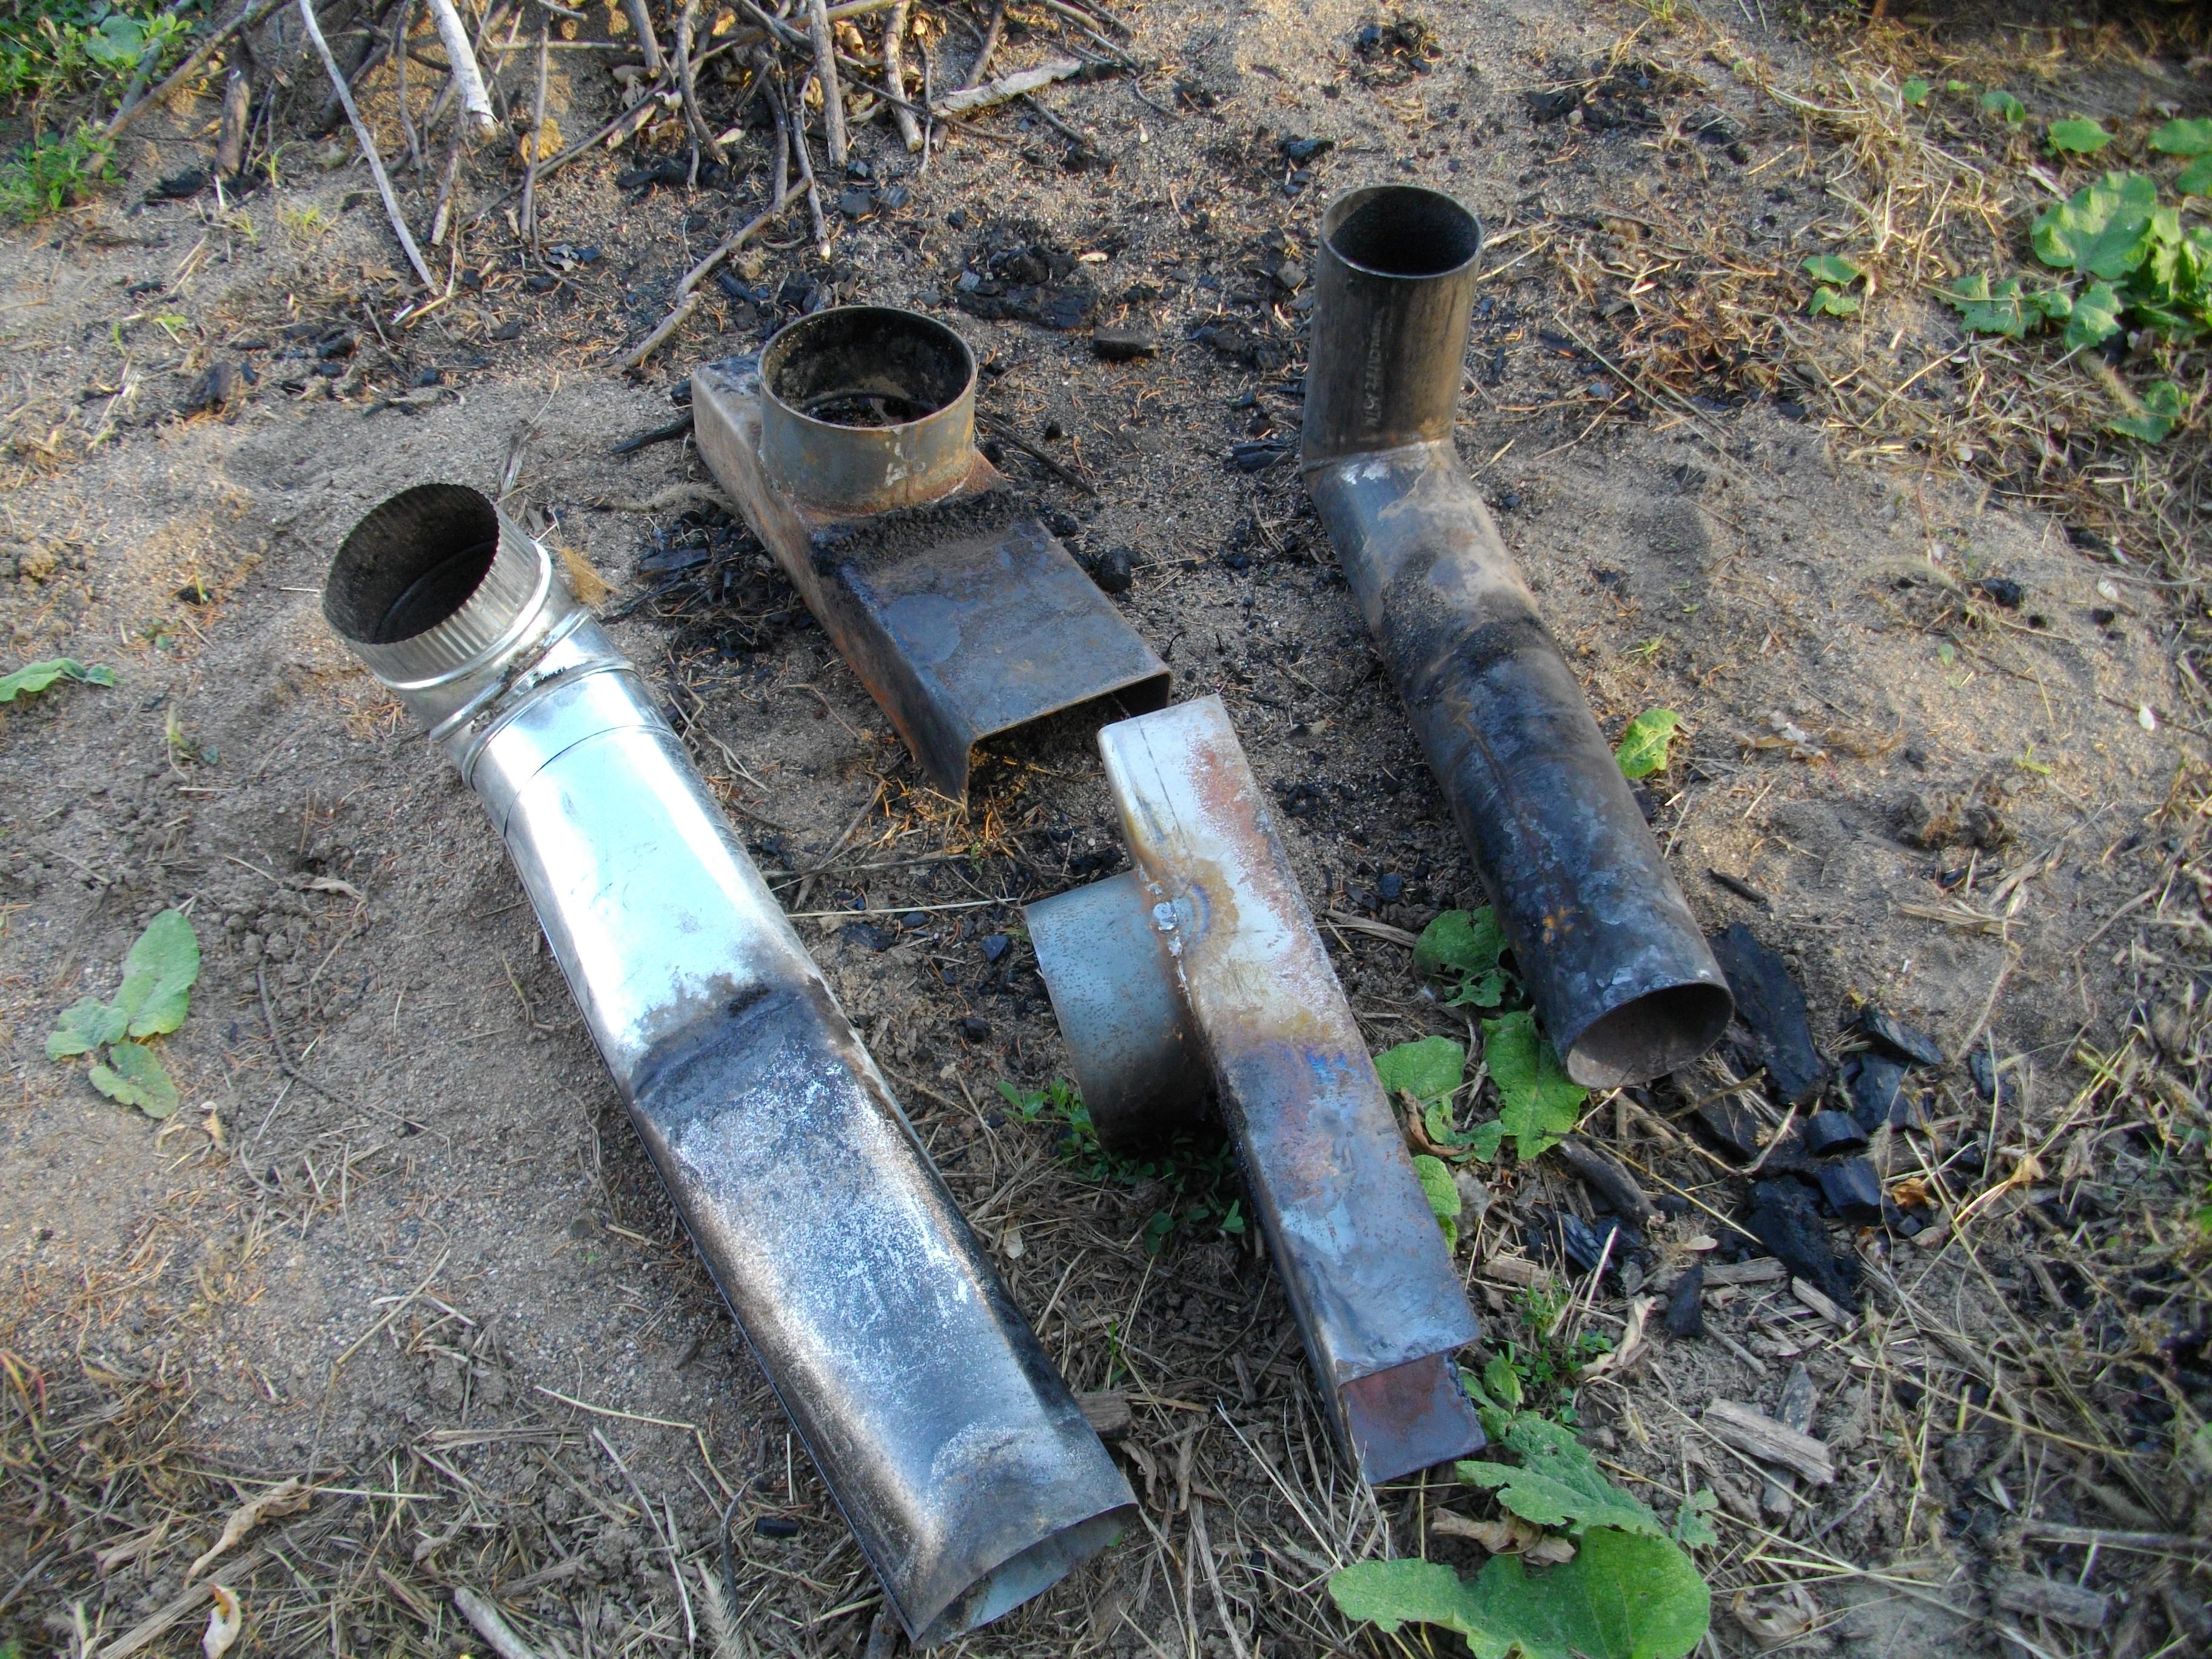
C series: photo of hex construction. (Note use of jig). I chose to fabricate a large kiln because I believe it is more efficient to produce the char in a larger vessel. Some people have used 55 gallon drums as a kiln, but these are more difficult to load, the feedstock must be cut to a smaller size and the ratio of volume to surface area is approximately 2 to 1. This is because the volume is determined by a square of the radius whereas the surface area is determined by twice the radius. Doubling the size of a kiln will result in a doubling of the surface area but a quadrupling of the volume. A smaller kiln means more heat will be lost during the initial endothermic phase with a subsequent loss of yield. The total yield from a 55 gallon kiln is also about one fifth at best so it will take considerably longer to generate useable quantities of char. Since the focus of my experiment is to generate useable quantities of char, I chose to fabricate a kiln that was as large as practical for one person and to be easily transportable. I used three different types of elbows.
D series: photo of three elbows. The first was a metal pipe cut at 45 degrees and welded to make a 90 degree elbow. The second design was fabricated at the machine shop and is a U shaped channel with a circular collar welded on. The final elbow was a prefab adjustable unit purchased at a hardware store. All worked for the process, my favorite is the tubular elbows, followed by the u-channels. The readymade elbows are rather flimsy and probably will not hold up well. The upper stack was a 5 foot section of snap together stove pipe. The upper stacks do not have to fit exactly, there can be considerable slop. The first step is to locate a suitable site for the kiln. Level ground away from flammable hazards and down-wind from habitation. The operation of the kiln generates considerable smoke and this condition can last for several hours. It’s a good idea to check for burning bans; the charring process generates a large amount of smoke and can alarm neighbors. Let them know. And be aware of wind direction. It is important to monitor the kiln during operation; it doesn’t need constant surveillance, but it should be monitored closely. Wood should be seasoned and dry and for a complete char, it should ideally be of uniform size. Of course wood with varying lengths and diameters will be used but the burn works best if the sizes are maintained within reasonable limits. I have used 4 vents per kiln, but I think 6 or 8 are better.
E series: photos of loading sequence.
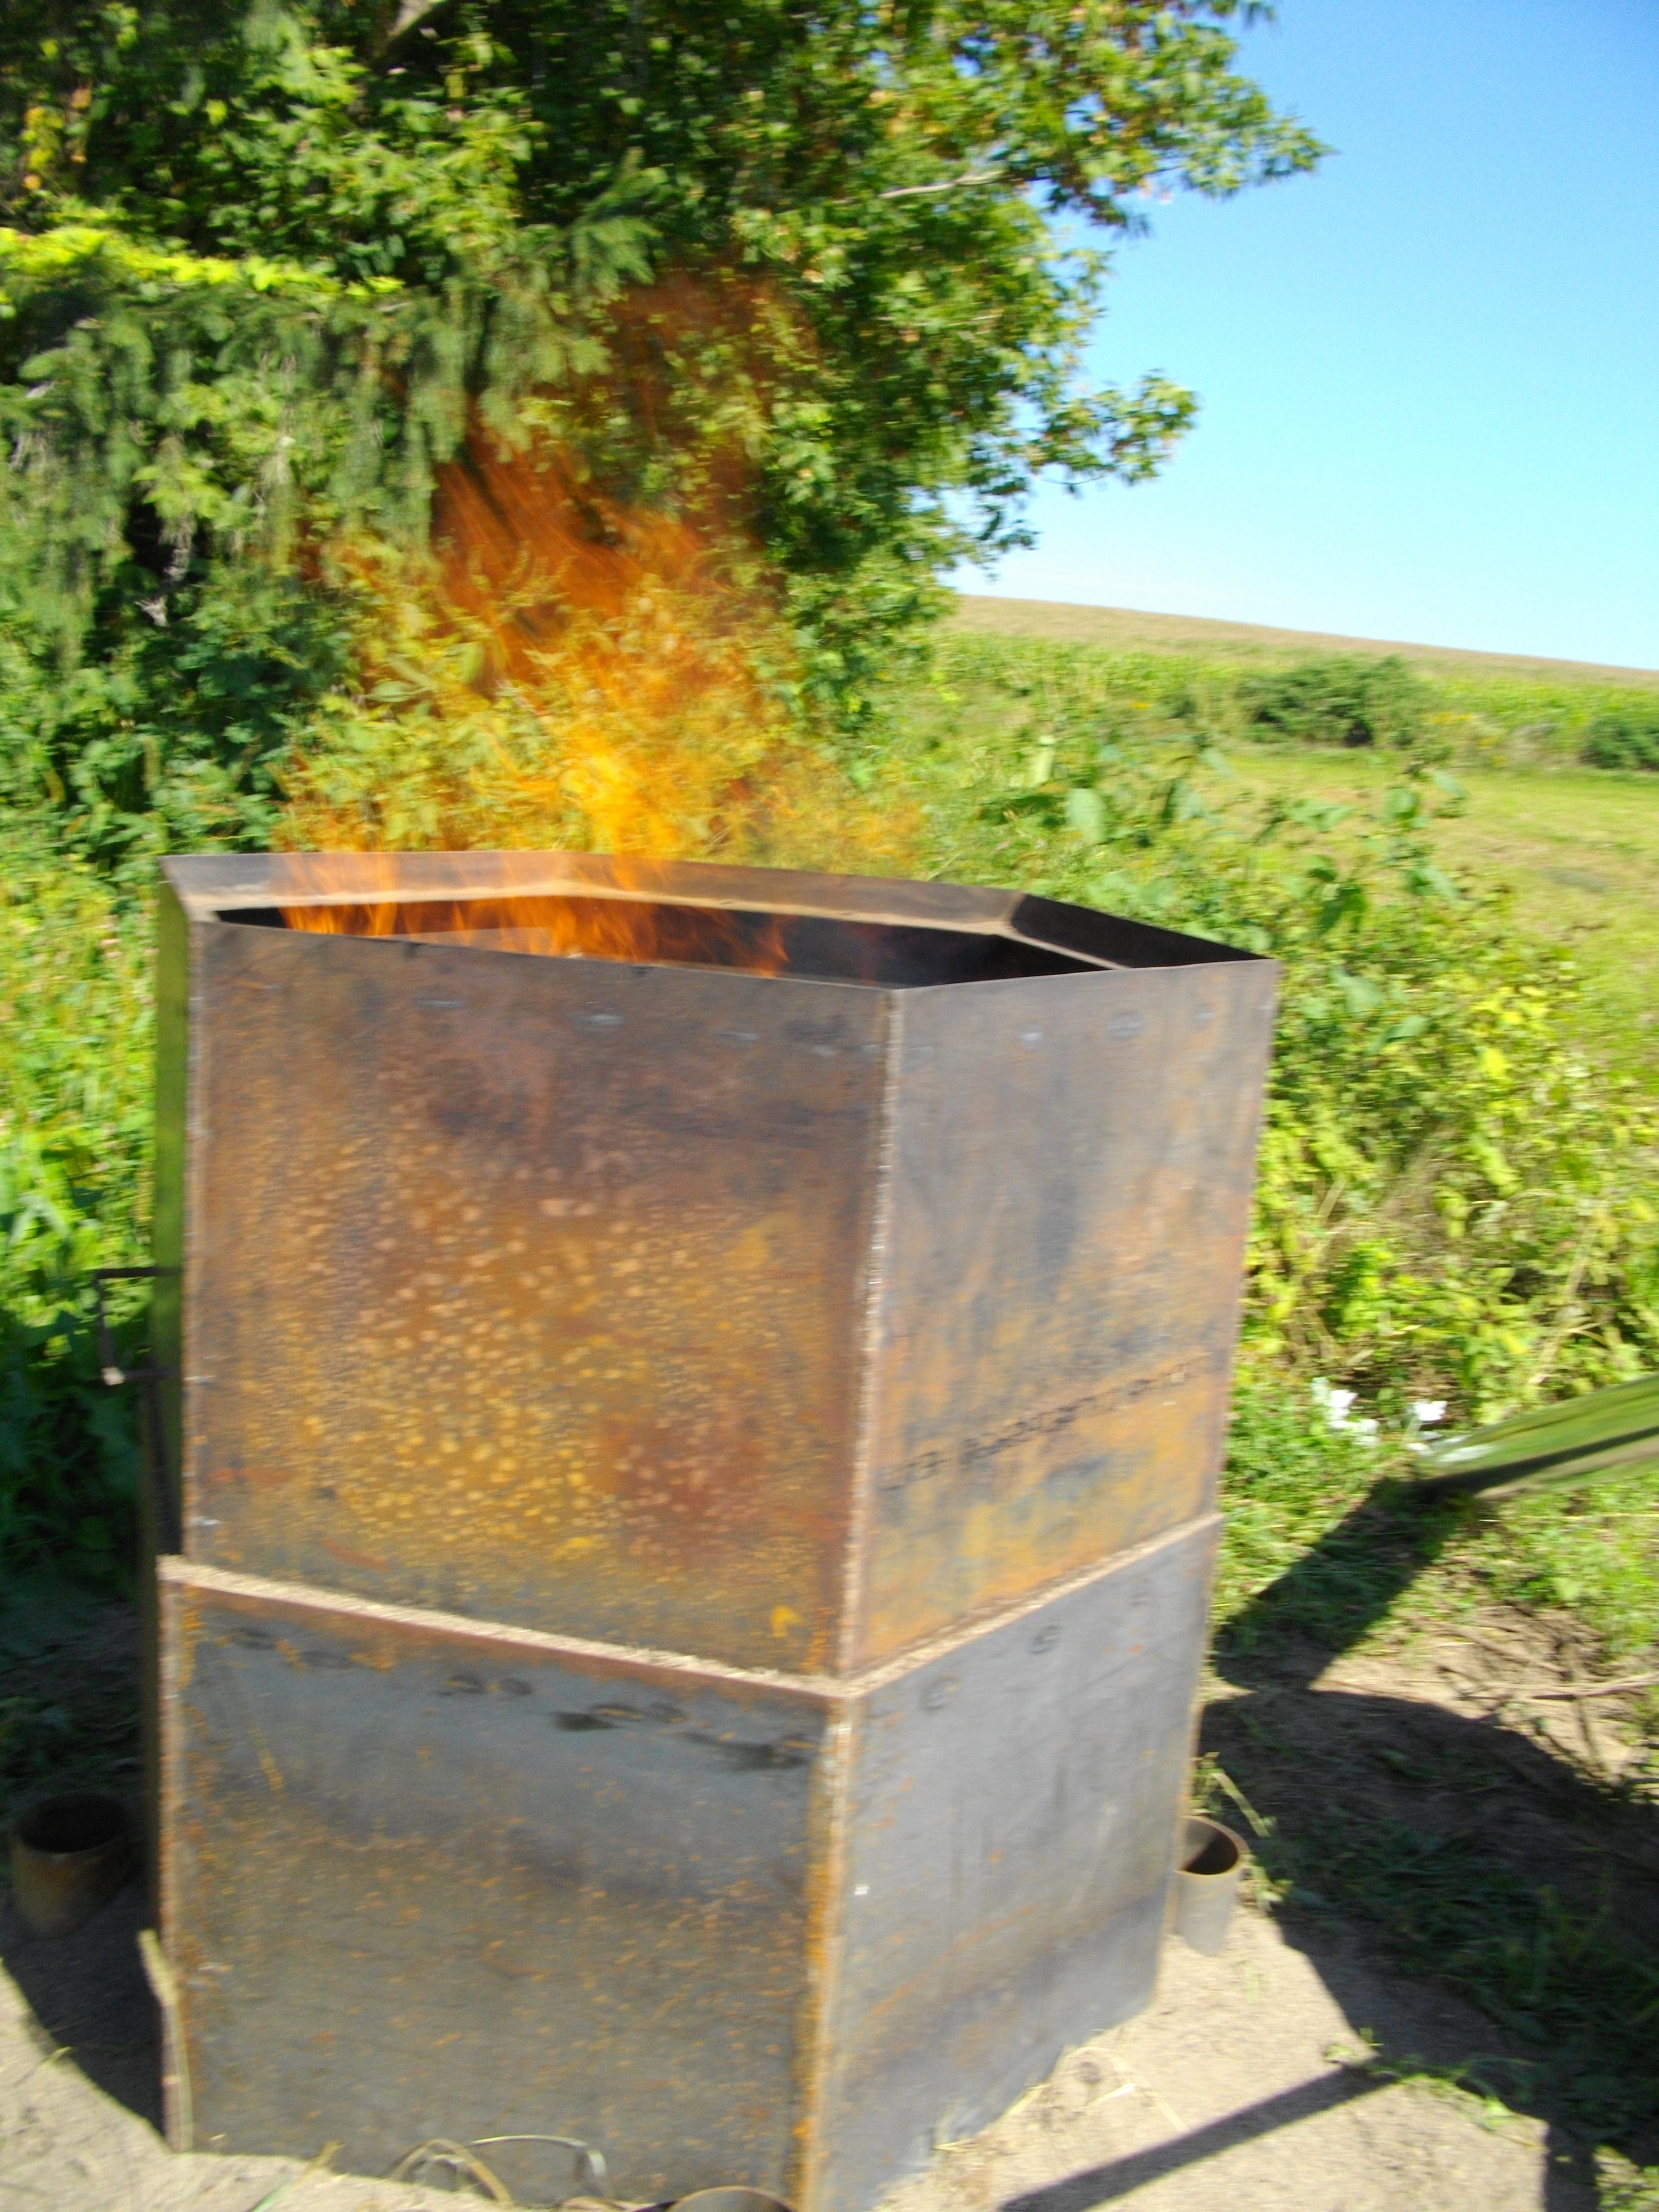
First the elbows are arranged in a radial pattern with the interior ends well towards the center of the kiln. This is to keep the burn in the center of the stack. Stringers are then also placed radially between the elbows to create a channel for gasses to flow. A layer of wood is placed crosswise over the stringers and wood is closely packed all the way up to the top. The second ring is placed and the packing of wood continues to the top of the second ring. I intentionally leave a loosely packed center, so that when lit, the kiln will burn rapidly into the center of the stack. A supply of sand, around 2 cubic feet should be at the ready, this is used to seal the bottom edge, the connection between the rings and the top cover. Use coarse sand, fine play sand doesn’t work as well and if it has any clay in it can clump and result in poorer performance. Do not use soil, it dries out and cracks and results in leaks that allow uncontrolled air into the kiln. Lighting the kiln can be either from the top or the bottom. I light mine from the top, it seems easier and I don’t think it makes a difference. I allow the burn to progress until the sides of the upper ring are hot. By this time the fire will be quite intense and it is preferable to have two people to lift the cover into place. Installing handles on the cover is highly recommended.
F series: photos of lighting. Covering the fire should be done quickly, uneven heat can warp the cover. As quickly as possible seal the cover with sand along the edge and place the smoke stacks in position. If the fire was hot enough thick white smoke should pour from the stacks and should continue for some time.
G series: photos of smoke. If the smoke diminishes or is weak, there are two courses of action. It can be allowed to heat up slowly, and may eventually begin to smoke more, this could lengthen the burn by several hours. The best method I’ve come up with to accelerate a slow start is to prop open the lid a couple of inches with a stick and allow the fire to build. This only takes a few minutes and the fire in the kiln will intensify. This procedure can be repeated as many times as necessary until the kiln is hot enough. I think it is better to crack open the lid in several short bursts rather than one long one; there will be less chance of warping the top. Wet or green wood is often the culprit for a balky start.
H: photo of hex kiln with second ignition(the lid has been completely removed; a better and safer method would be to simply prop open the lid a couple of inches). During the burn I like to use a spray bottle filled with water. I spritz the sides of the kiln and get a reliable idea of the kiln wall temperature. It’s desirable to have uniform heat around the kiln. The fire follows the direction of the smoke. I try and coax the fire towards the up wind side at first, I start with a smokestack in that position. But in the end the fire will go where it wants and the operator must adjust. I alternate air vents with stacks and allow the fire to burn and settle in for an hour or so, then switch stacks onto air vents. However there is no set formula and the operator has to use judgment to determine location and even the number of stacks to achieve an even and thorough burn.
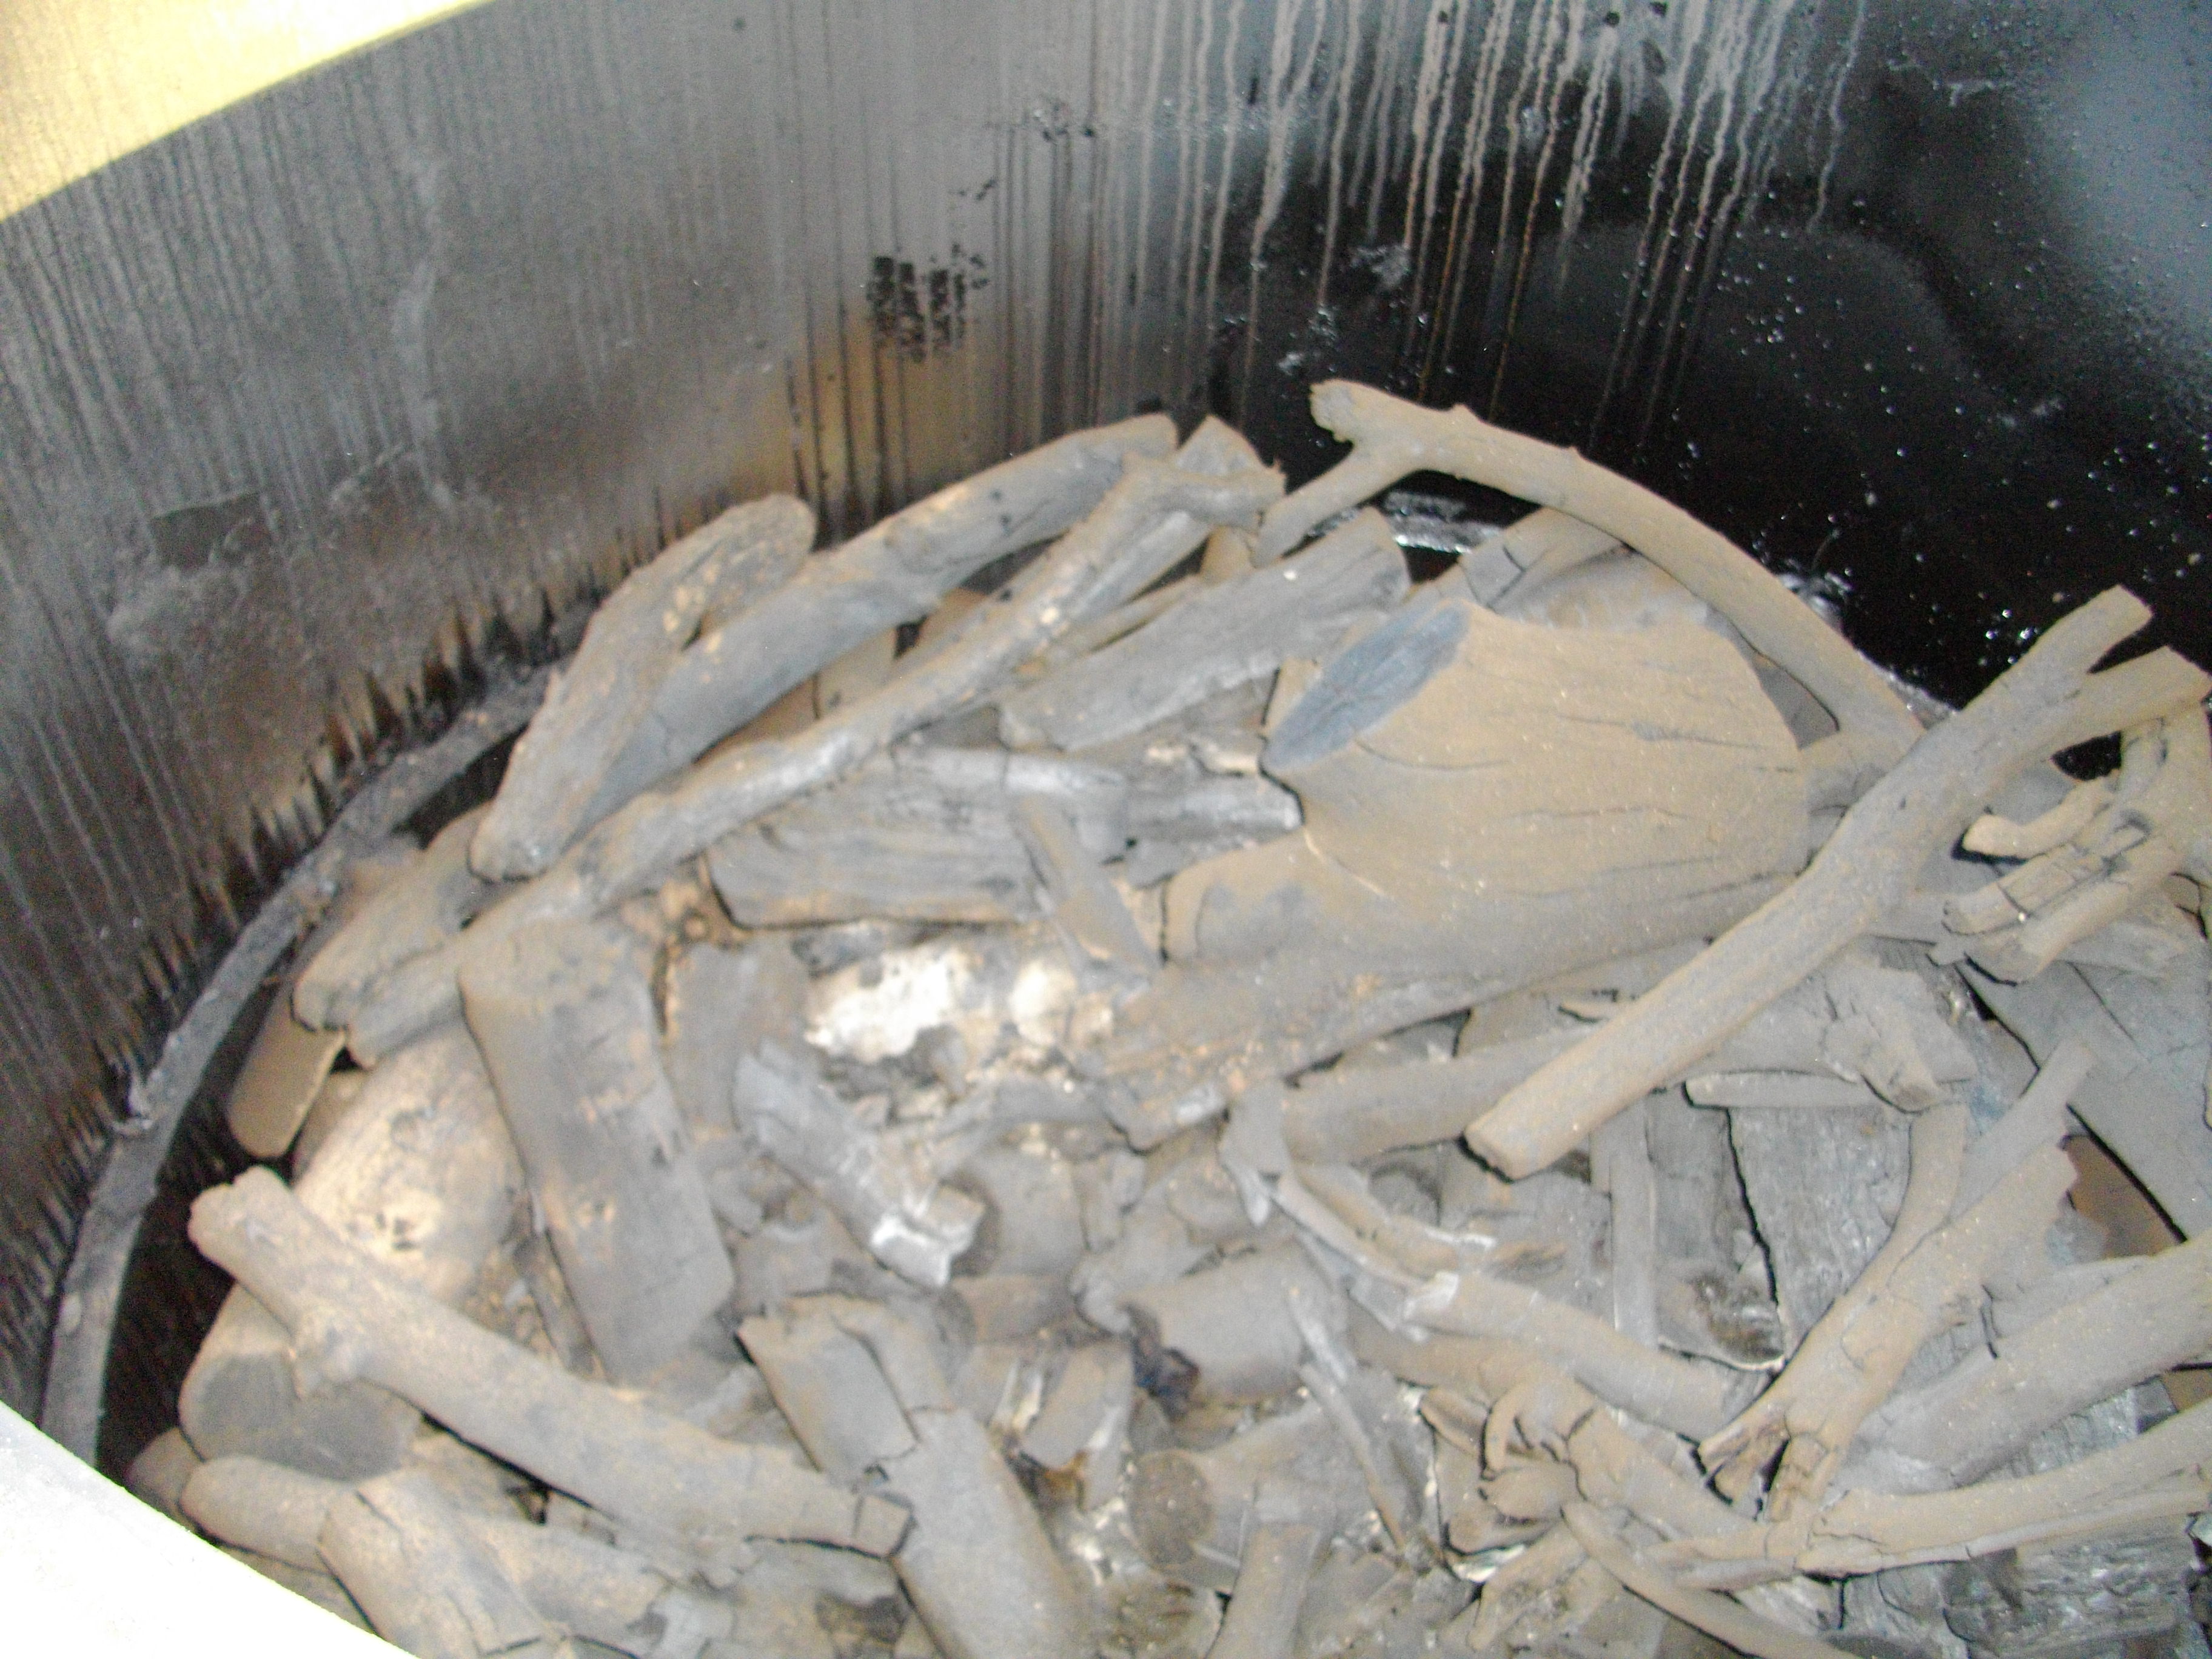
If all the wood doesn’t char as is often the case with especially large pieces, the wood can be simply tossed into the next batch. When the charring nears completion, the smoke from the stack will weaken and start to clear. The temperature of the exhaust will become noticeably hotter and a whistling sound as from a blowtorch will manifest itself. Take care that the sides of the kiln don’t overheat in one spot, the fire can heat a localized spot red hot and potentially warp the kiln. That vent will be sealed by dumping sand down the throat of the vent. When all the vents exhibit this stage and are sealed, the kiln is allowed to cool. I have had a kiln cool completely overnight, but most often I allow 24-36 hours before I open; it all depends on ambient temperature or precipitation. Most application rates are at minimum one half pound of char per square foot, or around 10 tons of char/acre. A firing will produce up to 200 pounds of char from wood, which will treat at most 400 square feet or a 20 by 20 plot. The amount of char is dependent on the initial weight of the wood and packing density. On one run I weighed the char, it was 138 lbs. This run was not packed as efficiently as it could have been and it was primarily spruce.
I: photos of opened kiln with char.
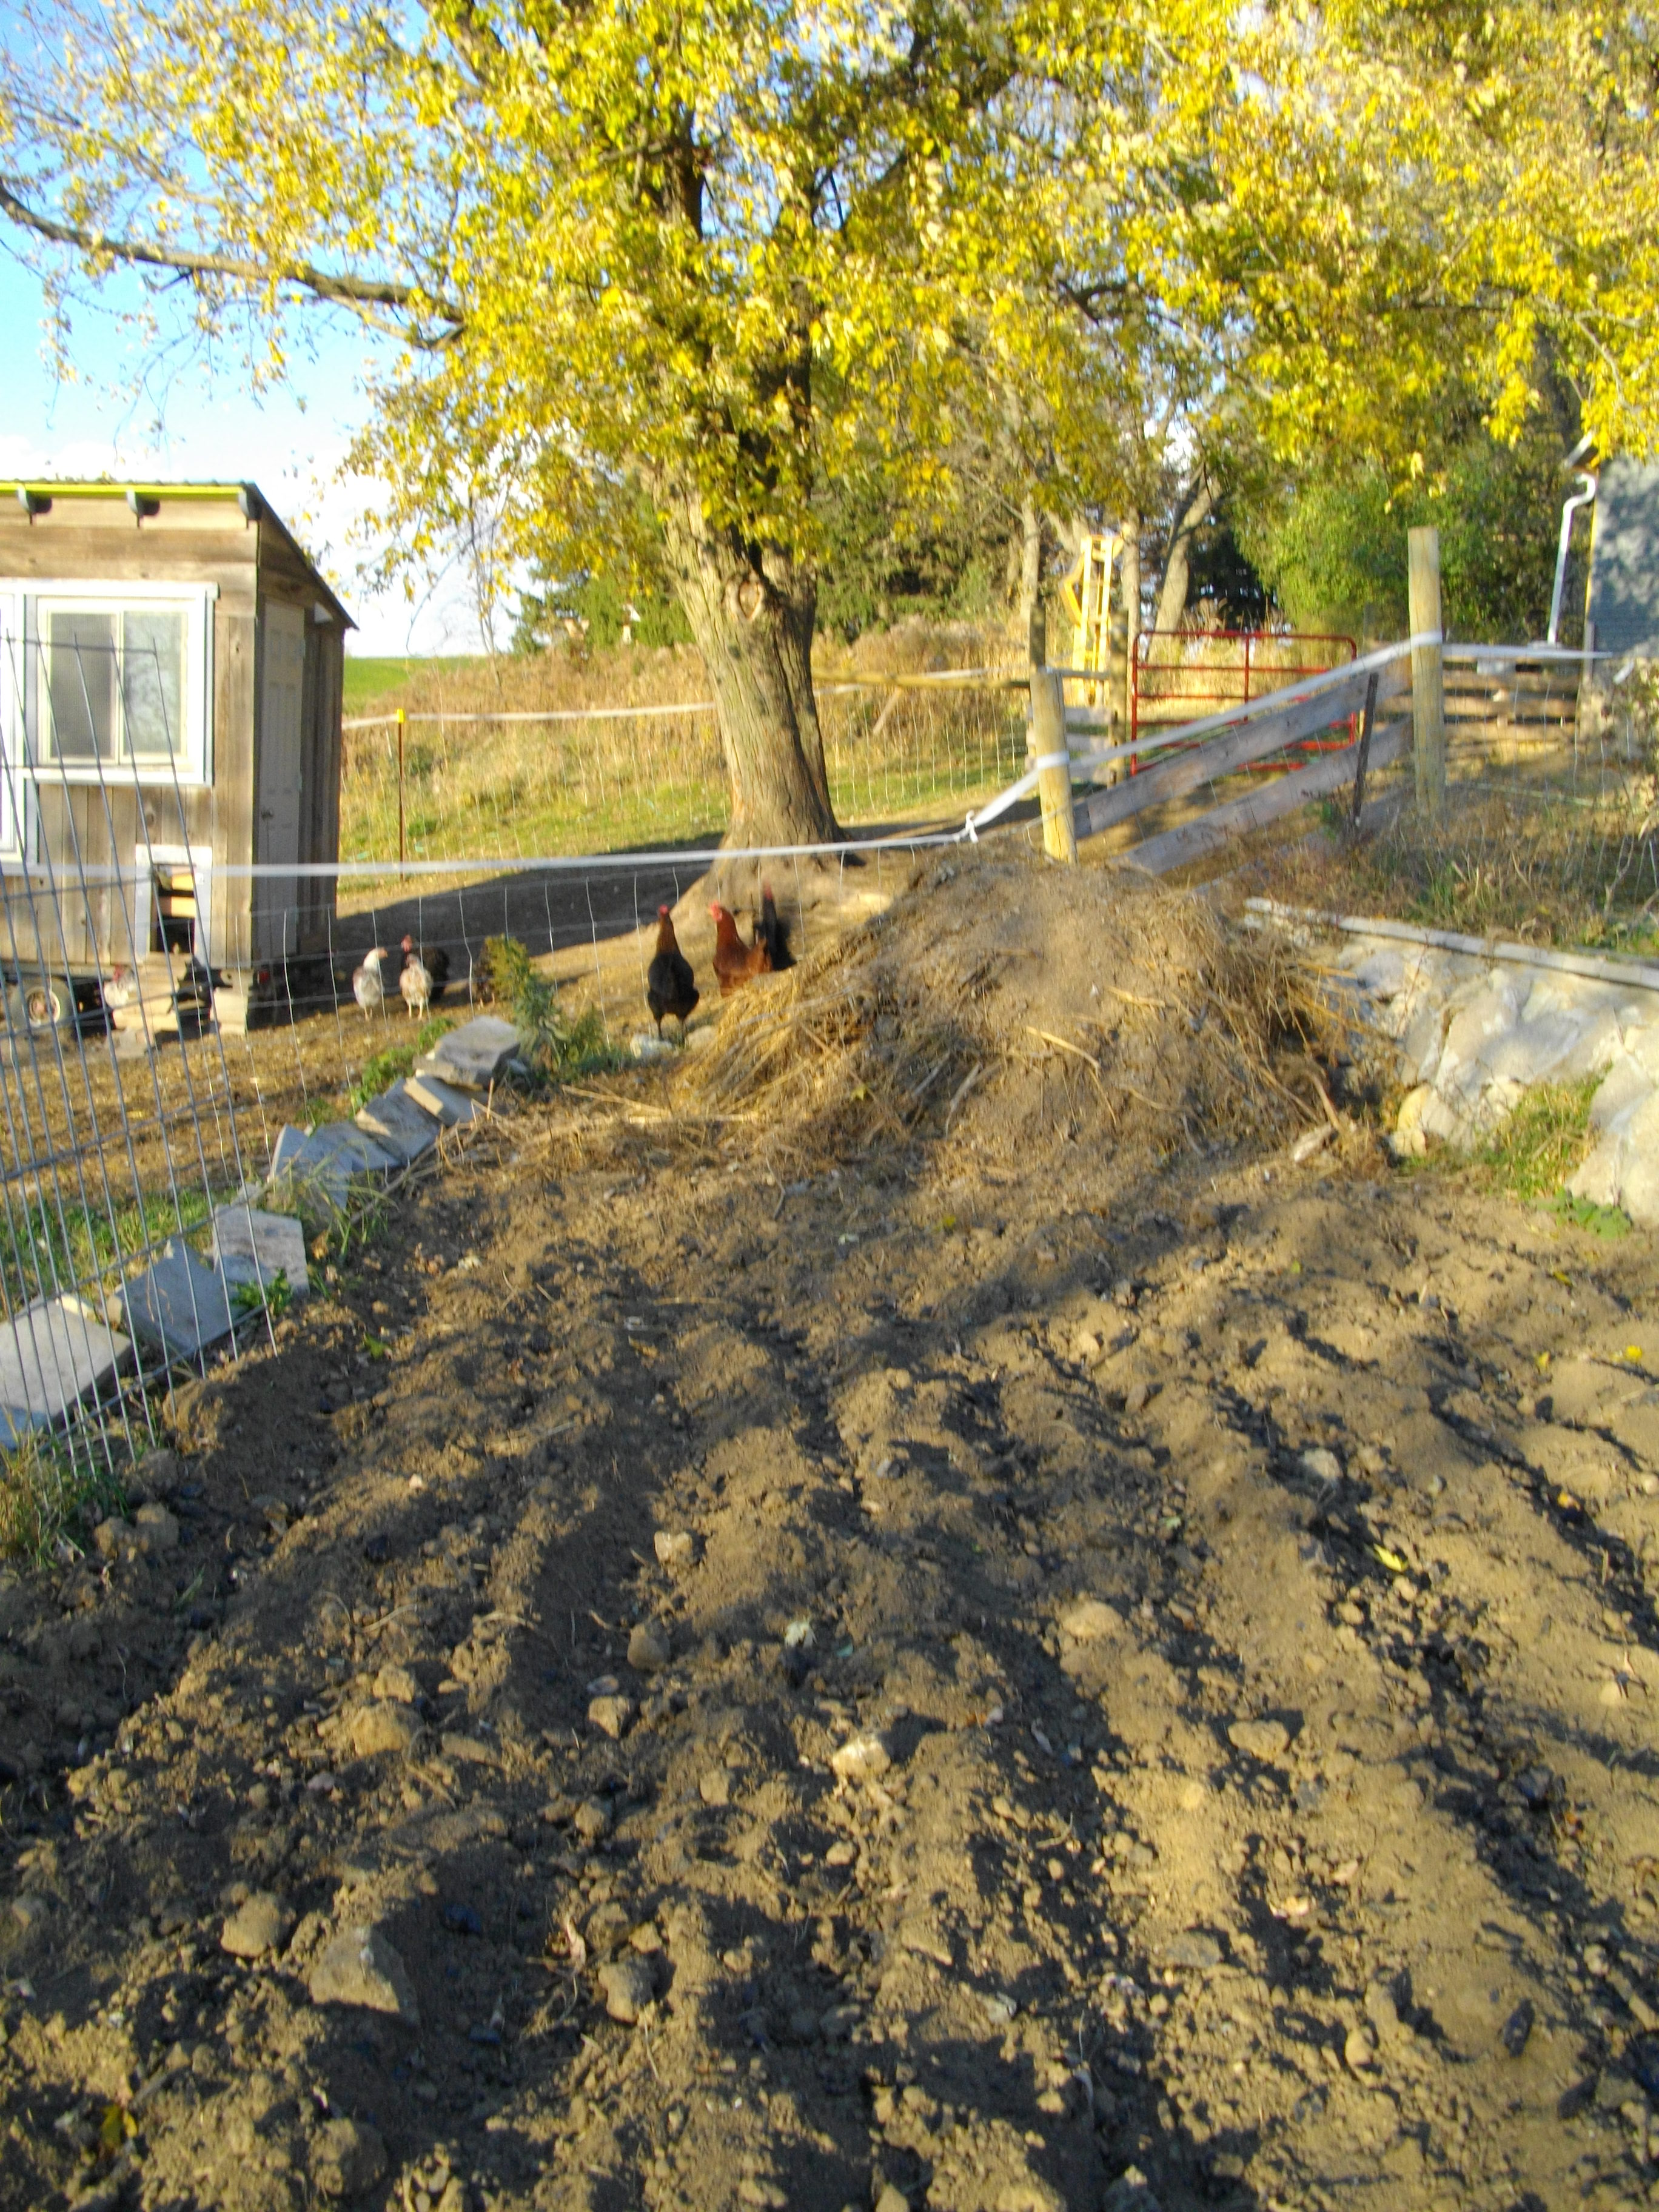
In 2011 I began incorporating char into garden plots. On a small potato bed of approximately 600 square feet, I began a compost pile. The pile has a layer of char on the bottom and additional layers of garden vegetation, chicken litter, and bio char throughout the stack. The pile has an entire load of around 200 pounds of char. I also tilled into the plot another 200 pounds.
J: photos of potato bed.
On another potato plot of around 600 square feet I designed a small experiment. One fourth of the plot had composted horse manure and char, another fourth had just the composted horse manure, the third section had char only, and the remaining fourth was a control.
K: photos of test plot experiment.
Results from the first year test plots and further experiments.
The first year test plots showed some very encouraging results. Spring 2012 was very early and I was able to turn the soil by March 15th. The previous Fall’s test plots had remarkable differences. The control plot of untreated soil was sticky and heavy; the plot of composted animal manure was also sticky. The plot of char was slightly less gooey, the soil clumped a little less. The test plot of char and manure was perfectly friable, a garden fork slid easily into the soil and it broke up into a beautiful seed bed with a twist of the wrist. I broadcast some edible beans, just to get something growing. All plots germinated about the same, a problem was in keeping the chickens out of the char/manure plot; they loved scratching in it and ignored all the other plots.
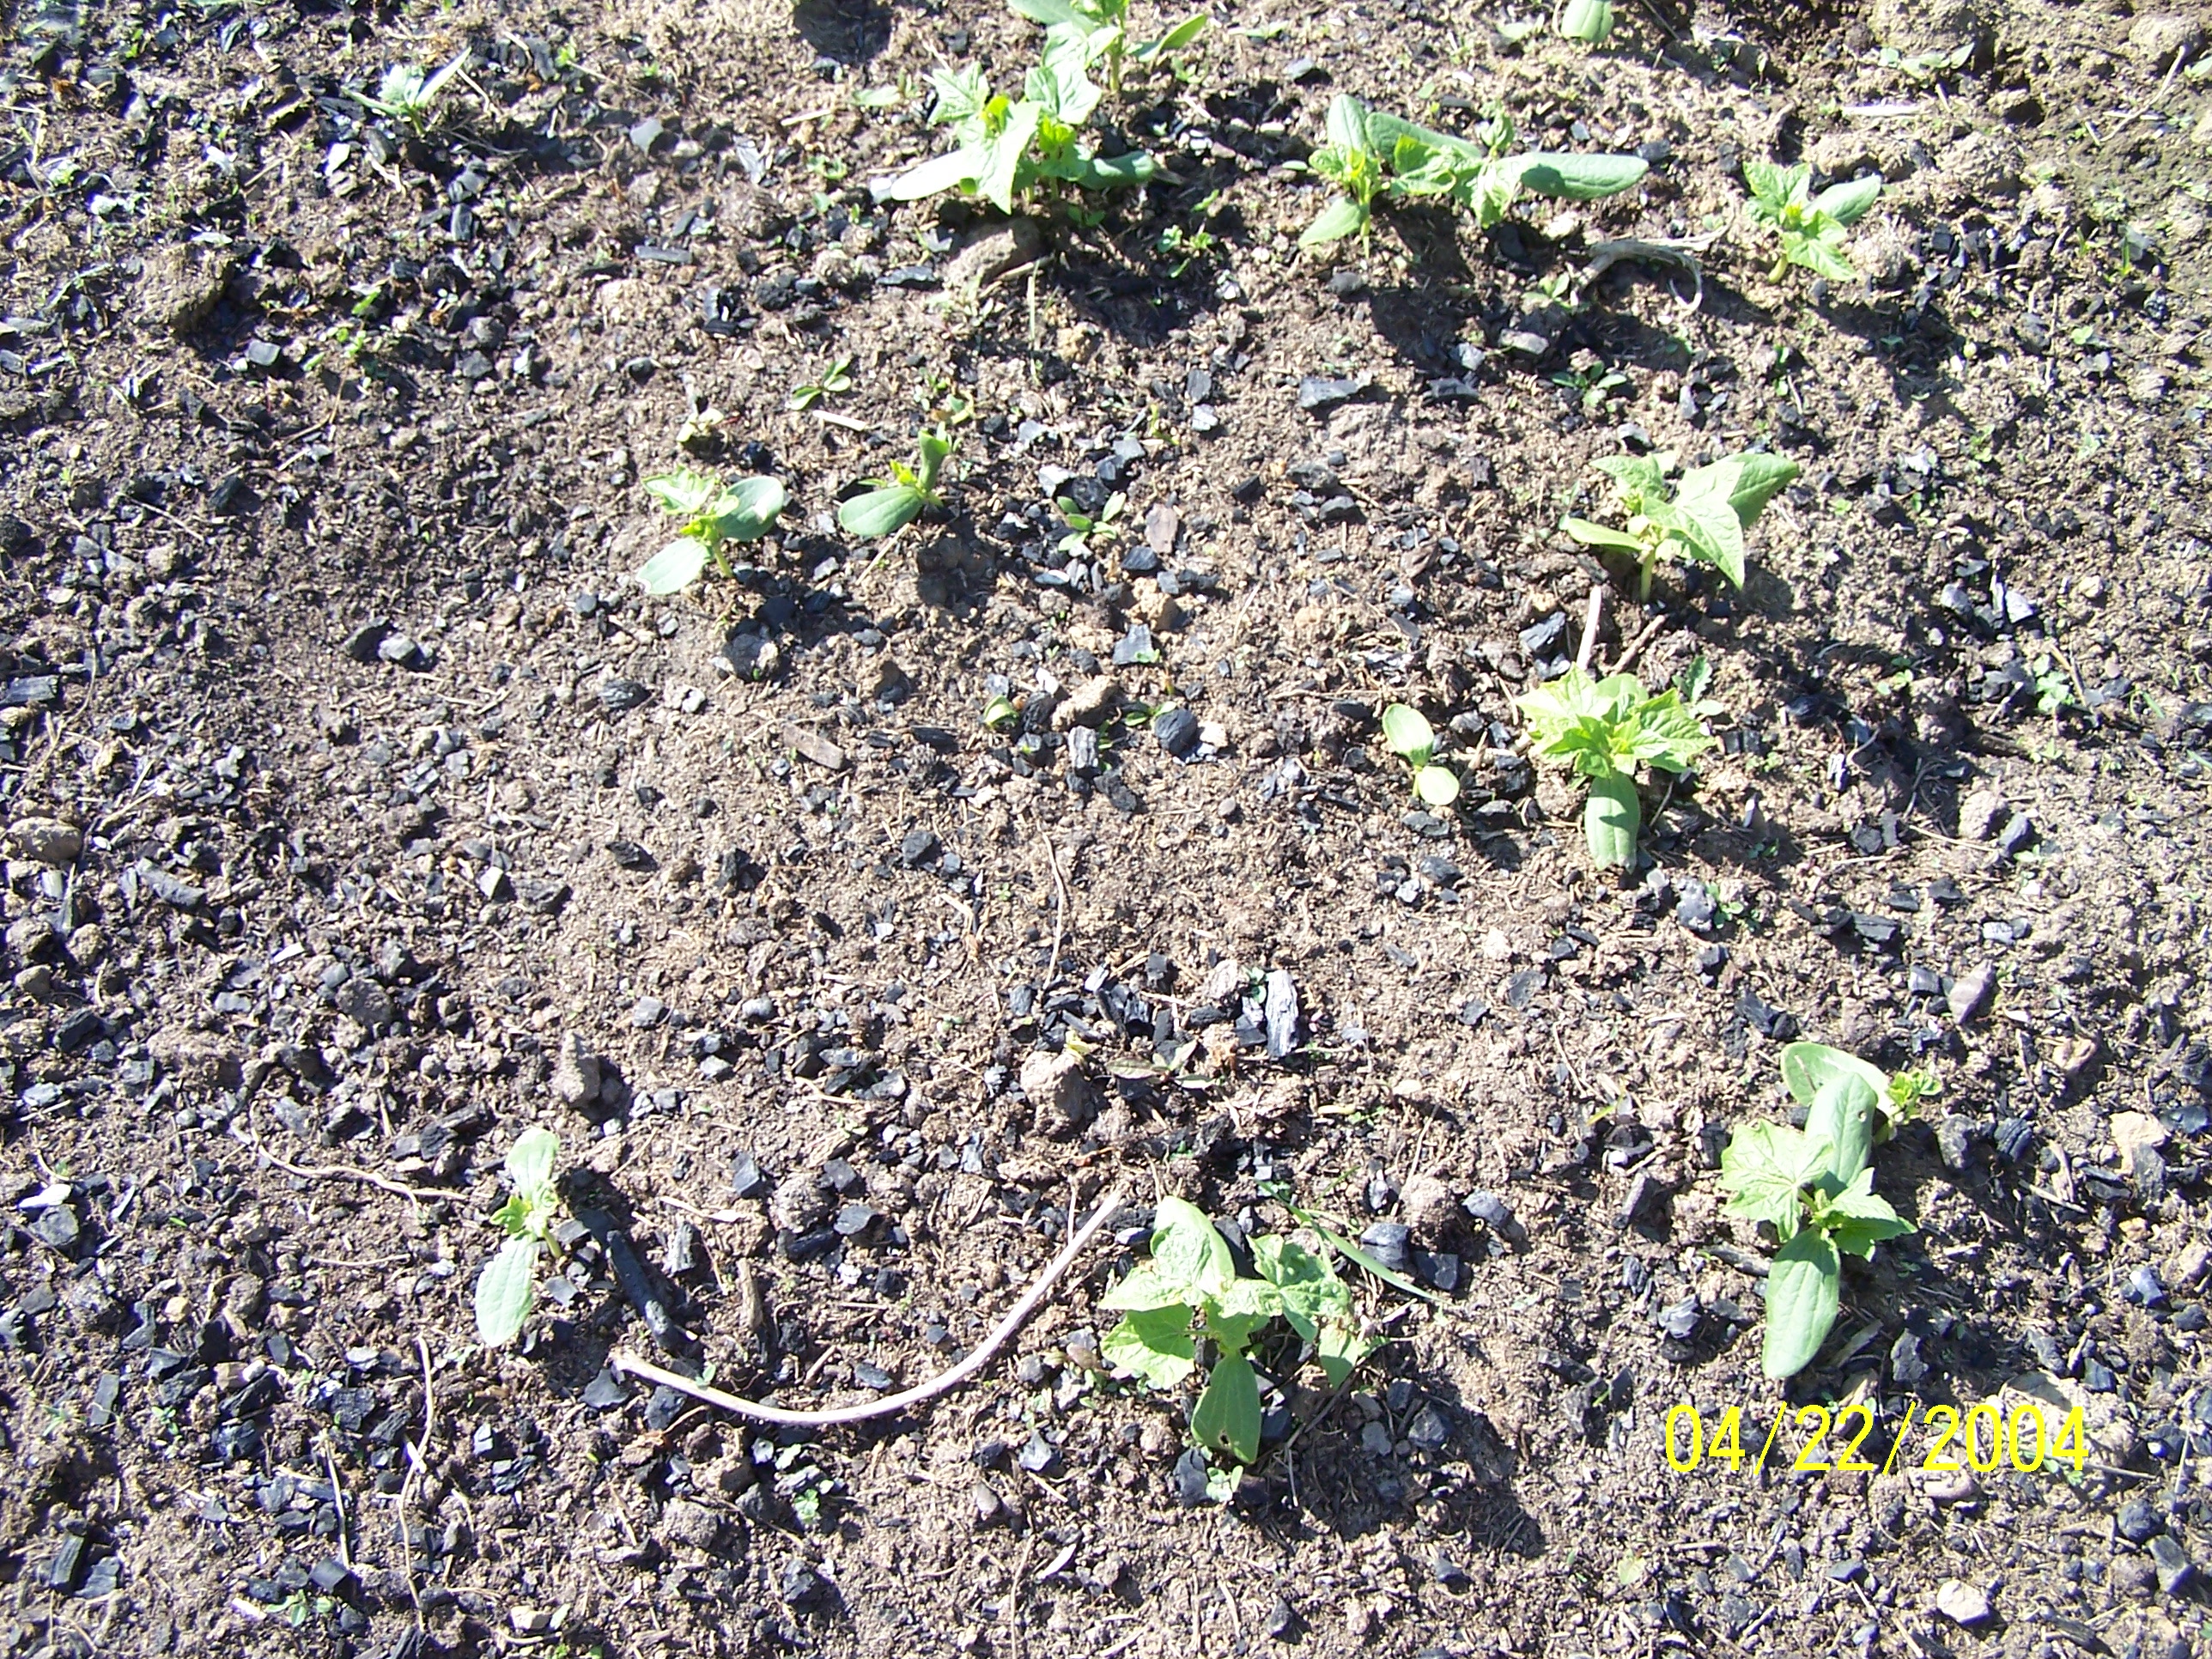
An interesting phenomenon was the germination of wild cucumber in the char/ manure and char plots.
L: photo of wild cucumbers. I think because of better solar heat gain, these two plots may have been slightly warmer and the incidence of germination of wild cucumber was 15 times higher than plots without char. A frost killed the beans in early May and I planted popcorn. The popcorn was growing nicely in all plots and I went on a two month European vacation. During my absence the family that was tending the gardens was involved in a horrific car crash; no one was permanently injured but there was a helicopter airlift and stays in the hospital. The gardens were of course neglected. Shortly before my return they attacked the by now completely overgrown plots and weeded, they didn’t want me to come back to a jungle. I can’t give any results on yield from the corn, the state of the plots was in complete disarray. However the plots still yielded interesting information. There were still some weeds remaining, especially lambsquarters. They had established some very impressive root systems and I attempted to pull them. In three of the plots; soil, manure, and char I had great difficulty pulling them out. In the manure/char plot the weeds pulled out as if they were in wet sand. And earthworms were present within a few inches of the soil surface. Earthworms were absent everywhere else, even under rocks and compost piles.
These observations prompted me to set up an experiment to evaluate drought resistance. I made up 9 pots of different soil mixtures 1: soil, 2: soil/char, 3: soil/sand, 4: soil/fertilizer, 5: soil/char/fertilizer, 6: soil/sand/fertilizer, 7: soil/compost/sand, 8: soil/char/compost, and 9:soil/char/sand. These mixtures were then allowed to dry completely in a greenhouse for two weeks. I planted 11 radish seeds in each pot and buried them to the top in a 3X3 matrix in the garden. I watered each with an equal amount of water. Germination was consistent throughout. After a week there were the beginning signs of stress, especially in the soil/sand and soil/sand/fertilizer pots. After two weeks almost all the pots were exhibiting major stress except the pots 7 and 8. These were the pots which incorporated compost and even the char/compost/sand was mildly stressed except the pot of soil/char/compost which was still free of stress. The stress in the soil/fertilizer and soil/sand fertilizer was so severe I was forced to water them to prevent death. I continued to water all pots equally as needed. At five weeks I pulled and weighed the crop, I weighed only the roots. M: photo of radishes (1 through 9 from upper left to lower right) The results were: soil 1.75 oz, soil/char 2.25 oz, soil/sand 1.75 oz, soil/fertilizer 2.0 oz, soil/char/fertilizer 2.0 oz, soil/sand/fertilizer 1.0 oz, soil/compost/sand 2.5 oz, soil/char/compost 2.75 oz, and soil char/sand .5 oz. The root hairs of all pots with char were caked with fine char particles.
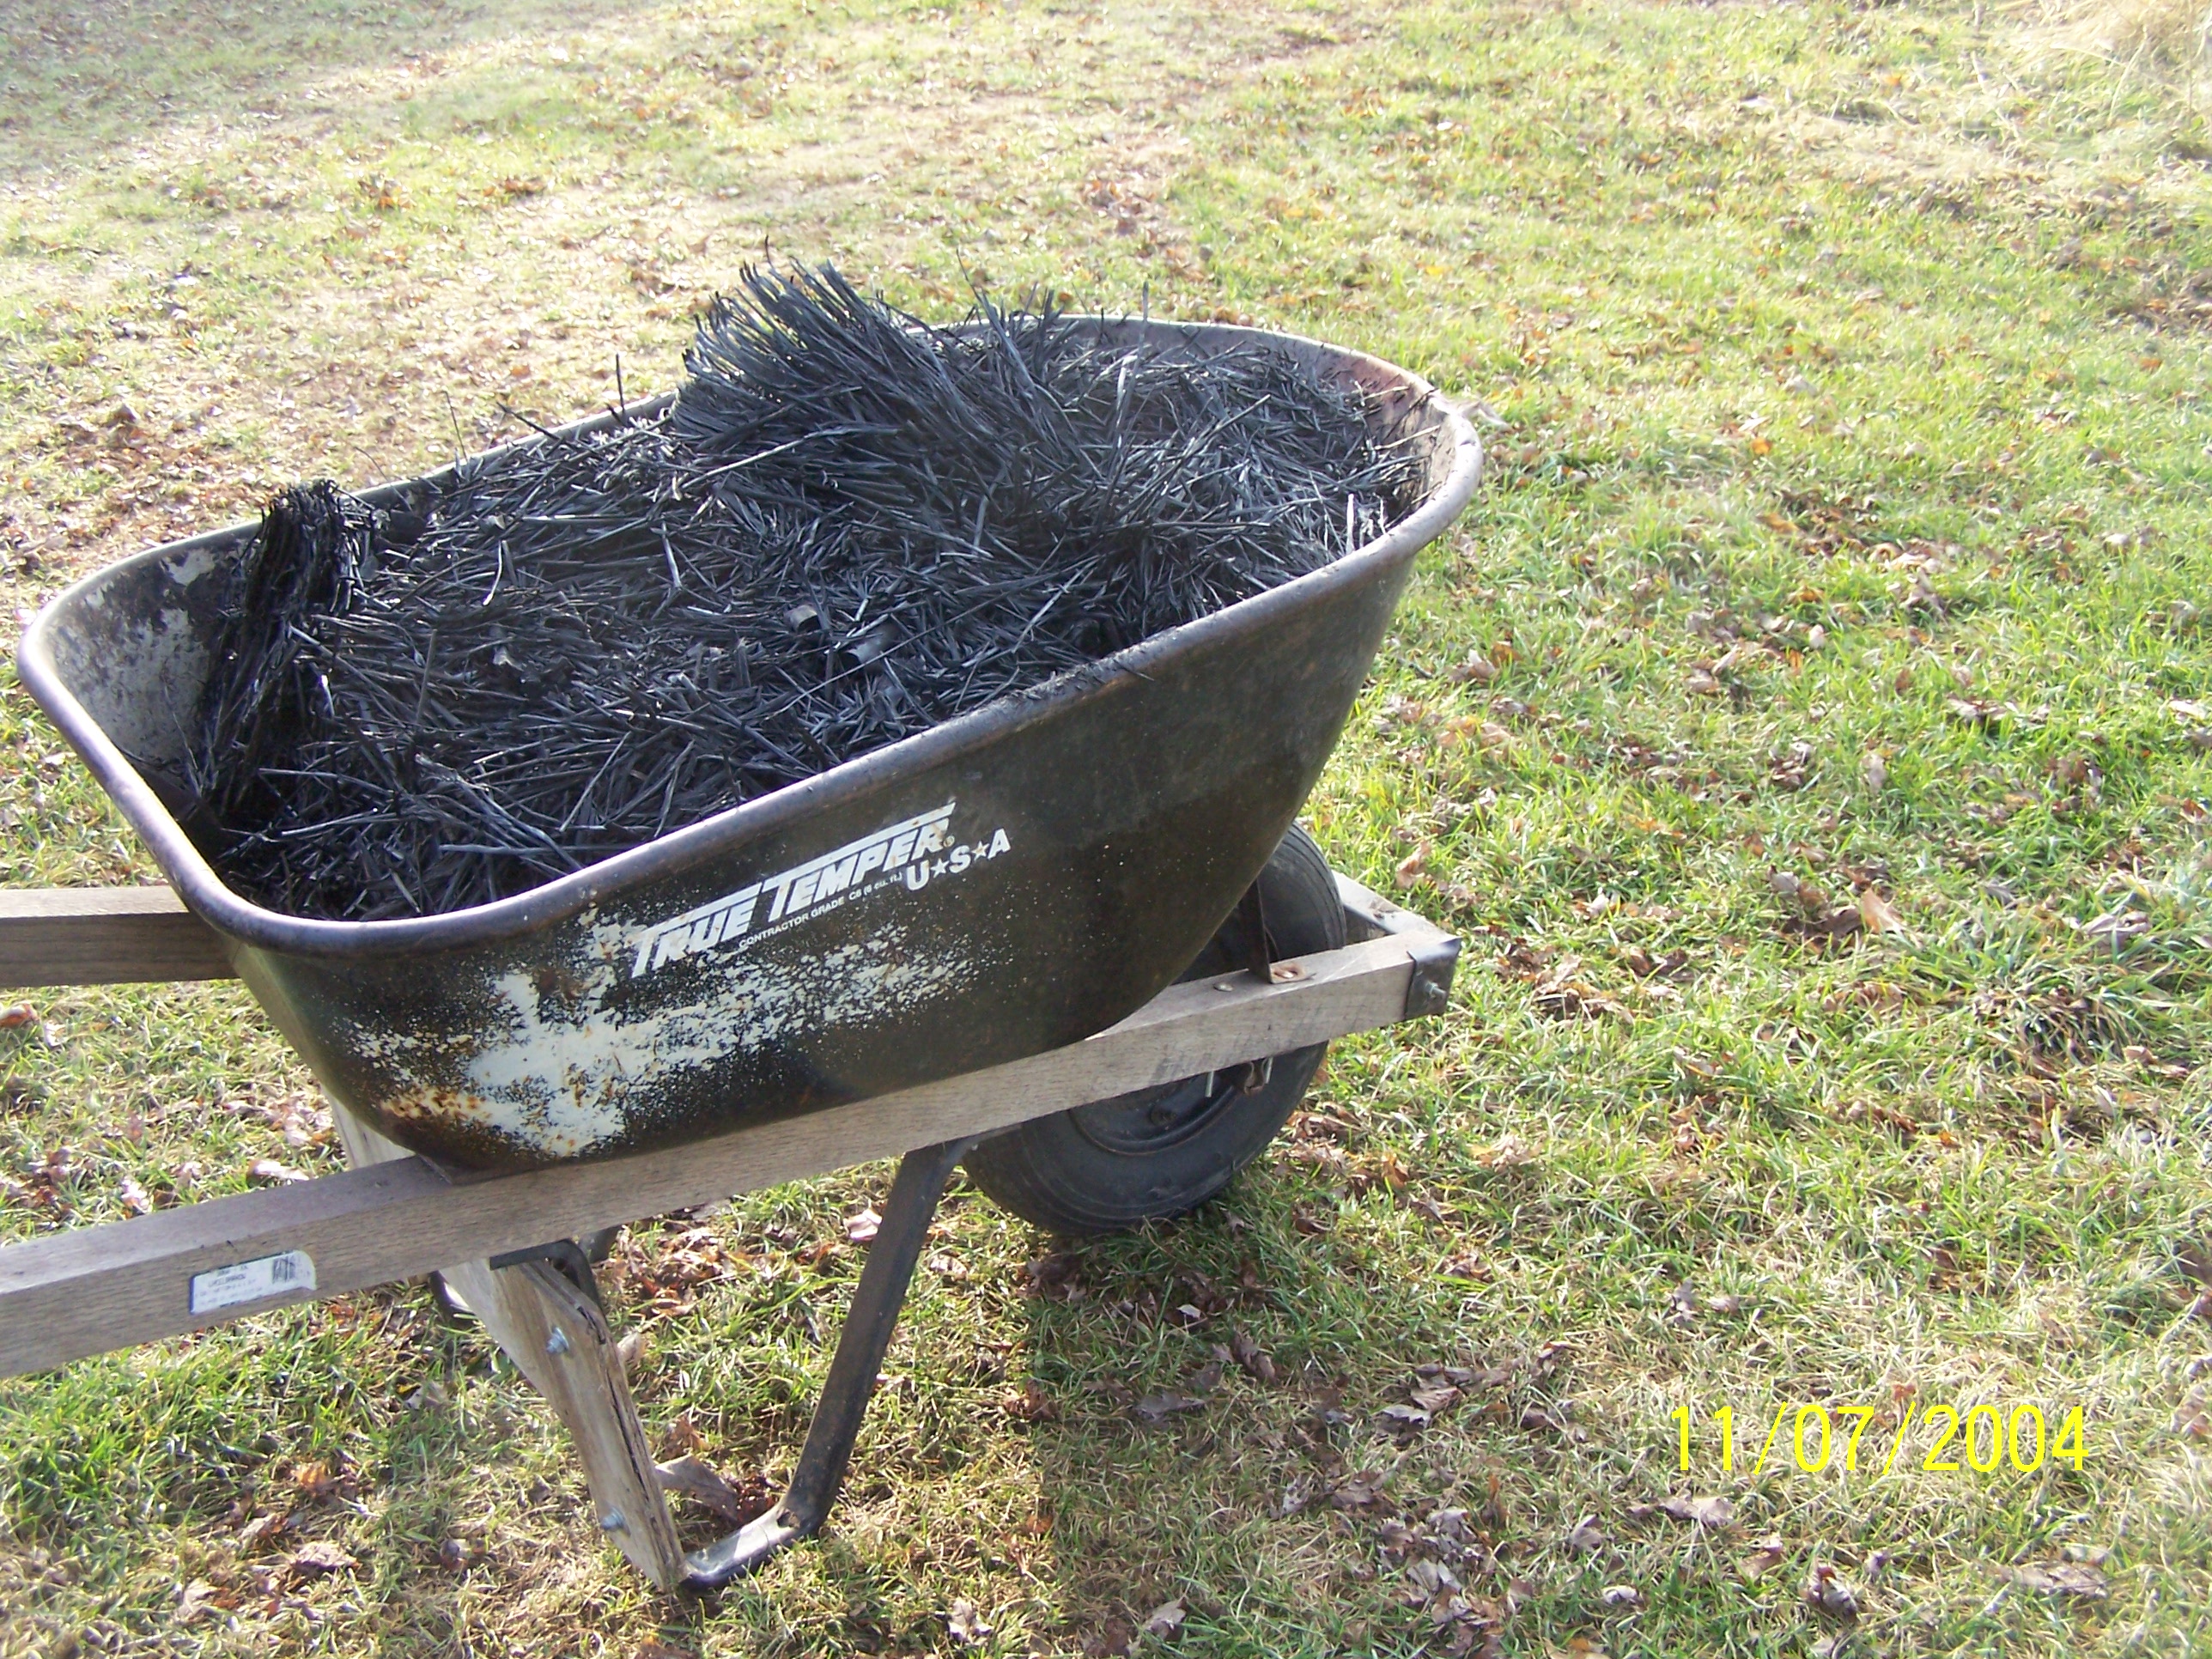
I think the information to take from this small experiment is the increased drought resistance and yield increase of the soil/char/compost mixture. There is a very beneficial effect of char/compost in modifying both wet and dry soil conditions. But char alone doesn’t exhibit its full potential unless coupled with compost. Because the root hairs of the radishes were caked with fine char, I decided to try charring straw instead of wood. Wood requires crushing and sifting to generate the fine particles that appear to be most useful for plants. Straw gives a char that is easily processed into a fine powder. Since straw mats during charring, I fabricated gapped screens that separate the kiln into 3 zones. The screens were cut from ¼ inch hardware cloth into circles the diameter of the kiln interior. Two of these discs were separated by a two inch spacer. The spacer material was also ¼ inch hardware cloth cut into 2 inch strips and wired between the large discs. This assembly was the initial layer on the bottom of the kiln. A layer of straw, (sections from standard square bales) was layered to a depth of 16 inches and another spacer was laid down, 16 more inches of straw, a spacer and the final layer of straw. The load was fired, it was of shorter duration than a load of wood, it took only 4 hours. The run was completely cool the next day and yielded a perfectly charred run. The mass of this run was of course much less than an equal volume of wood, but the char is easily removed from the kiln and requires no further processing.
N: photo of charred straw.
Because of the obvious benefits that I’ve seen in the small test plots, this past Fall(2012), I treated a larger plot with char/compost.
O: photos of 2013 plot The previous year’s test plots were not altered, I want to see if the char/compost treatment persists and if so, for how long.
- J: photo of potato bed after char
- K: photo of test plot experiment
- L: photo of wild cucumbers
- N: photo of charred straw
- O: photo of 2013 plot
Impact of Results/Outcomes
I was able to fabricate kilns, operate them for a season and treat test plots in the first year. Effects on the soil of a combination composted manure/biochar were quite positive and astounding. i continued this study into the second year, charring more and different material and treating even more plots. I'll know more in a few weeks when the ground thaws and I can evaluate the last two years worth of experimental plots.
Educational & Outreach Activities
Participation summary:
I gave a talk at the NCR-SARE Farmers Forum at the National Small Farm Trade Show and Conference in Columbia, MO in November of 2011. I am actively searching out people or institutions interested in biomass utilization, permaculture, and organic gardening.
Project Outcomes
Potential Contributions
From my experiments it appears that it is possible to produce quantities of char large enough to treat garden plots. For a few hundred dollars, a kiln can be fabricated that produces enough char over a season to treat a large garden. Although the data from my experiments are statistically small, every result gives a noticeable and beneficial outcome. It appears that the effort involved is worth the results. Soil treated with a mixture of composted animal manure and bio-char has remarkable tilth and water mitigation effects that are evident after the first application. An easy, one time application in the Fall yields a beautiful seedbed in the Spring. This means seedbeds are ready earlier, they retain a sponginess throughout the growing season, and weeds are easier to pull. Plants respond well to this treatment, they require less water and yield better.
Future Recommendations
In 2013 I look forward to evaluating the test plots and developing connections with other people interested in char. In particular I am searching out local sources of bio mass such as miscanthus or corn stover. Non-woody bio mass has a greater potential for general use than wood I believe because it can be processed with machinery such as mowers, choppers, and balers. There is also no need for processing after charring, it readily crumbles into a powder. From what I’ve observed in the field trials, plants utilize the fine powder on their root hairs. The disadvantage is of course less mass per run but there is considerably less manual labor involved than with sawing wood.
I began some experiments with earthworms in Spring 2012. I mixed char with the bedding media, sometimes straw or sawdust and fed the worms vegetable scraps. I had mixed results, my worms didn't thrive as I had hoped and I had difficulty with their culture. My hope was that the worms would pass the char through their gut and mix the char into their castings. I did manage to obtain about a cubic foot of castings that have a large percentage of char incorporated within. I plan to use this material as seed starter and evaluate it against commercial potting soil. I will continue my efforts with worms, I believe there is potential and any difficulties I've had with their culture has been my fault.
And lastly I did build a char crusher to process the char from wood, it will enable me to generate char with finer particle size, without screening, that plants seem to prefer.