Final report for FNC17-1076
Project Information
Serenity Farm is a small diversified organic farm on 40 acres just north of Wichita, Kansas. I, Brad, farm along with my wife, Tiffany, and our 7 young children, Ray, Sam, Lindsey, Hannah, Isaac, Josh, and Liam. We raise a wide variety of vegetables, along with pasture raised pork, sheep, chickens, and eggs. The land was formerly certified organic no-till for wheat, milo, and soybeans, but is now mostly laying fallow. We raise organically grown vegetables on approximately 2.5 acres. The vegetable gardens are divided into fourteen 75' by 100' plots, which are further divided into permanent 30" wide by 100' long beds arranged 15 beds to a plot with 30" pathways. Over the course of the year we grow 40+ different vegetables. We market our produce through the only 4 season CSA in the area, the farmers market, and a couple of restaurants. I grew up on a 2000 acre commodity grain farm, went to K-State for a B.S. in Ag. Engineering, then Iowa State for my Masters degree, also in Ag. Engineering. After college I worked as a design engineer at two major agricultural and construction equipment manufacturers for 8.5 years before making the break back to farming full time with my family. I have designed and built numerous pieces of equipment to improve efficiency and reduce labor, and am the recipient of two patents stemming from my work on skid steer safety systems. We are also constantly researching and testing new and innovative methods of growing our vegetables as we work to regenerate our soil from its former decades of use in conventional agriculture. I would like to say our farm is sustainable, but a better description would be regenerative since sustaining is just another word for maintaining what you have, and we are faced with healing and rebuilding severely degraded soil. For the four years we have been in operation, we have utilized minimum tillage, and are working to eliminate what tillage we do through integrating cover crops, deep layering of compost, hay mulch, plastic mulch, and adapting different planting methods to work with reduced/no tillage, and have seen some of our best results from beginning use of the no-dig method pioneered by Charles Dowding in the U.K. We are increasing the no-dig percentage of our gardens each year, with the aim to eventually completely eliminate all tillage in our gardens.
Our farm struggles tremendously with time management. With just 2 adults and 7 young children, we are always behind schedule. Added weed pressure from tilling our heavy clay soils often overwhelms us when we are also juggling harvesting, planting, delivery, marketing, and childcare activities. Anything that will decrease labor in the field is highly valued by us as we work to heal the soil to a point where we get acceptable yields and plant vitality, and ultimately, become profitable. With the widespread damage to the soil due to decades of chemical mono- culture growing methods, and the current movement to bring young farmers back to the land in small scale market gardens, our farm’s situation is not unique. For the scope of this project, I have focused on the task of transplanting seedlings into the garden beds, along with the attendant preparatory work required to successfully establish the seedlings. This is because the way you prep your beds, start your seedlings, and place them in the garden sets the stage for all the work required for the remainder of the growing cycle for those crops. There are a great many labor saving transplanting tools out there for the small market gardener, but they tend to be geared to conventionally tilled gardens, and rely on clean, residue-free beds with loose soil. When you bring those tools to our heavy clay soil in Kansas, and add residue from cover crops, they lose effectiveness. Farms like ours need tools and methods that are adapted to our heavy soils and wild Kansas weather in order to have a chance at succeeding in becoming profitable while regenerating the soil.
I am evaluating a method of no-dig gardening which uses thick layering of compost directly on top of the soil for weed suppression and to provide a looser medium in which to use transplanting tools for setting seedlings. This is a long term regeneration effort for the soil that promises to reduce weed pressure by not bringing up weed seeds through tillage and disruption of the soil structure. In order to start a “no-dig” bed with the heavy layer of compost, and reduce the incidence of weeds emerging through the compost from the soil below, it is good to start with some sort of sterilized bed, or use cardboard or heavy paper as a blocking layer. We made extensive use of plastic mulch for weed suppression the year prior to project initiation, and removing the plastic mulch leaves a weed free bed of bare soil with a drip irrigation line already installed. This is ideal for beginning the no-dig beds. Some no-dig beds will solely utilize compost, while others will have cover crops grown and rolled down in order to have natural plant cover and a living root system in place ahead of transplanting seedlings.
The other part of the project involves evaluating and comparing different methods of transplanting seedlings out into the prepared beds. Three different transplanting methods are compared in this project: hand setting, the Stand ‘N Plant transplanter, and the Japanese paper pot transplanter. Modifications to the paper pot transplanter will also be developed and tested in order to allow the paper pot transplanter to be used in beds with varying degrees of residue, including rolled down cover crops. The ultimate goal is to determine the most effective method of transplanting seedlings that is compatible with no-dig gardening and cover crop use on regenerating soils.
- Evaluate and adapt the hand pulled paper pot transplanter for use in no-dig garden beds with cover crop residue, and compare the transplanter against other hand transplanting tools that are available to the small market gardener in the areas of seedling vigor and vitality.
- Benefit the environment by working to regenerate degraded soil.
- Help farmers benefit economically and socially by maximizing efficiency through reducing time invested in seeding, setting, and weeding.
Research
Timeline
Winter – Spring 2017: Lay compost in garden beds using home-built live-bottom compost wagon, amend compost with trace minerals, seed spring cover crops in selected beds.
March 2017: Receive funds and order materials.
April 2017: Seed trays with head lettuce, peas, spinach, kohlrabi, beets, and green beans. Begin setting out first seedlings towards end of month.
May 2017: Finish setting seedlings. Record variations in seedling performance between transplant methods. Weed as needed. Determine behavior of paper pot transplanter in high residue.
September 2017: Begin seeding trays for fall harvest. Crops for comparison included Pac Choi and kohlrabi. Seed fall cover crops.
October/November 2017: Set seedlings out, begin evaluation of modifications to paper pot transplanter. Development/fabrication of modifications to paper pot transplanter for residue handling.
Winter 2017-2018: Analysis of records, progress report, lay compost, add trace minerals, seed spring cover crops, continue modifications to paper pot transplanter as needed.
February-April 2018: Seed trays for early spring planting, continue laying compost, set seedlings, record growth variations. Continue evaluation of transplanter performance in residue.
May-June 2018: Finish setting seedlings, harvest selected spring crops, record yield variations.
August 2018: Begin seeding trays for fall harvest. Seed fall cover crops.
September 2018: Set seedlings out, finish evaluation of modifications to paper pot transplanter. October/November 2018: Record variations in seedling performance between transplant methods, fall harvest of selected crops.
Winter 2018-2019: Analysis of records, Final report.
Measuring Results
Environmental Benefits: Since we are working to regenerate degraded soil, soil testing at regular intervals is a necessity. Of particular concern is biological activity, since 85-90% of soil fertility is due to the biological action of soil borne organisms. To this end, I am performing Haney soil tests throughout the project in order to quantify improvements in soil fertility due to the no-dig method of managing the garden beds. Soil microbes depend on living root mass for habitat and symbiotic relationships, so our seedlings are started with a commercial potting mix that already contains humus and mycorrhizae in order to provide a jump start for the seedlings as they are set out into the garden beds. The commercial potting mix reduces the variability inherent in our home mixed potting mix in order to objectively evaluate the effects of transplanting methods on seedling viability. Additionally, the relative success or failure of the paper pot transplanter in the no-dig garden beds and cover crop residue is tracked through its modifications, as its ability to be made to perform in difficult soil conditions will influence the farmer's choice of whether to use regenerative or “till and drill” practices.
Economic Benefits: Time is a major investment in any market garden crop, so time invested in the various activities of seeding, setting, and weeding is tracked, recorded, and compared between transplanting methods for each crop. Yield and quality of each crop is also tracked and compared between transplanting methods, since that is the ultimate measure of the success of a particular production practice.
Social Benefits: Again, time invested is the primary measure here, since reduced time in the field opens up more of your day to other pursuits, such as quality time with your children. After all, they only regard so much time in the field with you as quality time before they figure out you are putting them to work and disappear! Choosing a transplanting method that is not only the most efficient for your operation, but also results in the best crop quality furthers the social goal of providing more nutrient dense, local food to the market.
Modifications of paper pot transplanter performed and tested:
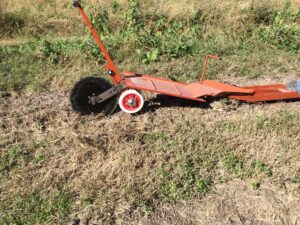
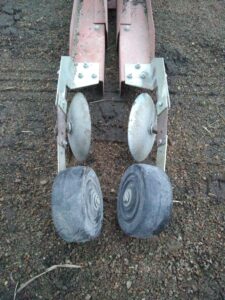
- Coulter wheel added in front of opening shoe. This is intended to accomplish two things. First, the coulter provides support further forward, allowing an increased pull force without lifting the rear of the transplanter. Second, the coulter either cuts or buries the residue to allow the furrowing shoe to work without residue hair-pinning.
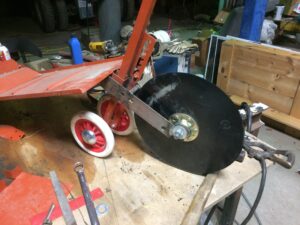
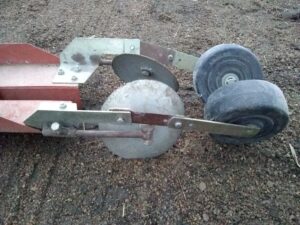
- Concave closing discs replaced the curled sheet-metal closers. This is intended to more aggressively close the furrow around the seedlings and be more consistent in varying soil conditions. Initial design fit the discs inside the existing envelope between the firming wheels and the back of the transplanter structure to limit modifications to the transplanter.

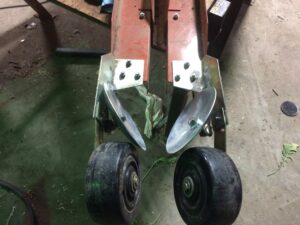
- Modify the firming wheel mounts to allow more clearance around the closing discs.
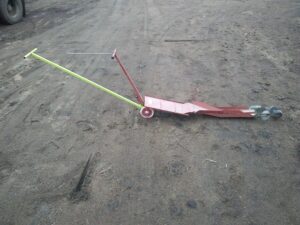
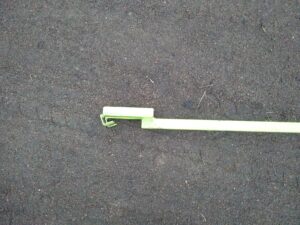
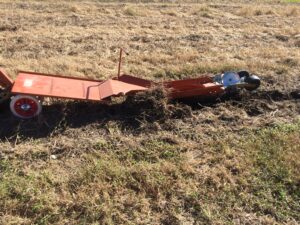
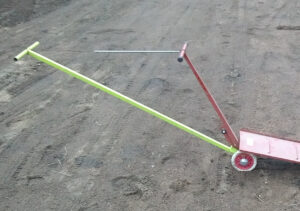
- Create a new swivel handle to allow more pull force on the transplanter without raising the rear closing disks and firming wheels off the ground.
Stand 'N Plant transplanter tested against the paper pot transplanter:
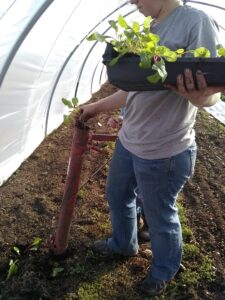
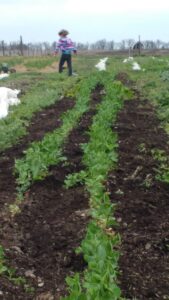
- The Stand 'N Plant transplanter is already well-used on our farm, as can be seen in the picture. It allows one person to transplant seedlings from plug trays into growing beds of any type. You operate it with one hand by forcefully thrusting it into the soil to the desired depth. You then allow the handle to rest against your leg while you pull a seedling from the tray cradled in your other arm and drop it down the tube. You then grab the handle again with your free hand and squeeze it to open the jaws as you pick the transplanter straight up from the soil. The seedling remains in the hole created by the transplanter. You then use the toe of your boot to firm the soil around the seedling and move on to the next one. Most of the time we will also have one of our children put a little scoop of worm castings into the transplanter tube just before dropping the seedling so that it has that valuable nutrition right there at the roots. The Stand 'N Plant will penetrate as tight of soil as you have strength to push it in and still squeeze the handle. It also has no trouble with residue on the soil or clod size, and can be used to place seedlings into plastic mulch without pre-cutting holes.
In year one of the project, a late freeze wiped out comparison seedlings in the spring, preventing yield and root mass comparisons. Fall yield comparisons were missed after falling behind on nearly everything due to the birth of our son in July, so the work of the first year revolved around evaluating the performance of the paper pot transplanter in difficult soils and adapting it to improve function.
Results of initial usage of unaltered Japanese paper pot transplanter.
- The seeder tool for seeding the trays is plastic, and carries enough static electricity to be unusable. Suggested static mitigation methods such as dryer sheets did not work. Marginal success was achieved with pelleted seed. However, the number of doubles and triples, or incidences of static pulling the seed over to drop in the wrong cell, eventually led to us going back to placing seed by hand in the trays. Overall, time to prep, seed, and care for trays is comparable to standard plug trays.
- The tray dibbler works well in moist potting mix.
- The transplanter is very light, and has the gauge wheels located behind the high mounted handle. With increased soil resistance, the rear of the transplanter lifts. This results in seedlings riding up out of the furrow and/or failure to close the furrow. Dry soil worked nearly to a powder allows the transplanter to work well. Clods as small as 1" can interfere with furrow closing.
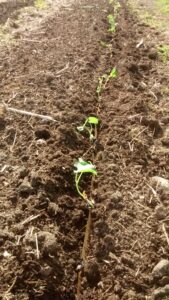
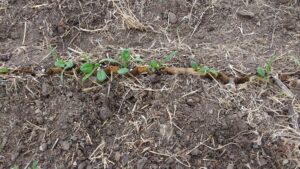
Seedlings in rototilled bed with incorporated compost. Note that the furrow did not close. - Rototilling our heavy clay soil with compost integrated from last year did not result in a soil texture conducive to using the transplanter.
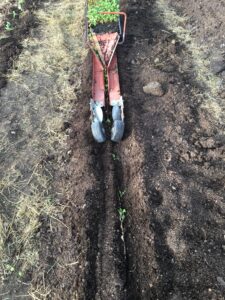
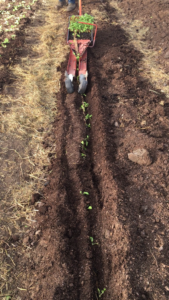
Rototilled bed with compost incorporated in the soil. - The transplanter pulls well through moderately dry un-screened compost laid thick as a mulch layer on top of the soil. However, furrow closing is inconsistent and requires a follow-up pass with a hoe to finish burying the string of paper pots.
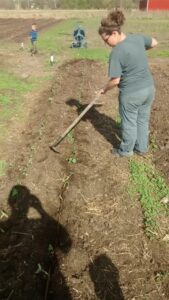
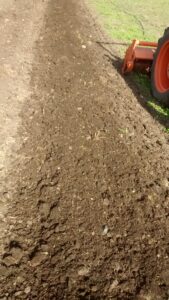
Closing furrow with hoe after transplanting seedlings into freshly laid compost. - One pass with the power harrow through the compost layer levels and breaks up the clumps sufficiently for the transplanter to work more consistently, though still not perfect. The depth of the power harrow can be maintained to condition the compost layer without disturbing the soil beneath, thereby avoiding bringing up weed seeds. A dirt rake would have the same effect, but the power harrow is much faster.
- Any residue on or in the soil hairpins on the opening shoe and creates a ball of debris that brings the whole transplanter out of the ground.
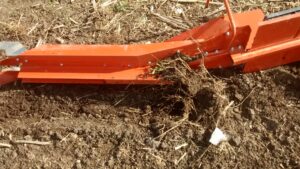
Debris buildup on opening shoe.
Evaluation of modifications made on the transplanter:
- Testing has shown the coulter to be ineffective. Testing was done in fall, in soil that had a compost layer applied in the spring, and had cover crops mowed and tilled in with a power harrow in the fall. It was then allowed to mellow through a couple of rains before testing. The transplanter is light enough that the coulter does not effectively penetrate the soil, and residue continues to catch on the opening shoe. Adding weight sufficient to penetrate the soil increases the pulling resistance to the point that the rear of the transplanter lifts out of the soil.
- Testing of the concave closing wheels shows promise. Testing was done in fall on freshly laid unscreened compost and compost with one pass from the power harrow over it. Initial adjustment had the discs oriented in a slight "cup up" configuration to lift and move the soil over to close the furrow. This configuration had the effect of lifting the string of pots out of the furrow and closing the furrow below it. Rotating the discs to a "cup down" orientation closed better, but the tight clearance between the discs and fixed parts did not allow soil to move through properly, resulting in clogging.


- Extension of the mounting arms for the firming wheels and adjustment of the mounting rods for the closing wheels to widen the space between them eliminated the clogging issues, and allowed the disks to work better.
- Addition of the long swivel handle was effective at keeping the rear of the transplanter from riding up off the ground with more pull force. However, the transplanter is light enough that the front would start to pick up instead. This made the transplanter unstable and reduced the furrow depth.
- Addition of a simple screen door spring to tie the long handle to the top of the original handle balanced the pull force to keep the transplanter level and in the ground. It also supported the swivel handle so that it did not fall to the ground when released.
- The extra length of the handle made maneuvering in our high tunnel very difficult at the ends of the rows. The length, coupled with the play in the joint, also made it difficult to keep the transplanter moving in a straight line when it encounters larger clods or residue, and that negatively impacted the ability of the closing disks to fill in the furrow.
Time comparison between transplanting methods
- Stand 'N Plant
- Time to transplant a tray of 128 seedlings - approx. 15-20 minutes working alone.
- A second person to drop seedlings down the tube can bring the time to 10 minutes.
- Paper Pot Transplanter
- Time to transplant a tray of 264 seedlings - approx. 3-5 minutes working alone, depending on amount of residue that hair-pins. This time includes time to load and start the strand of seedlings.
- Time for followup pass to fill in furrow and uncover buried seedlings - approx. 5-8 minutes, depending on seedling spacing and how much is buried.
- Total time 8-13 minutes for 264 seedlings.
Evaluation of no dig beds
- The thick layer of compost does well suppressing weeds from the underlying soil. However, grasses and clovers planted in the pathways migrate quickly back into the beds.
- The compost used the first year had a significant weed and grass flush from seeds and rhizomes in the compost. It is estimated that this was due to use of an old compost pile that had plants growing on it, and not due to weed seeds making it through the composting process. The weed pressure necessitated tilling the compost layer between crop successions. The second year had freshly cooked compost, and saw less inherent weed pressure, though the weeds still showed up and required weeding passes.
- In spite of the weed pressure, the use of the deeply layered compost looks to have been worthwhile due to improvements in soil moisture retention and soil tightness.
- The layering of compost saw a 25% increase in soil organic matter and more than double the soil respiration (a measure of soil biological activity). The overall soil health calculation also more than doubled. See table below.
| Prior to project start (incorporated compost)- 06/2016 | Layered compost - 08/2018 | Left fallow - 08/2018 | Ideal Range | |
| 1:1 Soil pH | 7.3 | 7.8 | 7.1 | 6.0-7.0, different crops prefer different ranges |
| Organic Matter, %LOI | 3.6 | 7.0 | 3.6 | The higher the better, goal is 10% |
| Soil Respiration CO2-C, ppm C | 43.5 | 91.2 | 59.8 | Region/climate dependent, the higher the better, >70 is good, >200 is great |
| Organic Nitrogen, ppm N | 23.2 | 30.5 | 17.1 | The higher the better, ratio to C is important |
| Total Organic Carbon, ppm C | 223 | 380 | 231 | The higher the better, ratio to N is important |
| Organic C:Organic N ratio | 9.6 | 12.5 | 13.5 | Between 8:1 and 15:1 is good, between 10:1 and 12:1 is ideal |
| Soil Health Calculation | 9.07 | 19.77 | 12.31 | Region/climate dependent, the higher the better, range is 0-50, most soils are <30, 7 is low end starting point |
For more in-depth explanations of soil health test values, see https://www.wardlab.com/haney-interpretation.php
Evaluations of paper pot grown seedlings
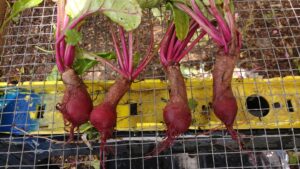
- Root vegetables such as beets seem to be inhibited in growth due to failure of the paper pots to degrade in the soil. The paper pots constricted the bulbs from developing properly, and were still intact after 3 months.
- The combination of the small soil volume of the paper pots and the perforated carry trays contribute to easy wilting of seedlings. We lost several trays when missing one watering.
- The plug trays with their larger soil volume are more tolerant of the occasional missed watering.
- Plant health and vigor in the paper pot trays was comparable to plug trays. However, the paper pot seedlings must be set out at an earlier stage due to reduced soil volume and close proximity of the seedlings. We had trouble with tangling in the pea and kohlrabi trays, which led to requiring a second person alongside the transplanter to help free the seedlings from each other as the tray unwound.
- Lack of degradation of the paper pots in the soil is a significant issue. We are finding them to be still intact 3-6 months after planting out to the field. However, once established out in the field, plant yield is similar to those set out with the Stand 'N Plant.
Educational & Outreach Activities
Participation summary:
Summer 2017: I spoke at length with a neighboring vegetable farmer about my experiences with the paper pot transplanter and brainstormed with him how to effectively integrate the tool into his own operation. Another neighbor farmer came to see a short demonstration of how the transplanter works. I walked him through the process and showed him how it works in the field.
July 2018: We hosted about 25 people from the NCR-SARE Administrative council and SARE staff for a farm tour and demonstration of the transplanter, along with in-depth discussion of our activities to build the soil and improve efficiency on the farm.
Learning Outcomes
Conclusions on the paper pot transplanter
- Overall, the transplanter is just built too light to be effective as a one pass transplanter in anything more difficult than finely tilled, dry, residue free soil, or freshly laid screened or harrowed compost on top of the soil. It cannot be recommended for stand alone operation in heavy soil or residue conditions without changes to its basic structure. It can be used in such conditions along with a followup pass to close the furrow and uncover any buried seedlings, and regular stops to clear any hair-pinned residue.
- The structure is too thin and flexible to handle the more robust disk closers needed for tougher soils and residue. The long furrow guide channels twist and flex. This changes the position and angle relationship of the disk closers, negatively impacting their ability to track with the row and close the furrow consistently. Even using a little thicker steel on just the long furrow guide channels would improve stability of the transplanter tremendously. The transplanter sold by Johnny's Seeds is from a different manufacturer and looks to be more robust than the one sold by Small Farm Works and tested here, and may be easier to adapt to closing disks due to its different furrow closer setup. The newest transplanters from Small Farm Works appear to have a shorter furrow guide channel, which also will help with the flexing.
- The opening shoe is shaped well to pull the transplanter into the soil. However, that shape is also adept at catching and hair-pinning any residue it encounters, resulting in rapid soil and residue buildup that pushes the transplanter out of the ground. The light weight of the transplanter and high handle location eliminates use of a coulter to help with residue.
- The extended swivel handle with spring balancer was effective keeping the transplanter level and in the ground with higher pull forces, but is better suited for outdoors maneuvering due to the added length.
- The time savings is significant, even despite the shortcomings of the machine in more difficult soils. While using it, there is frustration with having to go back and fix inconsistent coverage, and it seems like it takes longer than it should. However, you are still done faster, and that is a win!
Conclusions on the layered compost "no-dig" beds
- Layering in compost is a great way to improve your soil and have a much easier to work with seedbed in a short amount of time.
- Weeding is not eliminated, but it is lessened somewhat, and the weeding is easier due to the looser soil.
- One must pay closer attention to soil moisture levels, as the layered compost tends to dry out in the top inch or so more quickly. This will impact germination of direct seeded crops as well as survival of freshly transplanted seedlings.
- Soil organic matter and biological activity increase quickly with layering.
Overall conclusions/lessons learned
- Layered compost with a pass from the power harrow makes a great seedbed that is compatible with the paper pot transplanter, improves soil health, and reduces weeding time (if the compost is not full of weed seeds).
- Even with the frustrations of residue hair-pinning and a followup pass, the paper pot transplanter does realize a significant time savings in the field, even though it may not seem like it at the moment.
- The transplanter modifications investigated do help to widen the range of conditions the transplanter can be used in, but none resulted in consistent improvement.
Project Outcomes
If you are looking to transplant into rolled cover crop residue without tilling, you may want to stick with a Stand 'N Plant. For mild residue and layered compost, the paper pot transplanter could be worthwhile, but plan on followup passes.