Final report for FNC19-1163
Project Information
Years ago, after an unsuccessful day of fishing at my family farm pond, I came to the conclusion there must be an easier way to obtain fresh food fish. I decided to build a new pond to raise and manage my own fish. After formulating this goal, I met with several Iowa Department of Natural Resources (DNR) officers to talk about my plan. After speaking with them about how I wished to manage my ponds, they informed me that I would be unable to accomplish my goal without a hatchery license. After obtaining my hatchery license, I formed Jim Frey’s Fish Hatchery in 1974.
Initially, this plan started out as a hobby, but I soon found that almost every other pond in my area had the same conditions as my ponds. Upon discovering this, I formed a new goal: to help establish better fishing in my home in West Union and across Northeast Iowa. Over the course of 44 years, I taught myself through experience and by reading almost every article I was able to get my hands on. After many years of hard work, my business has expanded to Iowa, Minnesota, Wisconsin, and Illinois.
In the state of Iowa there are about 9,000 acres of abandoned quarry pits and 12,000 acres of abandoned coal mines. Depending on the location, many of these have substantial water resources that could support aquaculture but are not being used due to their depths (water bodies cannot be drained), which makes fish harvest difficult or nearly impossible. The goal of this project is to design a floating 7,500-gallon tank with 6,000 gallons available to hold fish. Once the fish are raised to a desired size, a discharge valve will be opened (using no pumps or energy), and water will leave the tank allowing fish to be easily harvested. This design will build upon a smaller, earlier prototype. In addition to the energy savings, this tank will allow fish to be harvested from these systems with minimal equipment and effort. Upon the successful completion of this project, aquaculturists will be able to produce fish economically by accessing abandoned water bodies that to date have not been used for fish production. The limited amount of energy in the tank design will allow fish to be produced with minimal environmental impacts.
- Develop and test a floating fish tank for use in Iowa’s abandoned water bodies.
- Evaluate the costs and benefits of the floating fish tank for regional fish production.
- Share findings through field days and web site.
Research
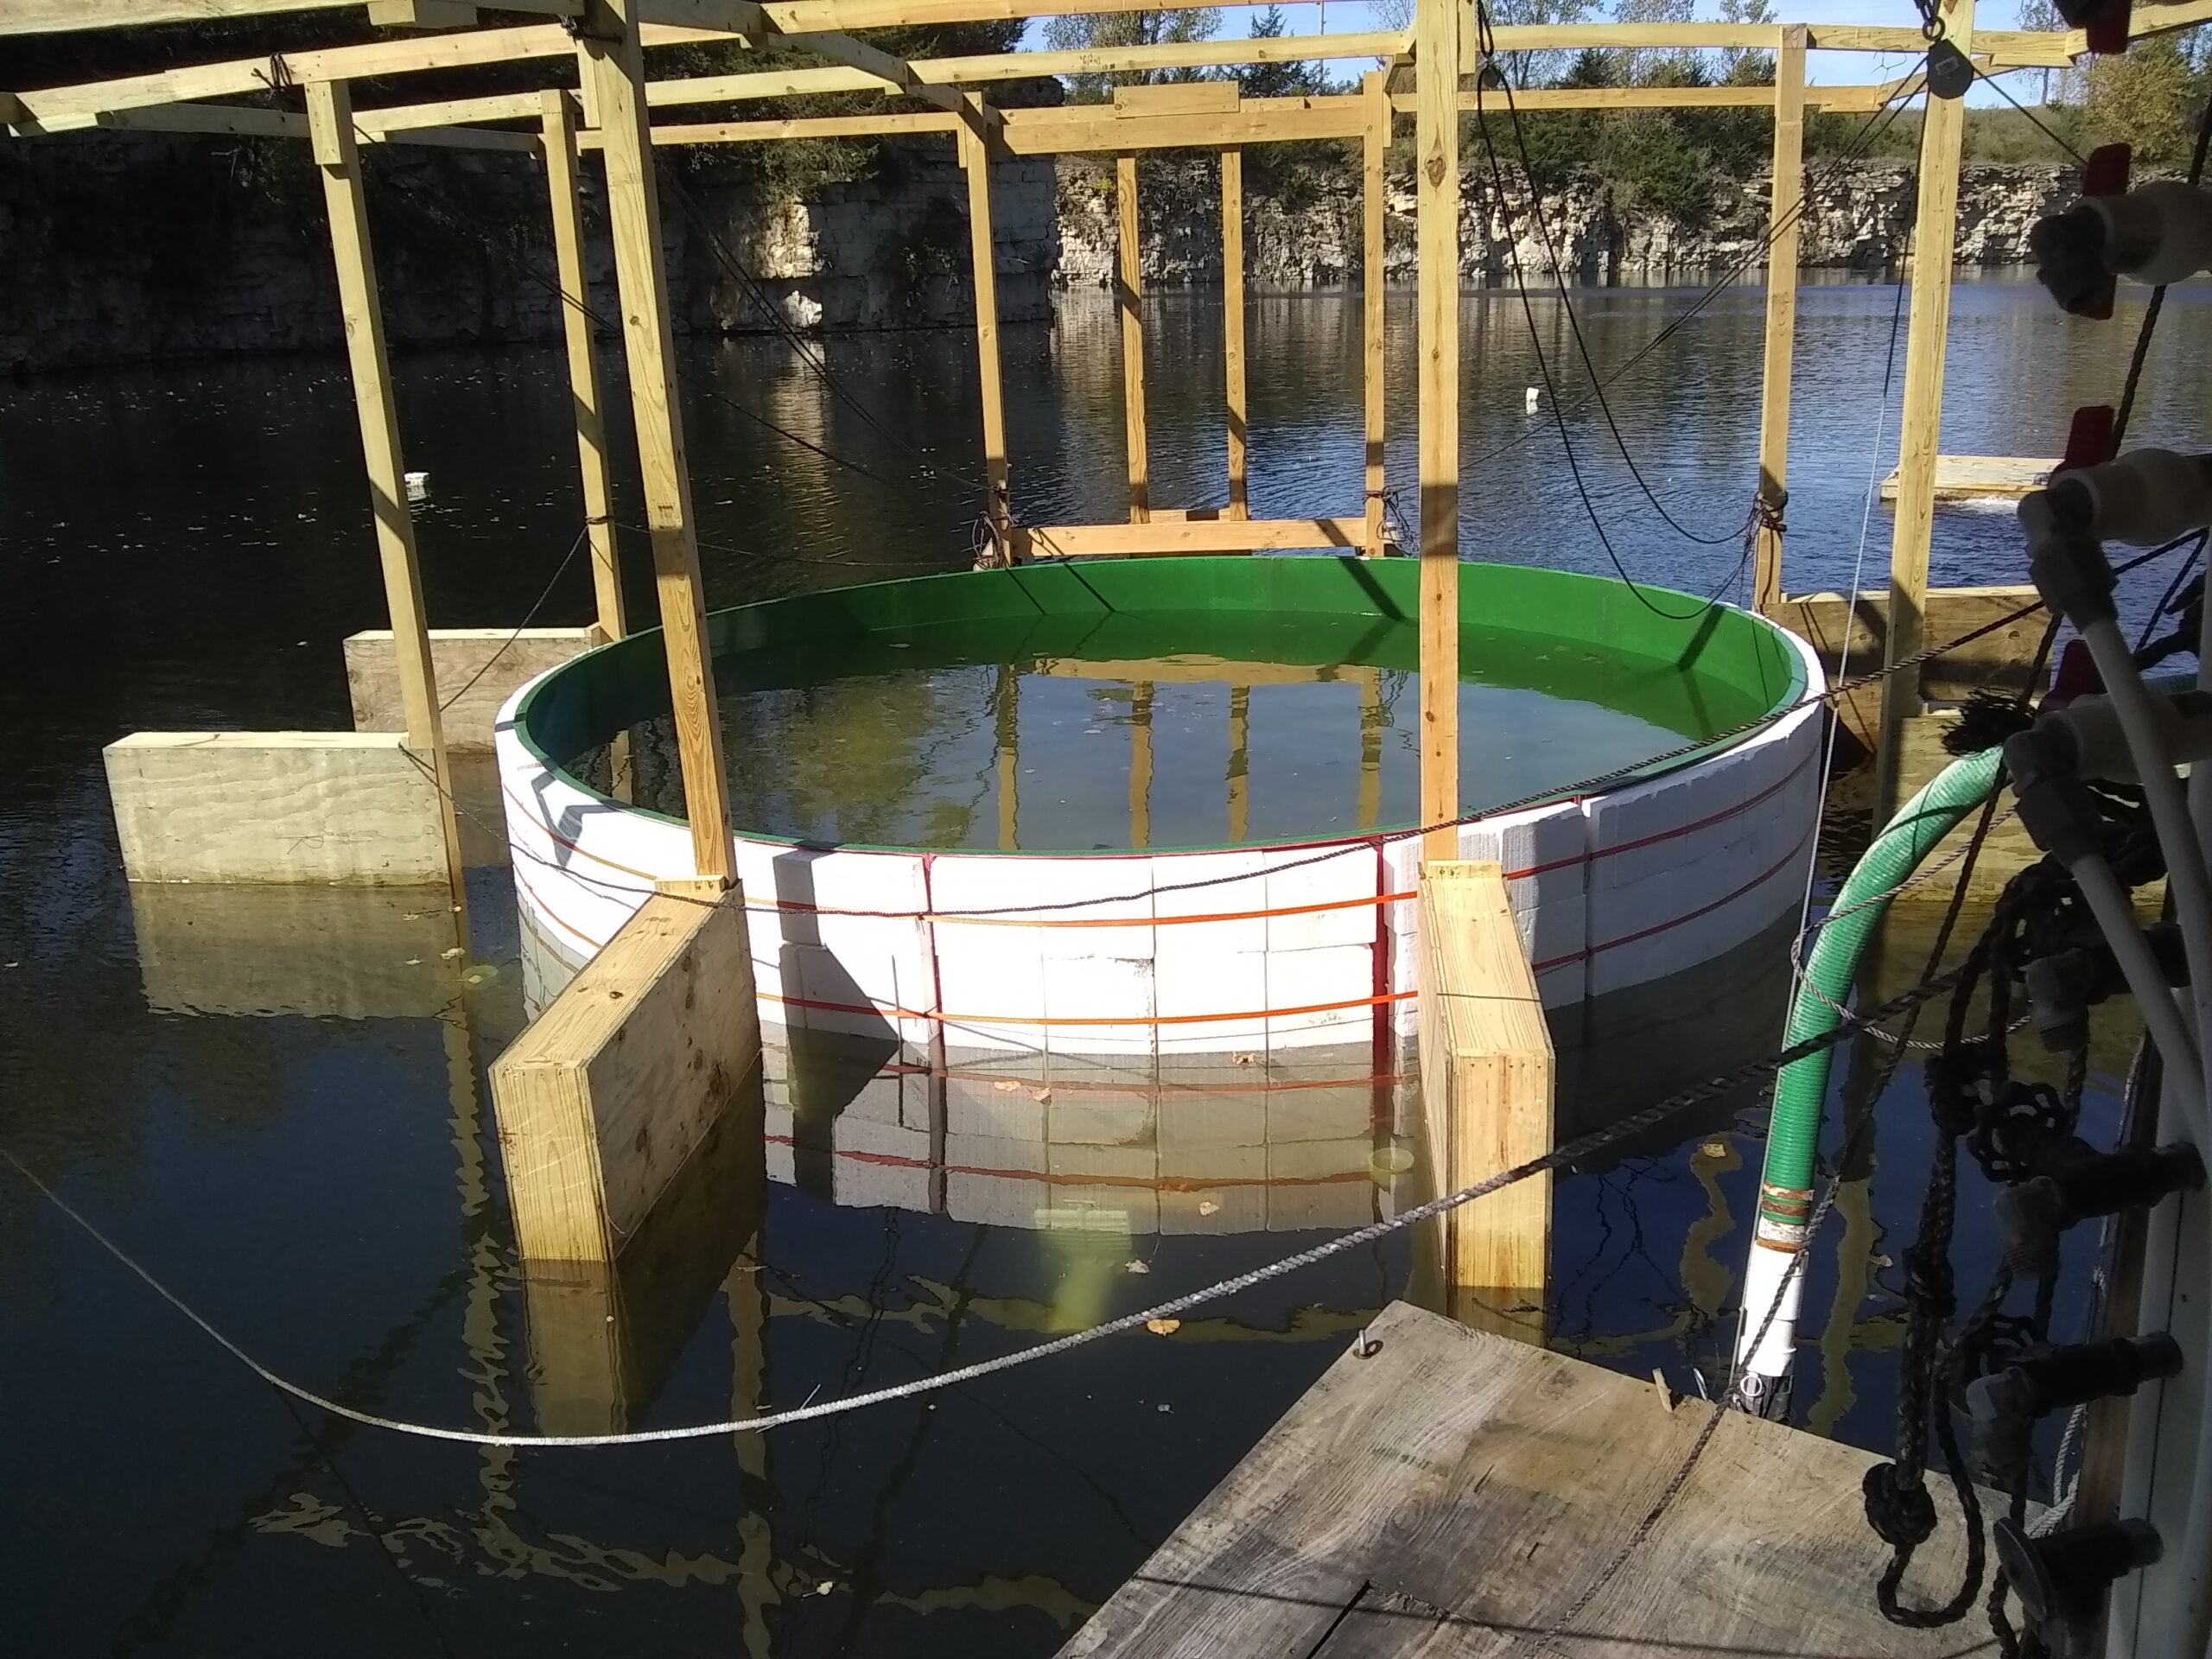
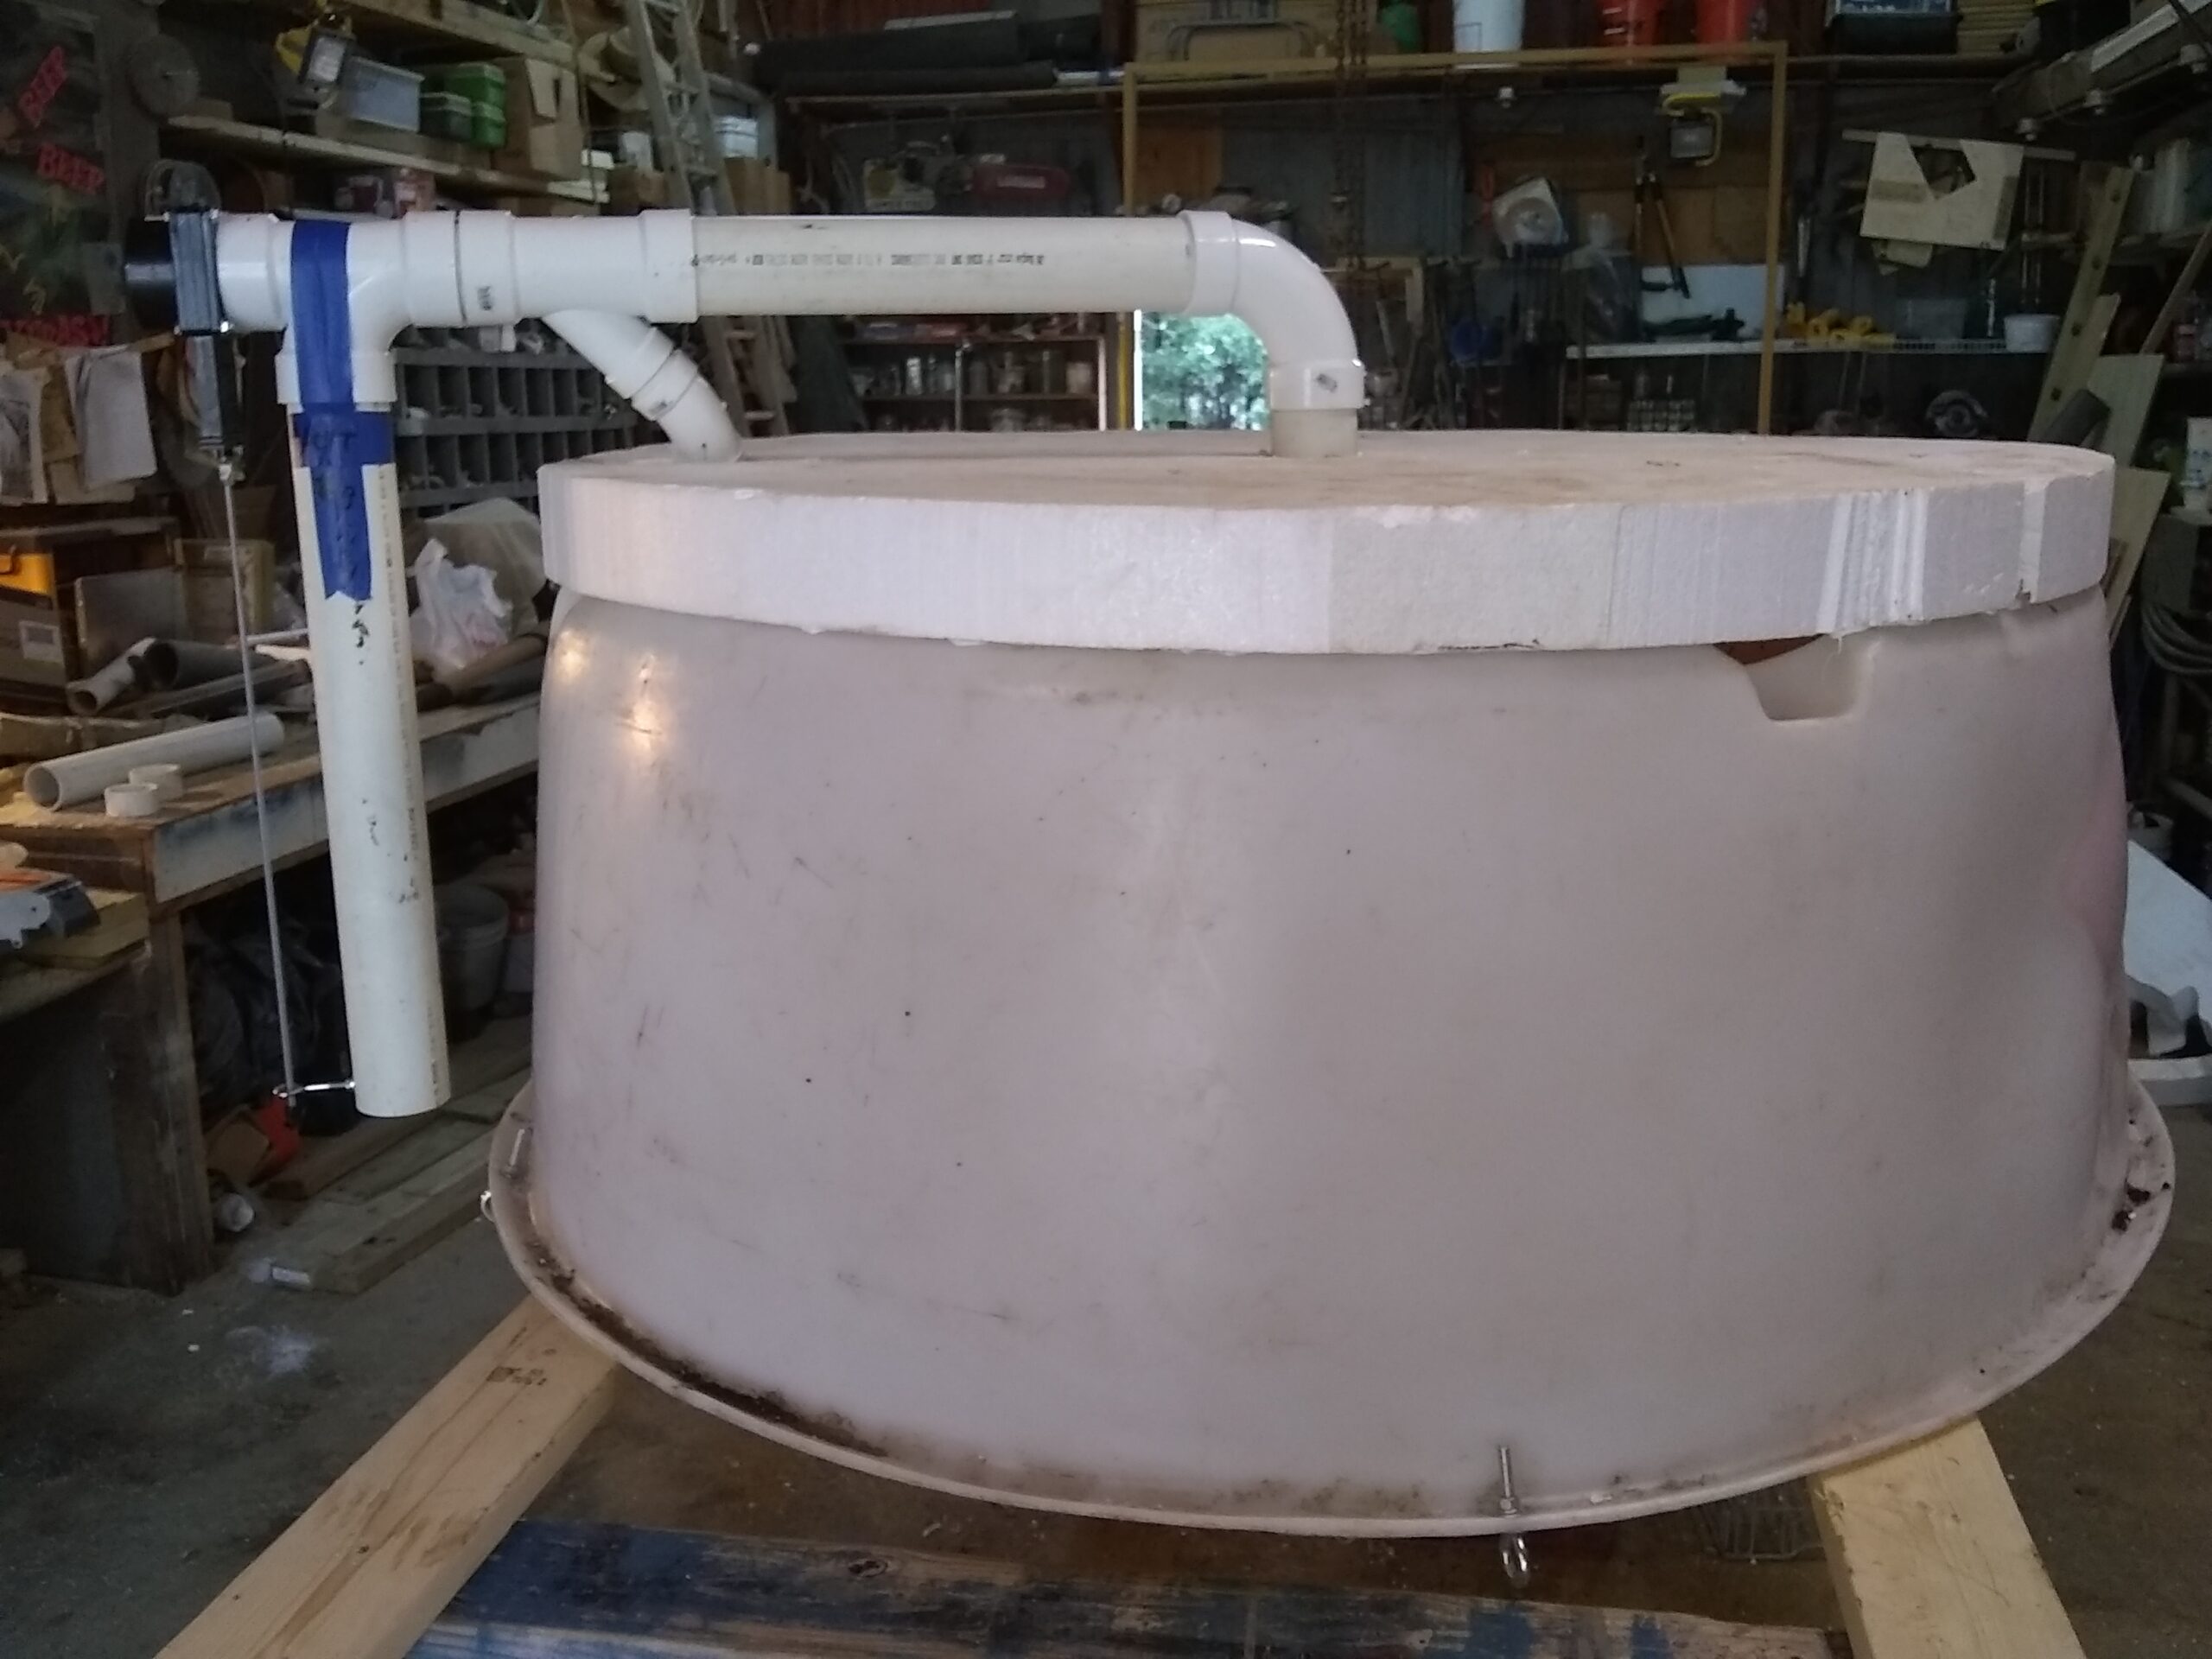
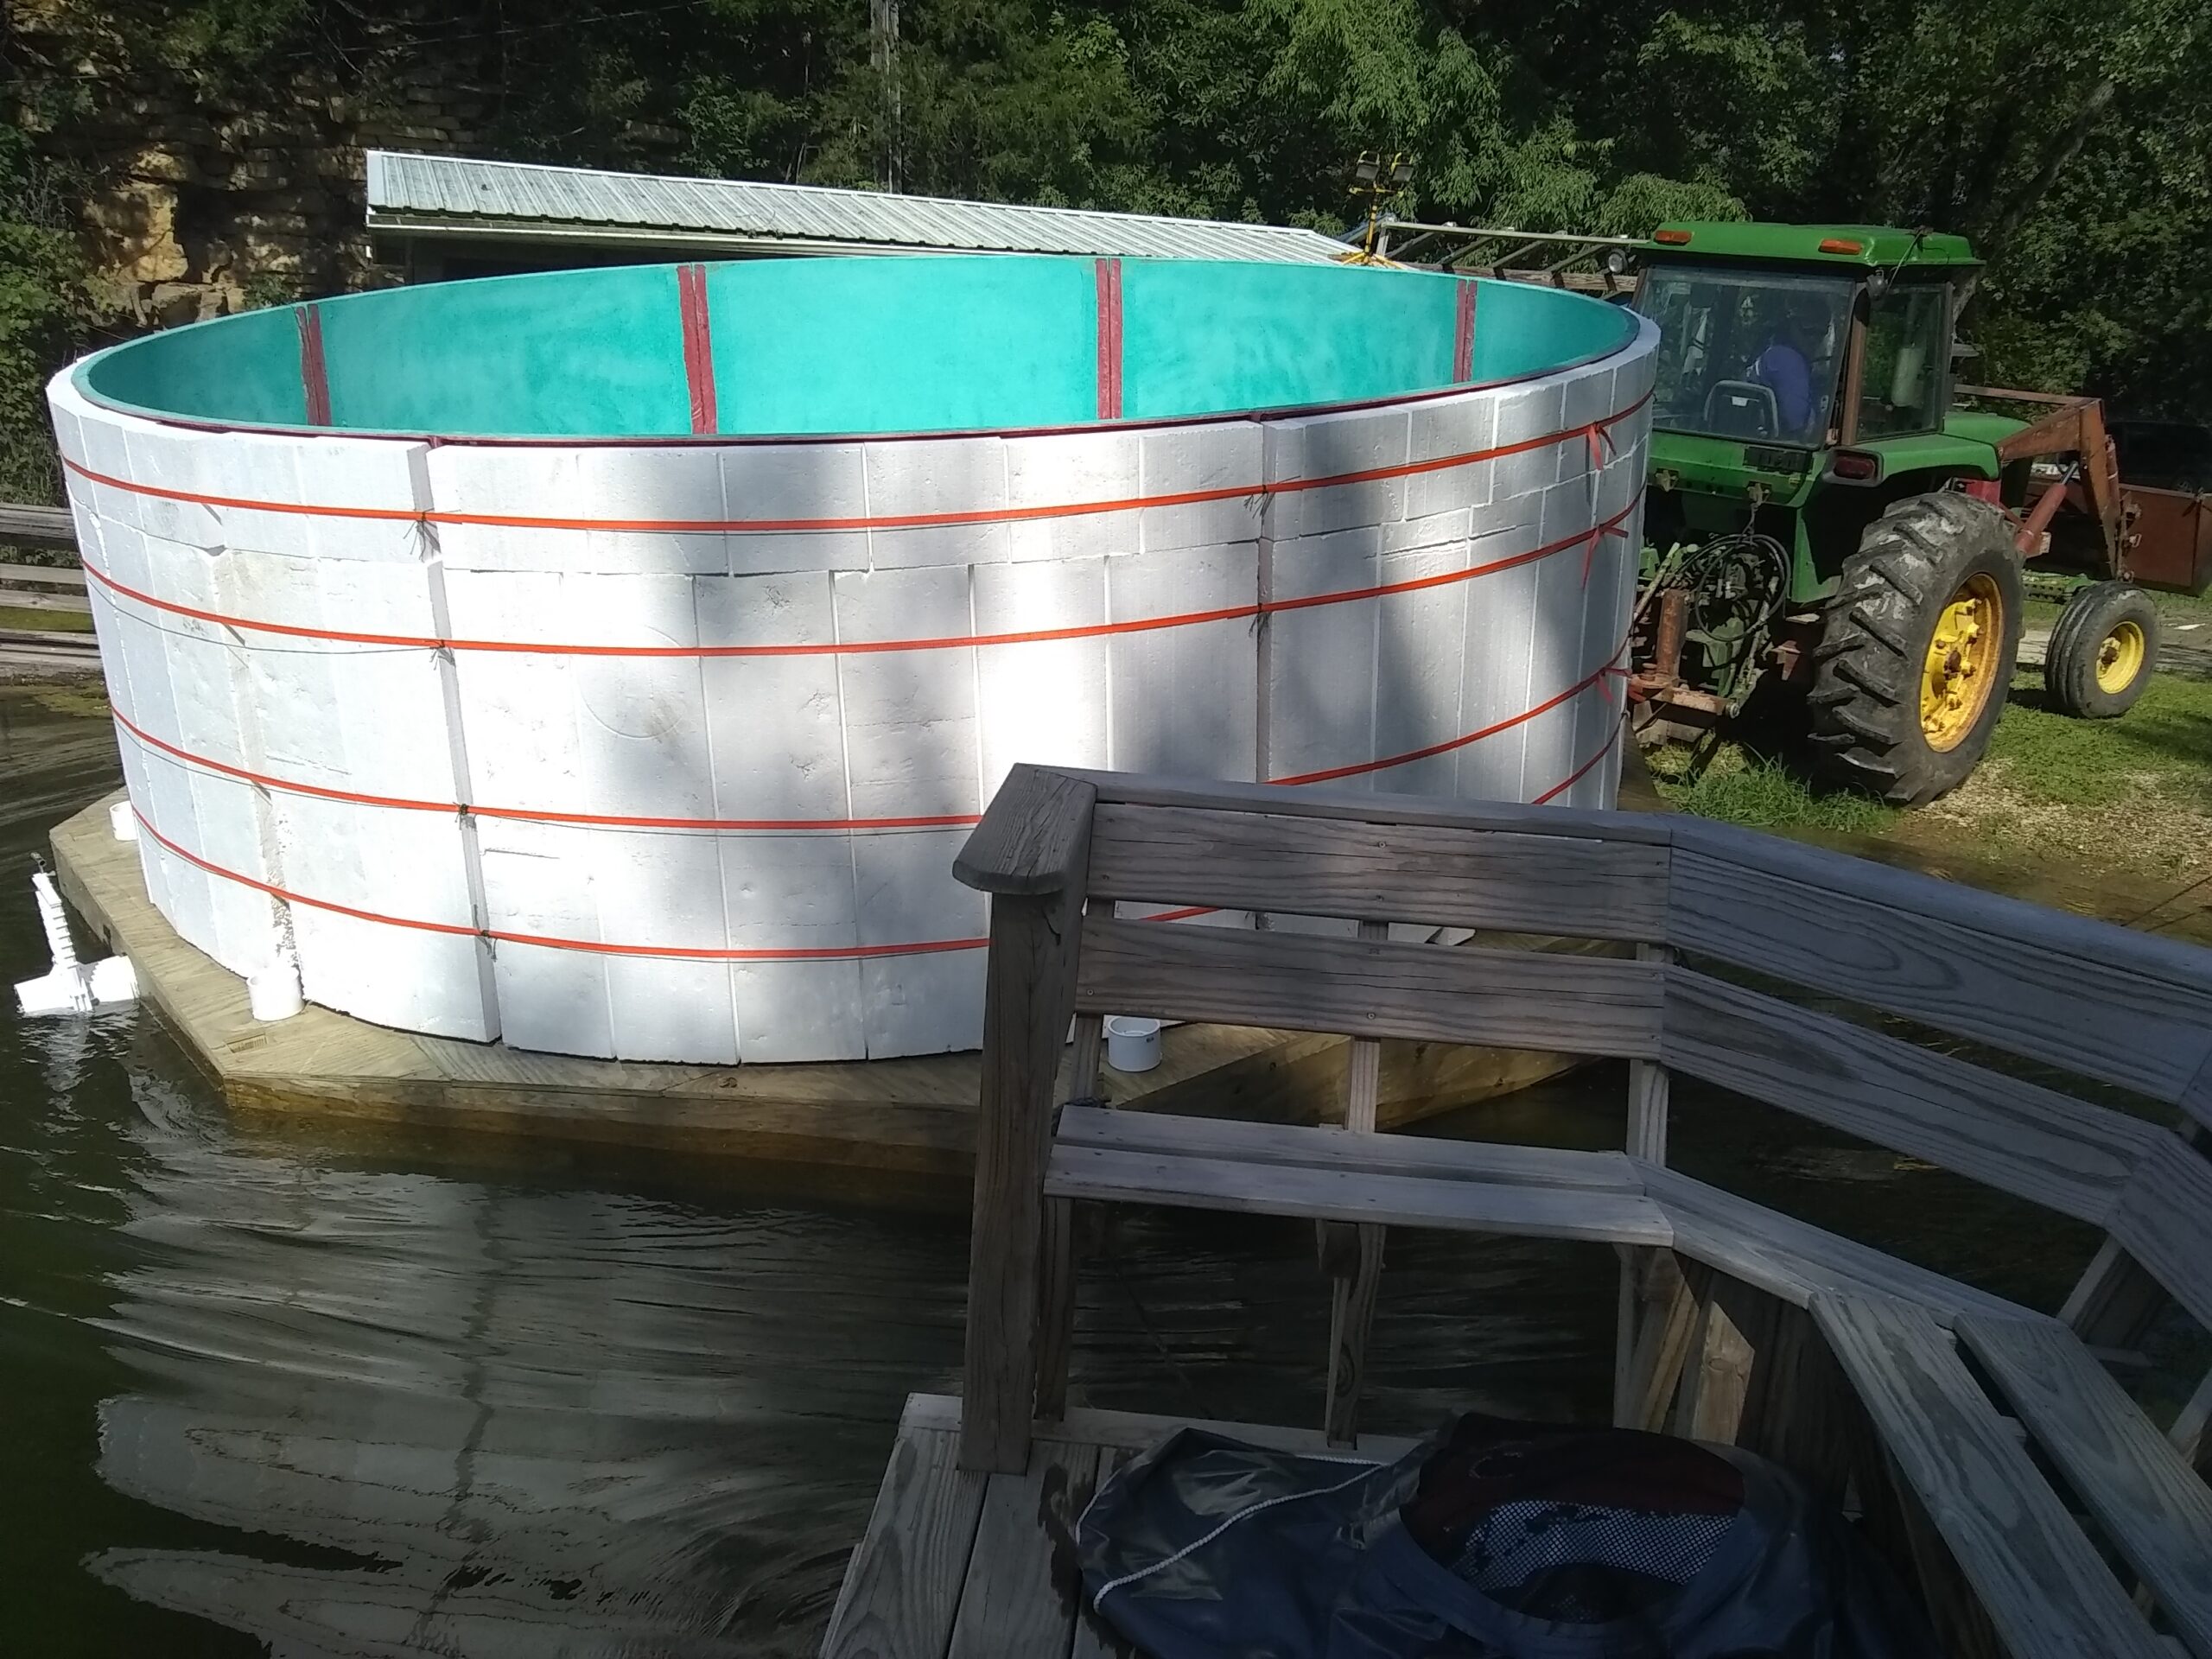
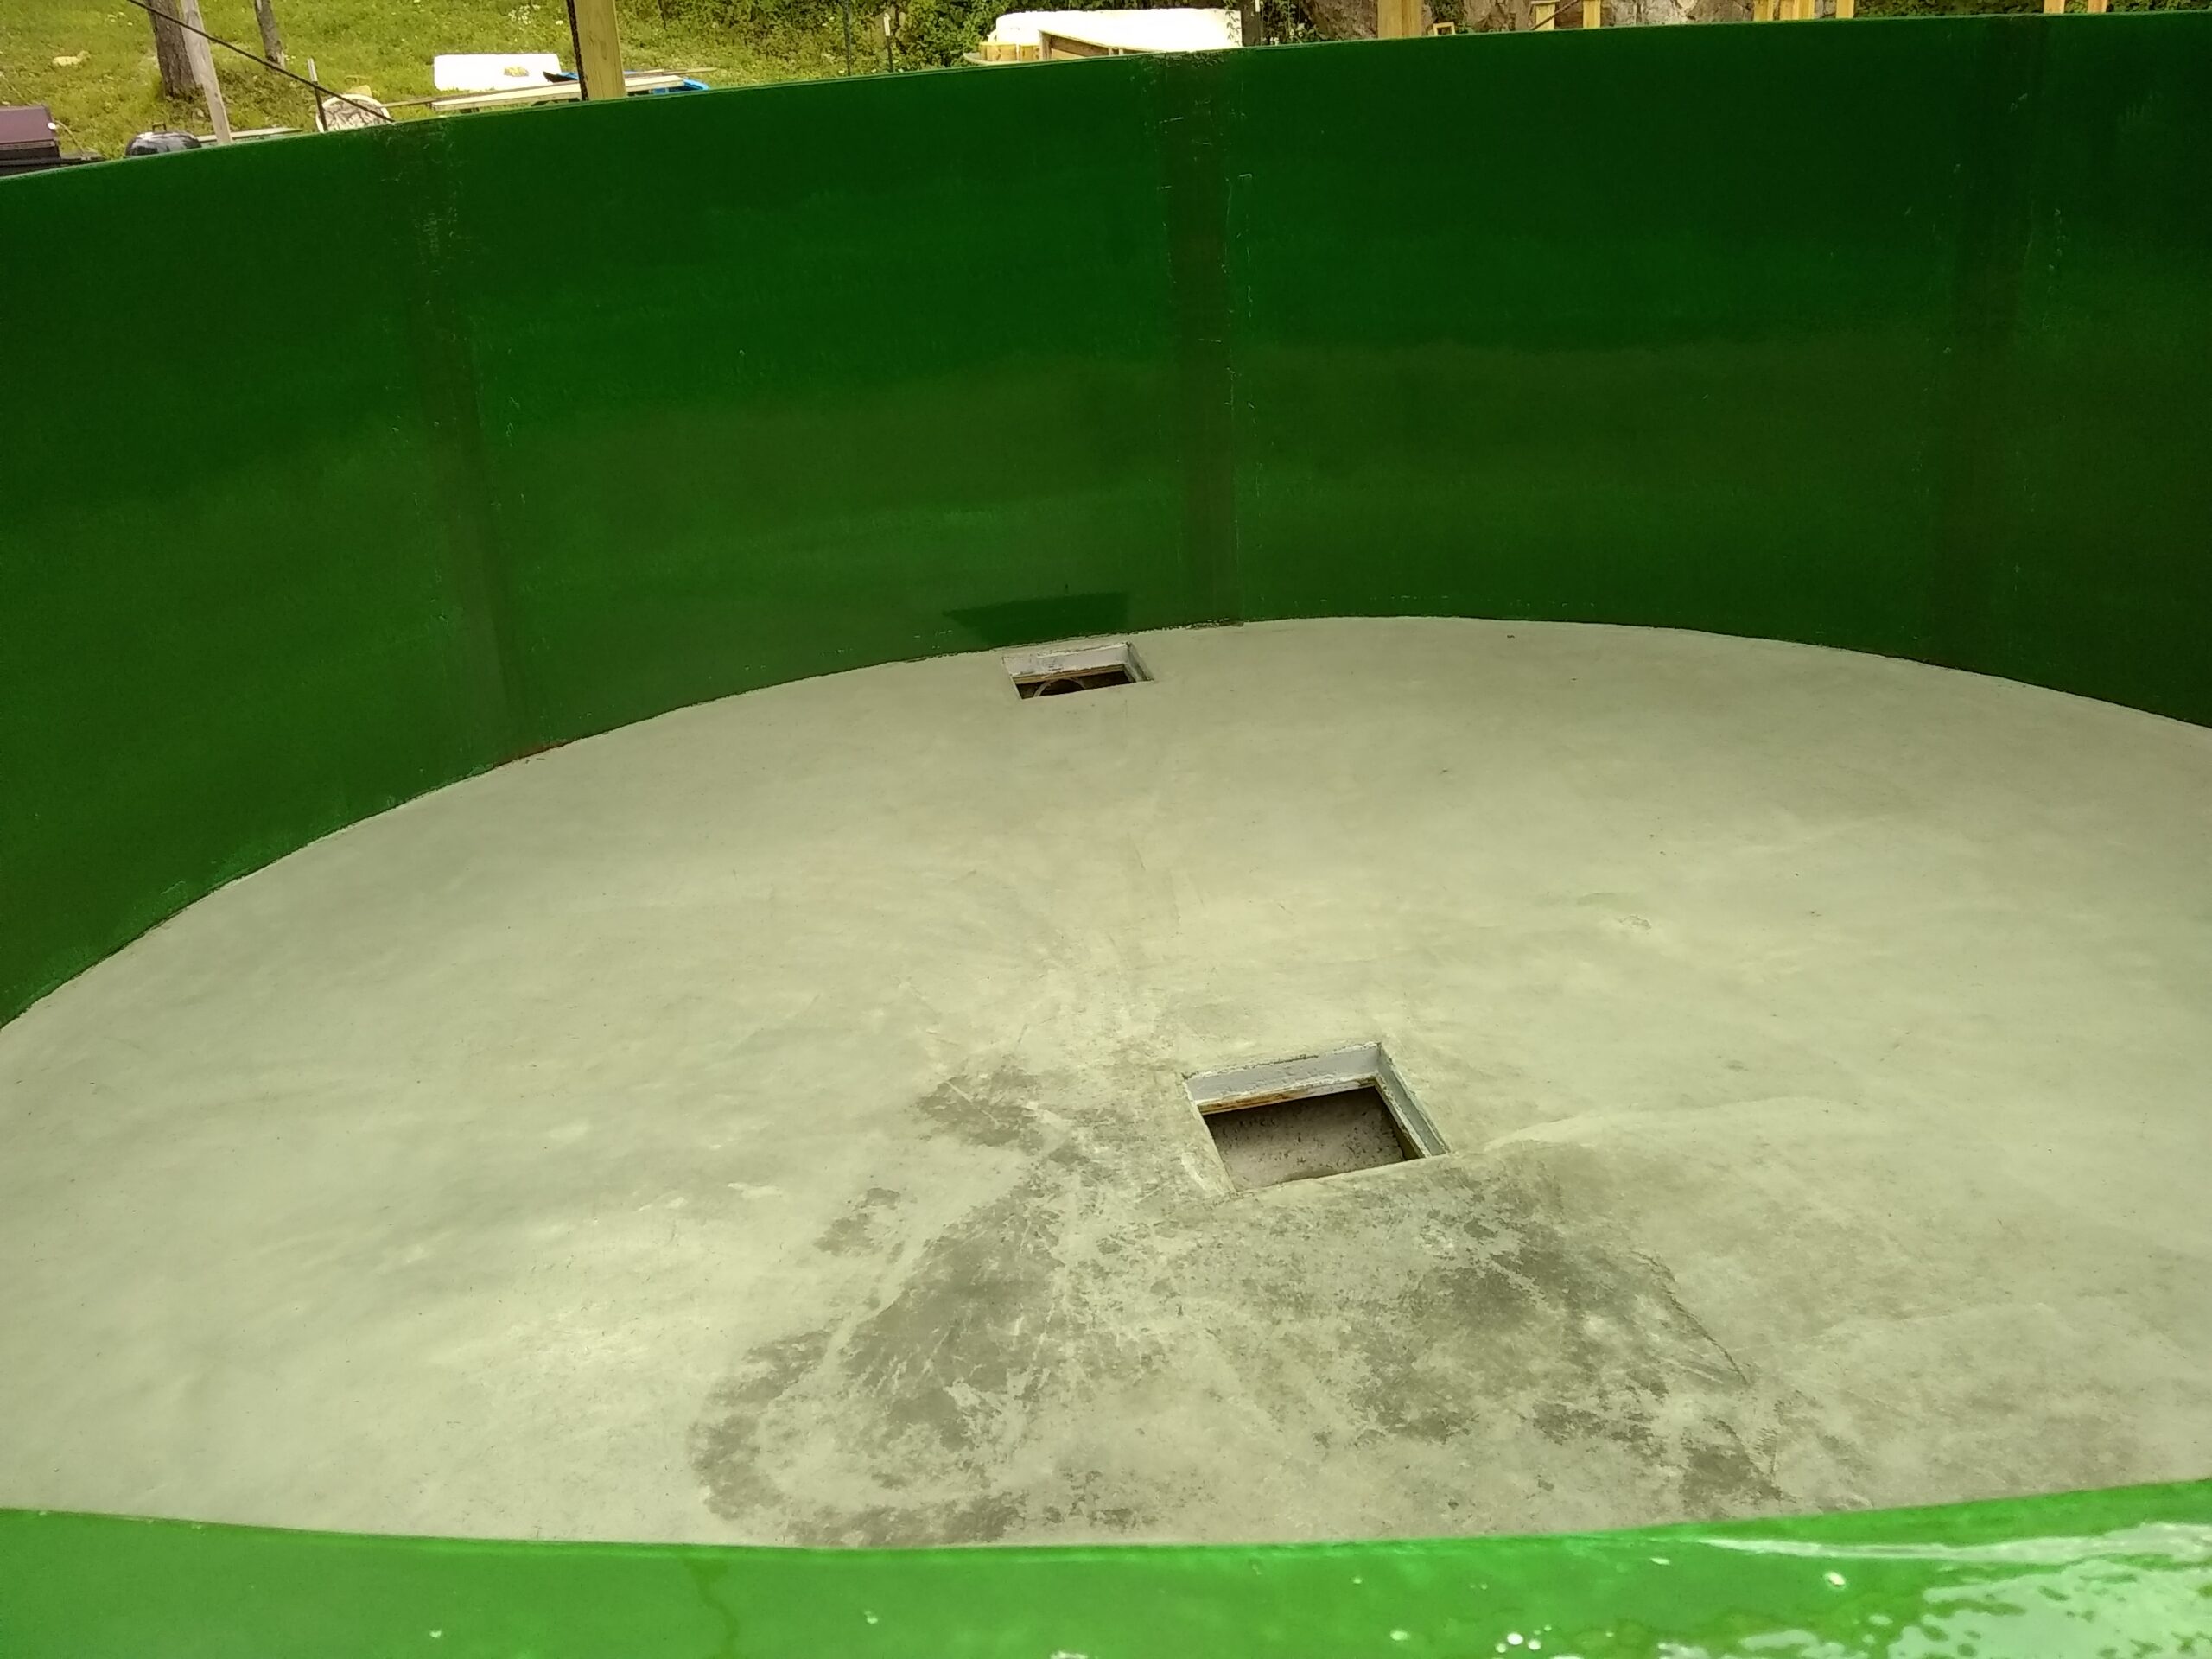
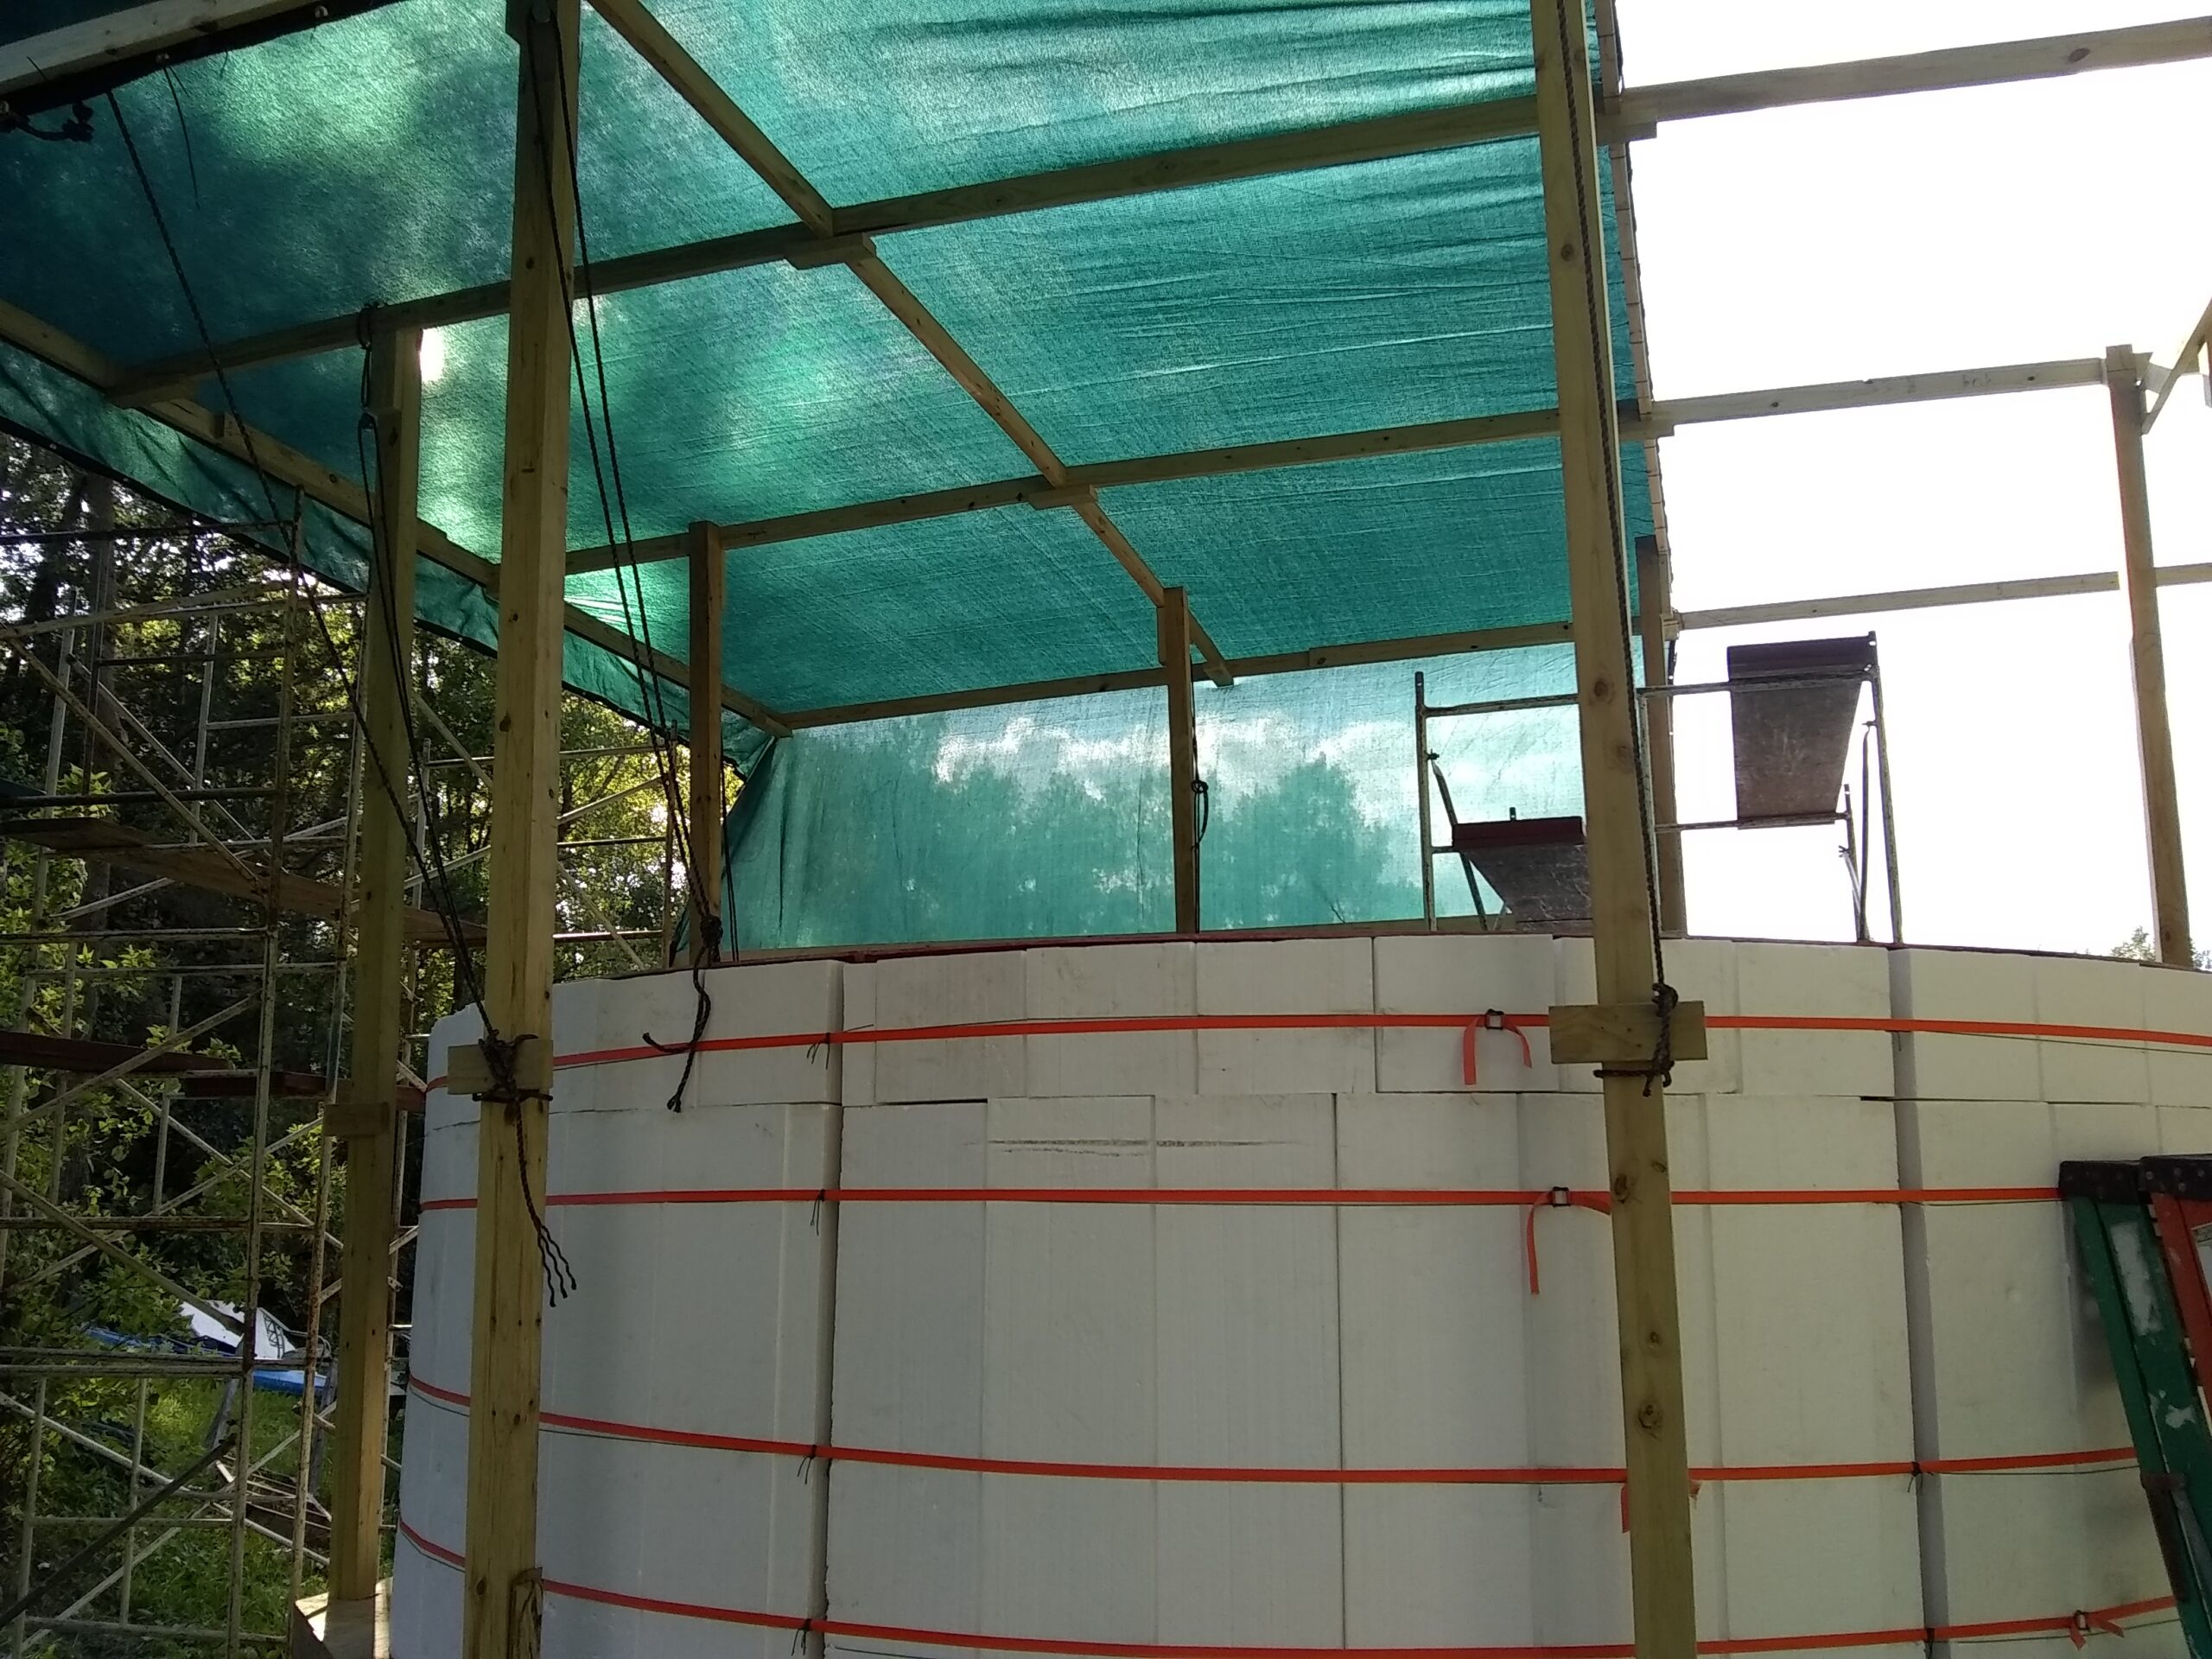
The floating tank has a 16 ft. diameter and a height of 5 ft. The tank will be purchased used, estimated value of about $3,000 being provided by my fish farm. The design will have a 6-inch drain pipe with an exterior stand pipe which sets the water level inside the tank. There will be four, 4-inch air lift pumps which will put 240 gpm into the tank, which will create circulation and aeration. This ensures a complete water exchange every 25 minutes. The water will exit through a discharge drain that will have a 3/16ths stainless steel grader to retain the fish. Water will then exit the tank into the main waterbody which will act as a bio-filter. Figure-1-Sare-Project
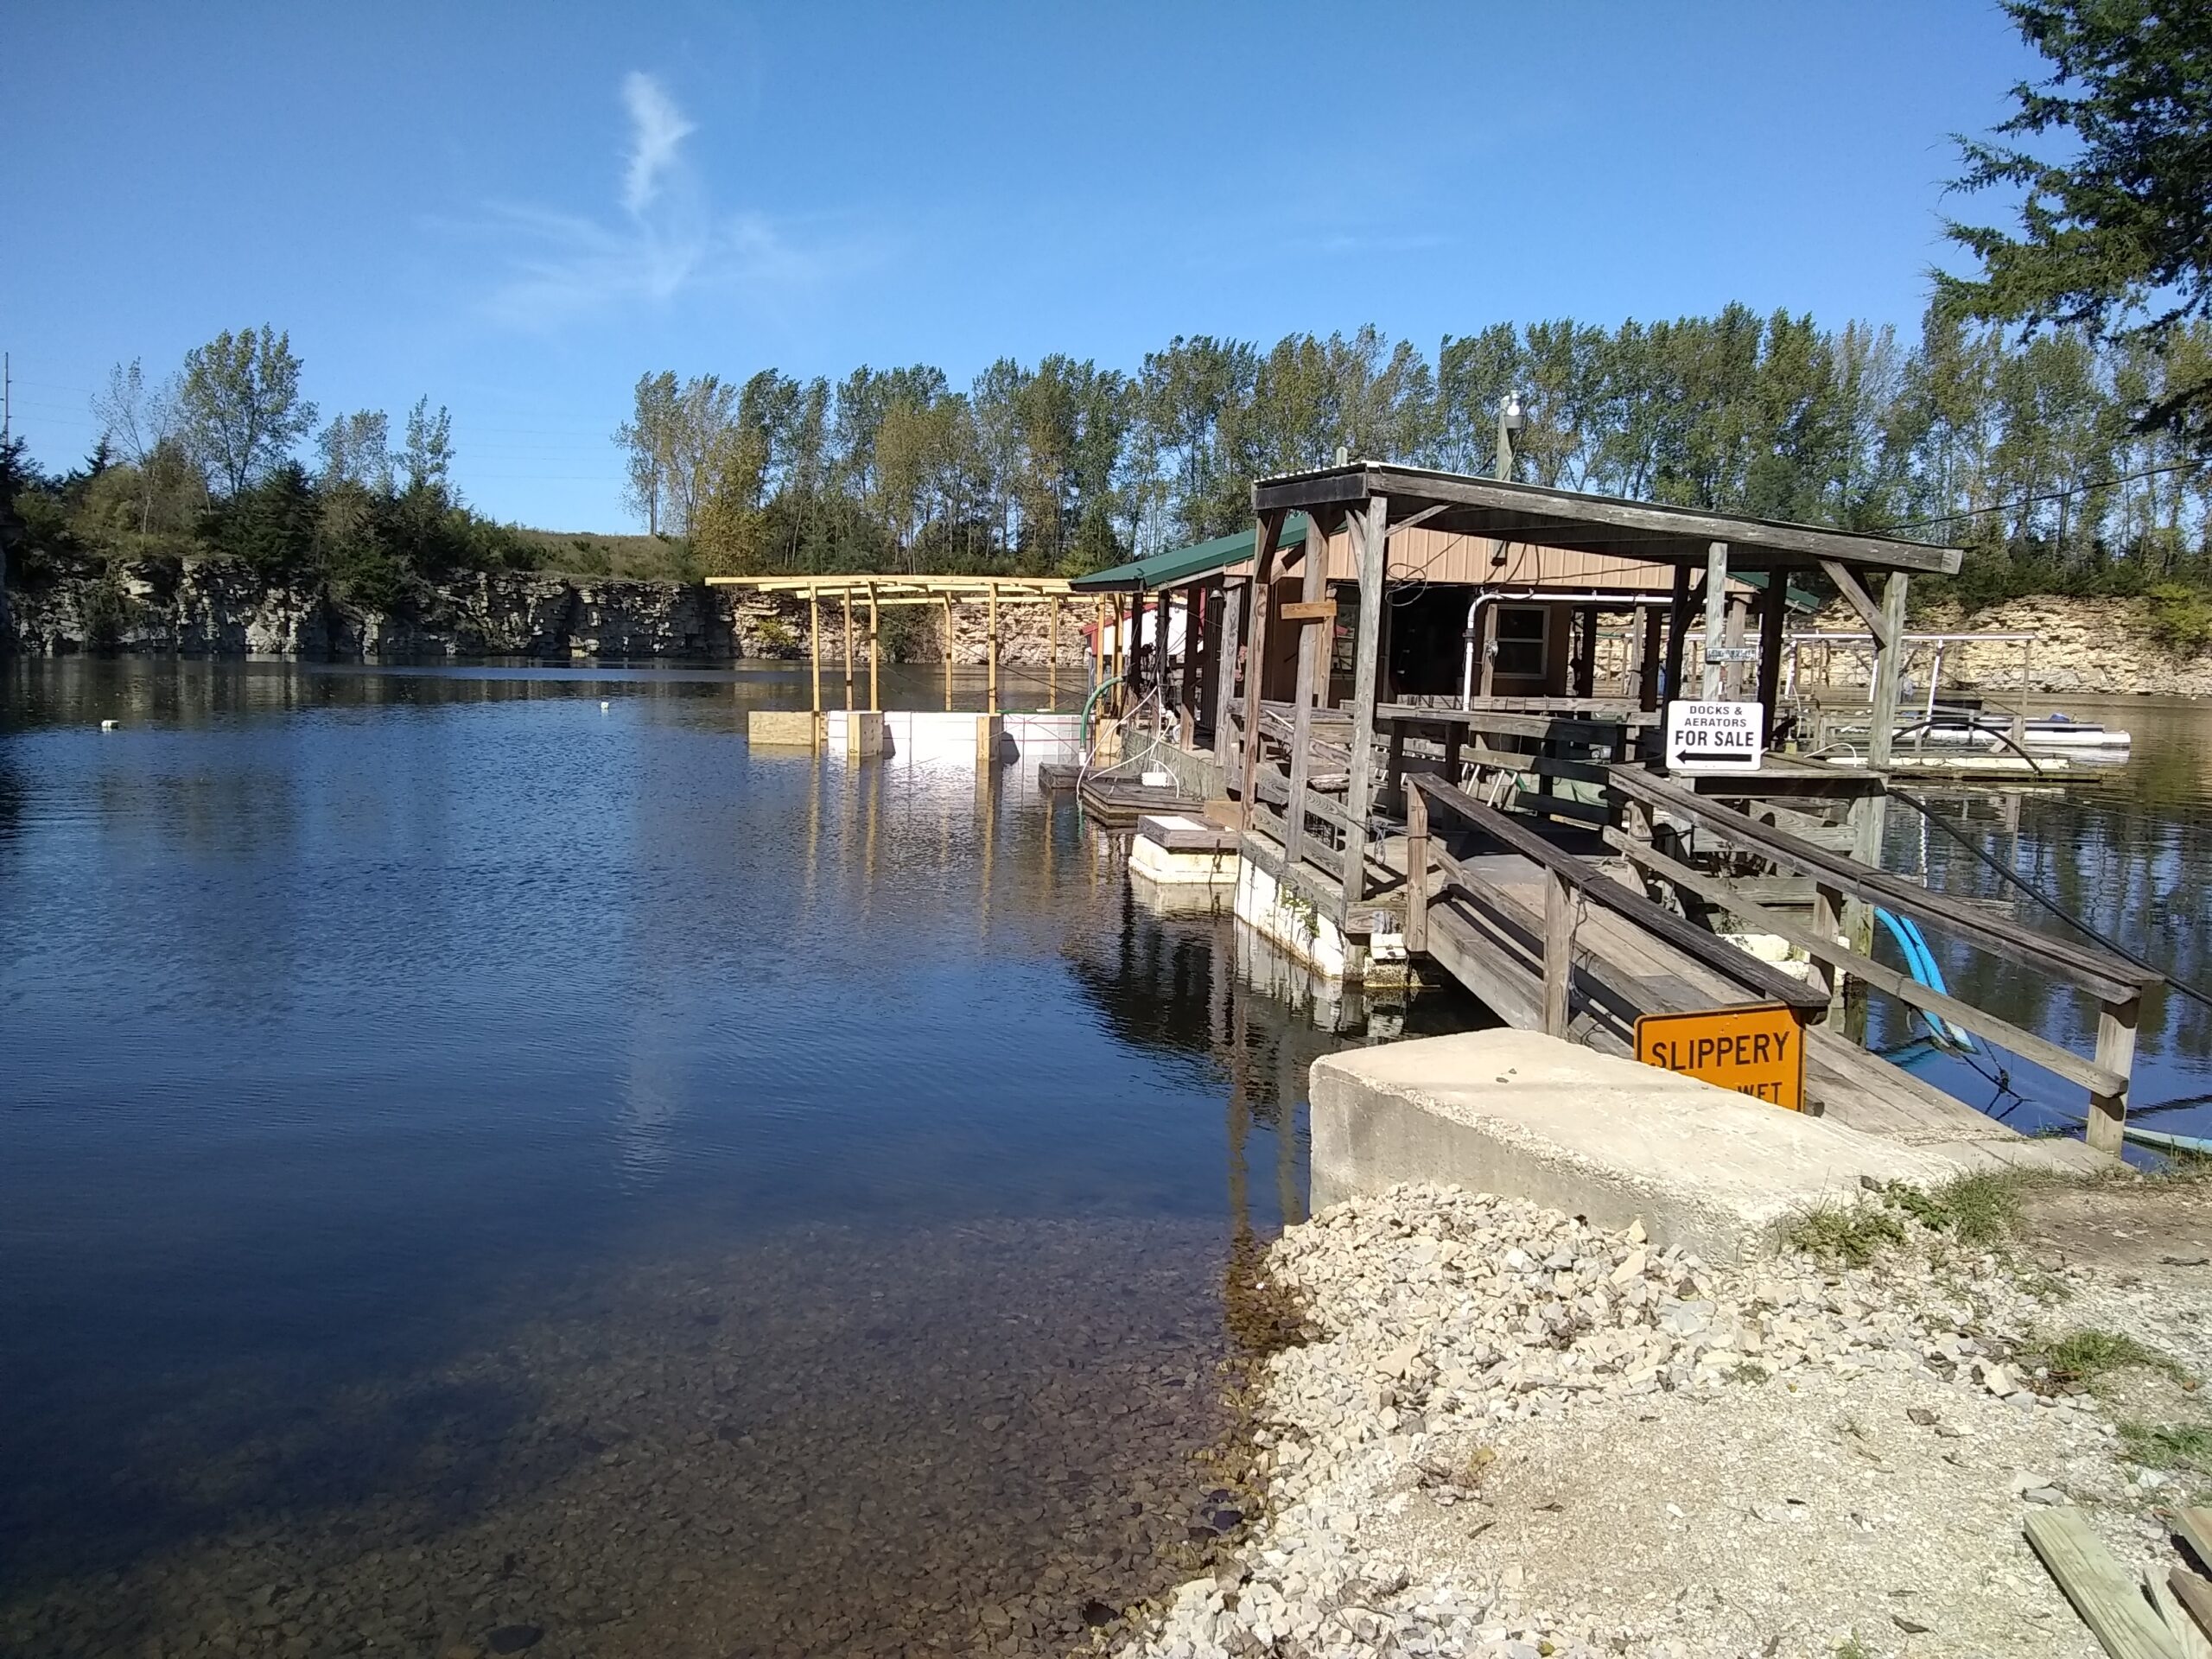
To fill the tank with fish, the tank will be floated to the fish flue, which is a 6-inch aluminum irrigation pipe above the water which slopes down into the fish tank. A fish trailer can hook up to the flue, and fish can then be emptied into the tank.
The tank can then be moved back to the work area where it will be anchored while fish are being cultured. When the fish are ready to be harvested, the tank can be easily drained as described above in order to make harvesting convenient.
The decision to use Hybrid Bluegills is based on my experiences in culturing them, their hardiness under fish culture conditions, and their marketability in the Midwest. Fish will be stocked into the tank in April 2019 and harvested in October 2019. Fish will be harvested periodically depending on growth rates and sold for stocking into private ponds. In 2020, the tank will be modified if needed to improve performance and a new set of fish will be stocked in April 2020 and harvested in October 2020.
Objective of tank
The objective is to float a 7,500 gallon tank on quarry, fill with 6,000 gallons of water, leaving one foot of freeboard, and then raise fish for stocking. Use air-lift pumps to exchange water and aerate tank. When ready to harvest tank, merely open valve and tank will rise out of the water and discharge all 6000 gallons without any pumps or any other mechanical device.
These things are true
You must know the weight of your tank, number of gallons to be used, weight of floor and additional rigging, floating capacity of your flotation per one square foot by one inch.
Small prototypes
Do all experimentation and calculations with a small prototype first. A bottom of a five gallon bucket works well. It is one foot diameter (it is one sixteenth of a sixteen foot diameter tank). All calculations can be made from this premise.


Tank leaks – very important
The statement, “ it leaks so bad it won’t sink”, is a nightmare. Therefore, special care should be taken at each step, as if you were trying to keep it from leaking if set on the ground. My major difficulties were underestimating the necessity of the tank not leaking.
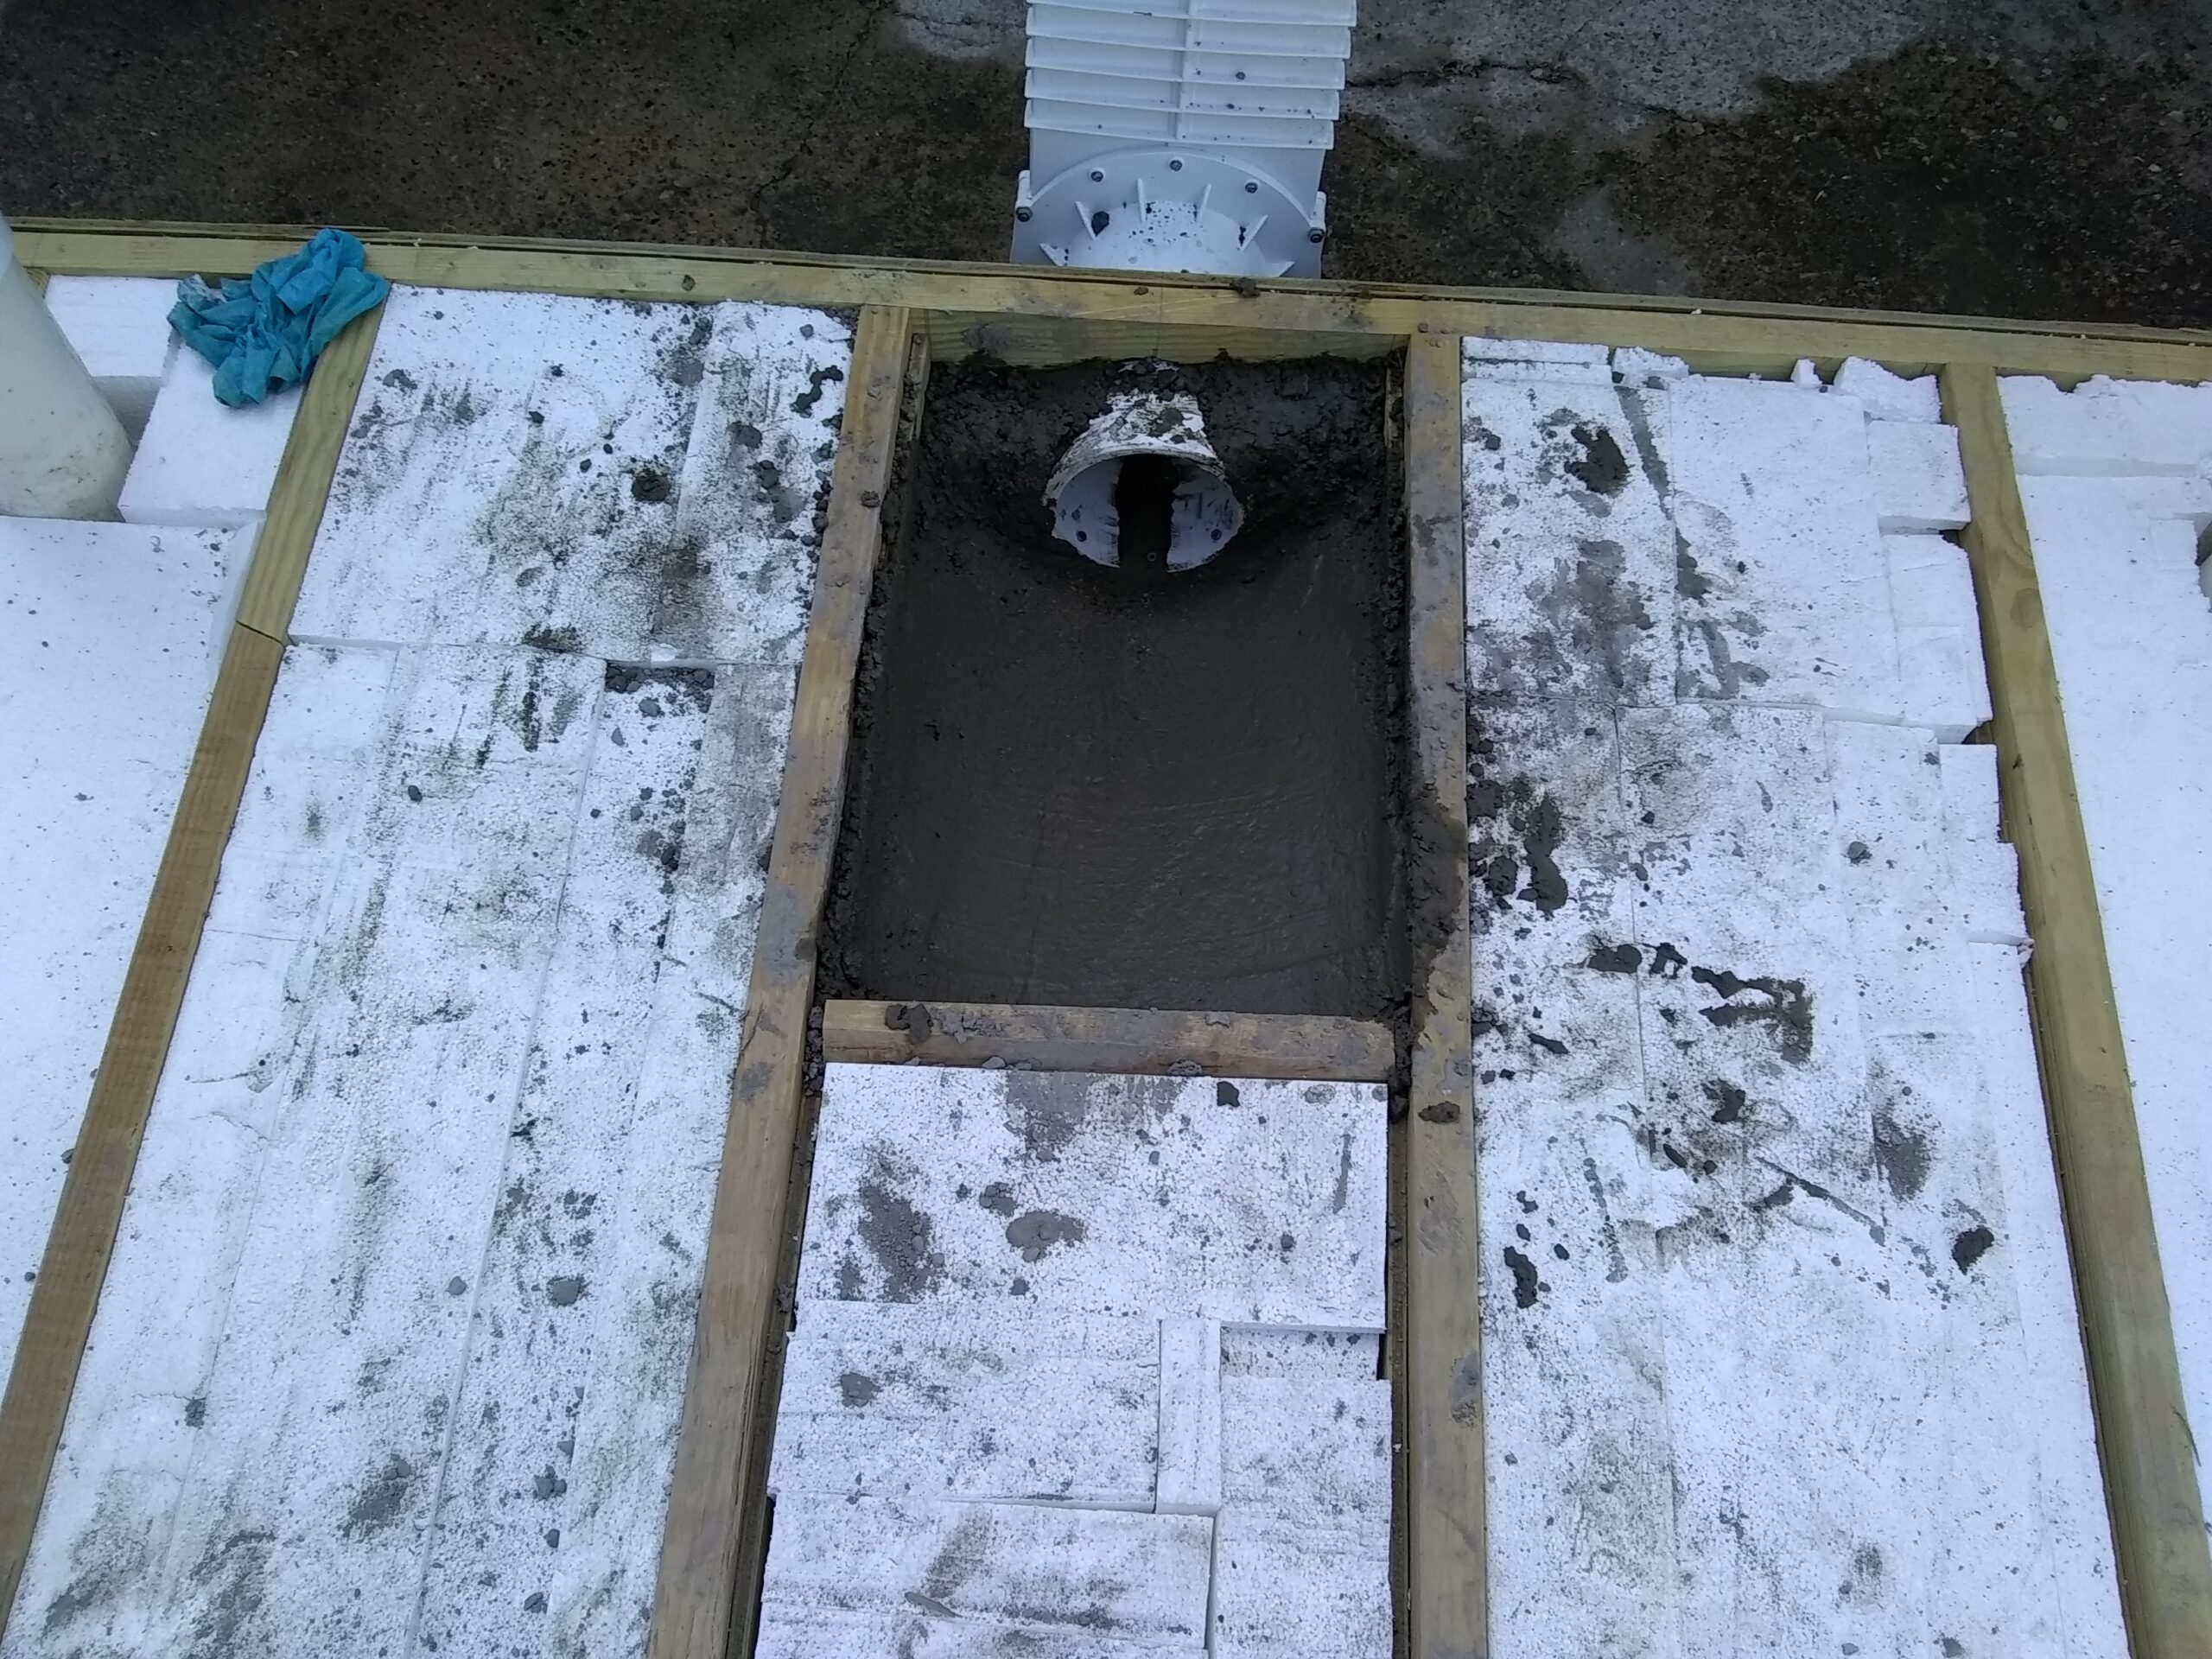
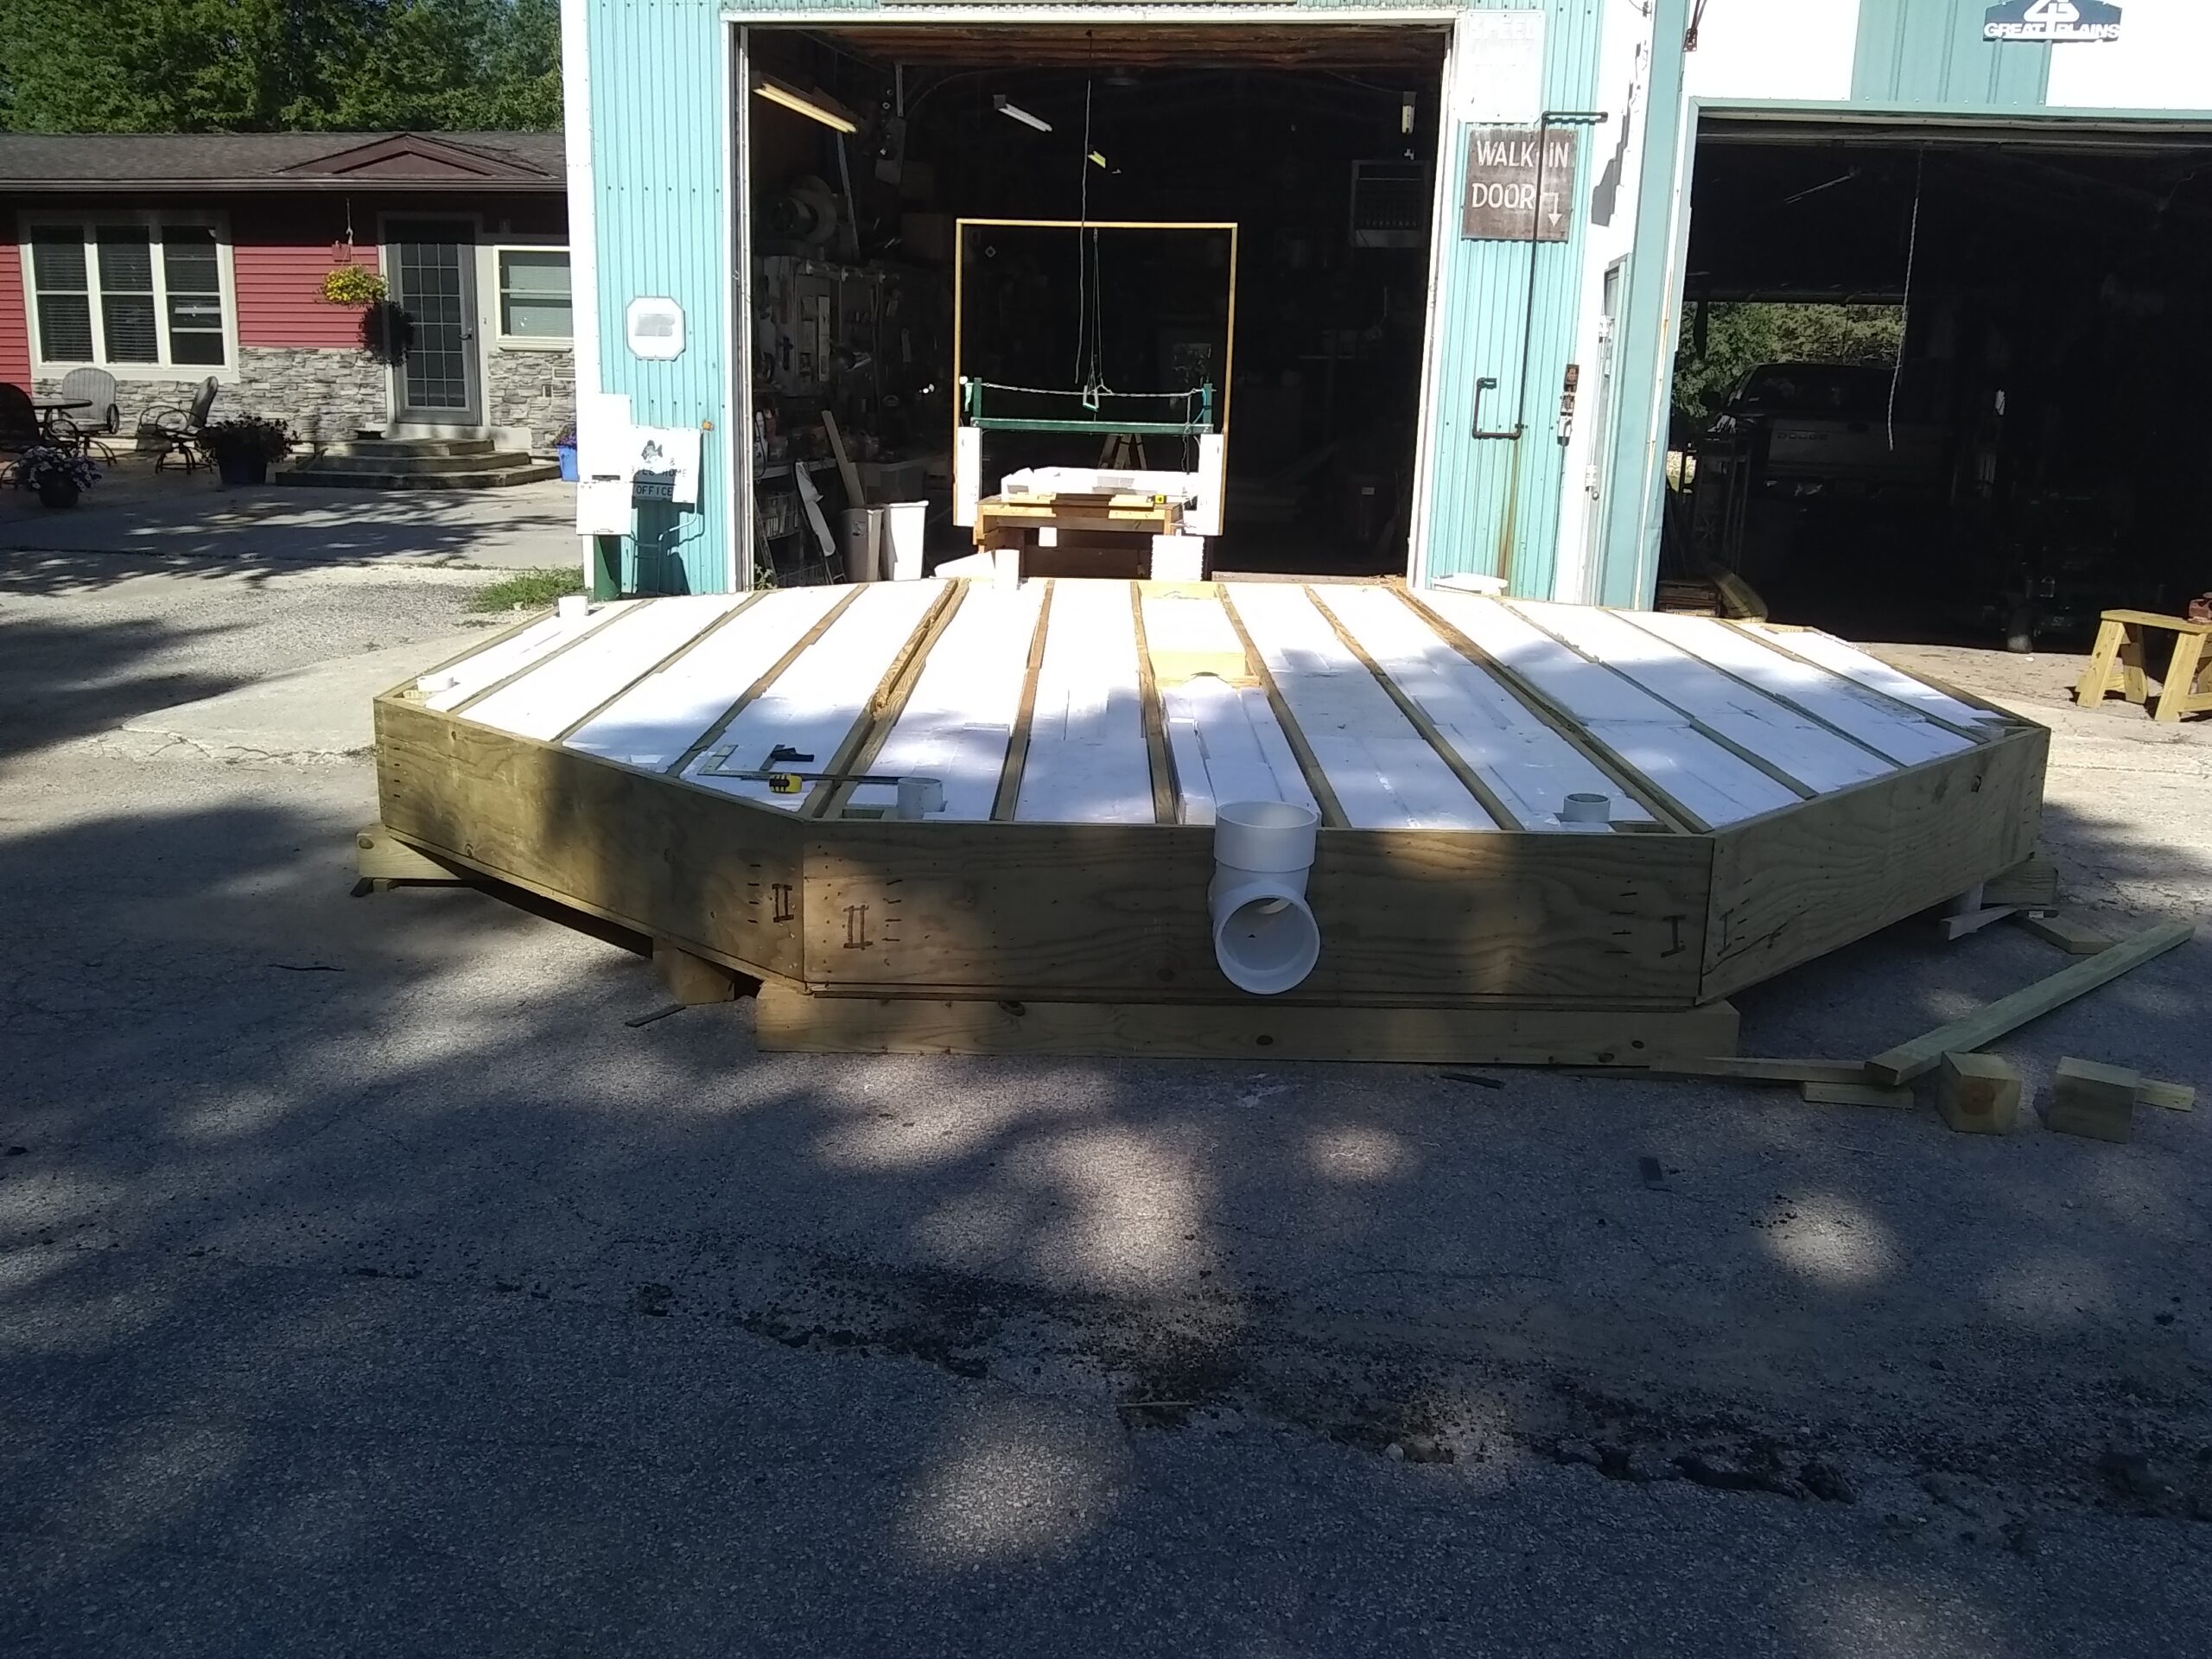
Cement collar should be at least 1 ft. on all sides and bottom of drain pipe. Silicone on top of cement before installing floor.

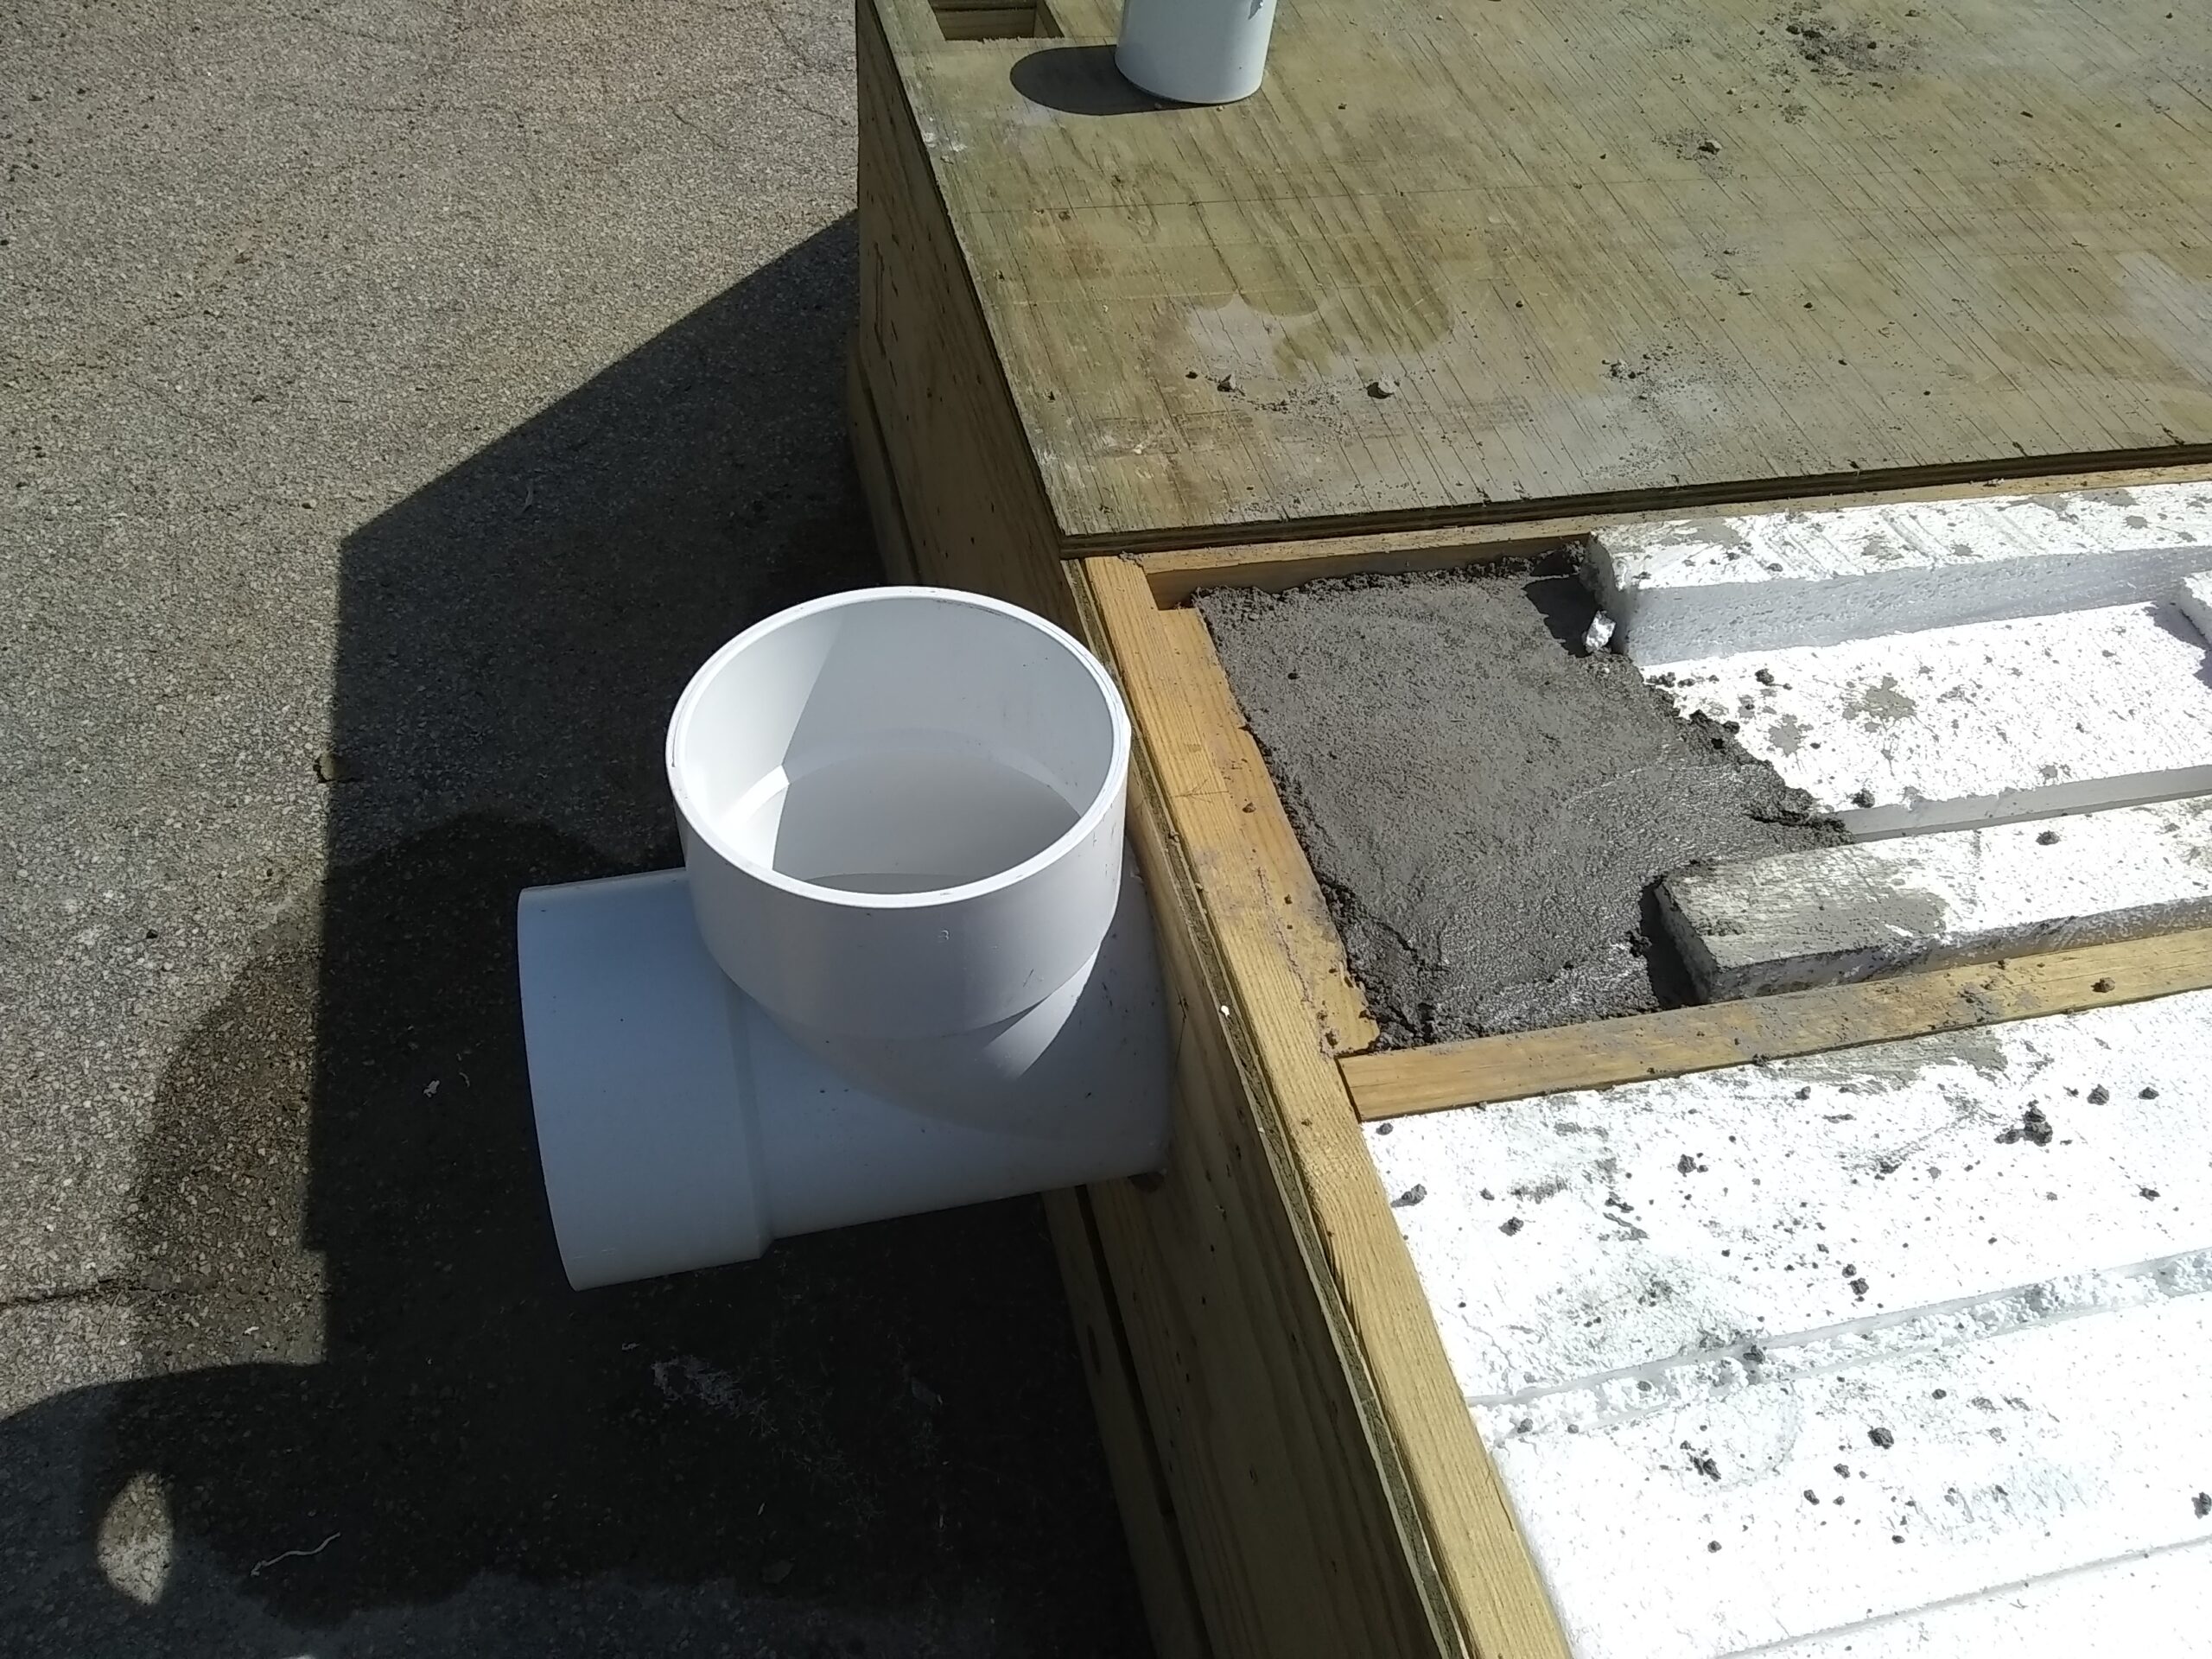
Floor is ¾ inch treated plywood and all framing is treated lumber.


A keel was considered for ballast, but with the use of prototypes it was determined it would take 12 foot deep and 5,062.5 lbs. of cement. This would interfere with the movability of the tank, because without it, the tank can be floated in 2 ft. of water when empty and 6 ft. when full.

In order to calculate the amount of flotation needed, you must first know how much weight a piece 1’ x 1’ x 1” will float, how much your tank weighs, calculate the weight of your floor and rigging, and know how much ballast you’re going to put in the tank. That will give you the amount needed for flotation, but nothing for discharging the water and refloating the tank that must be added into the amount needed. I believe if you were willing to pump the water out, the system could be streamlined somewhat.
The tank can be completely constructed prior to floating it in your water, but cement floor should be only installed after floating tank.
Cement floor is 1.5 yards, for ballast ( 6,075 lbs. ) It has a ½” slope toward the center drain.


The original plan was to fiberglass the seams on the tank and the seams on the floor. However, cementing the floor and epoxying the seams was less expensive and worked better.
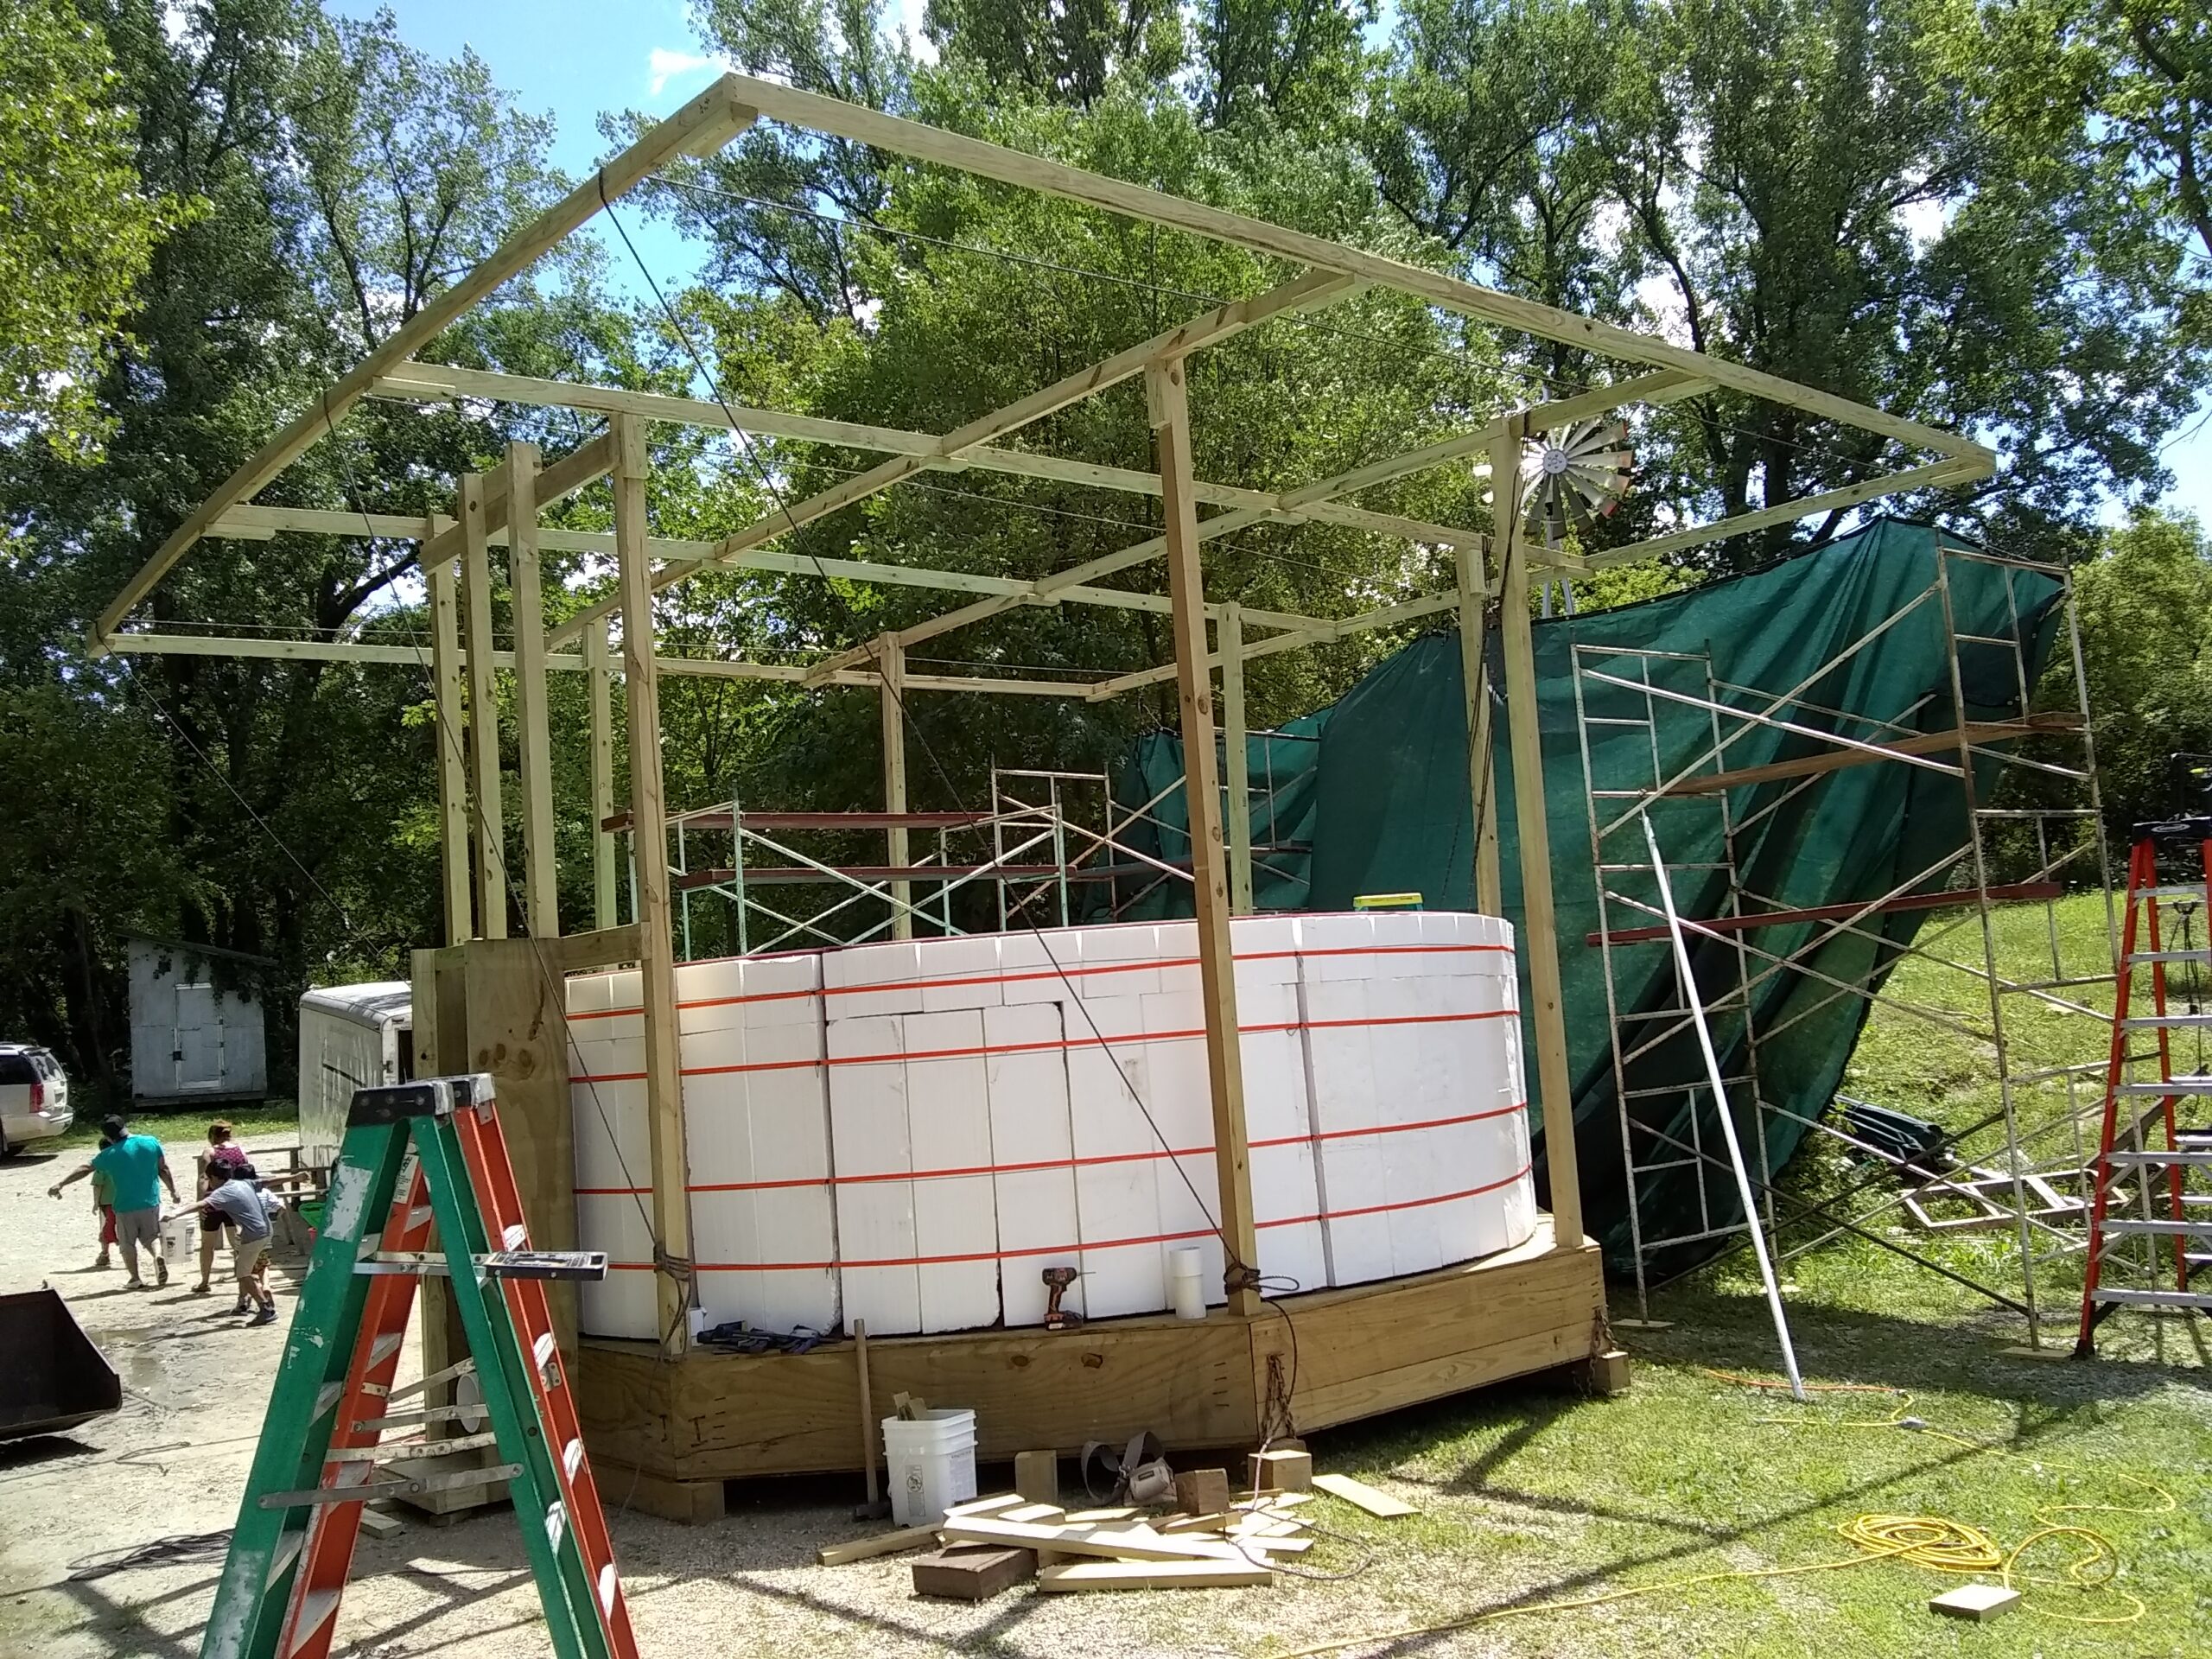
It was originally planned to have the framework, and sunscreen framing separate from the tank. However, having it attached made it easier to construct.
Once in the water, we filled the tank and proceeded to balance.
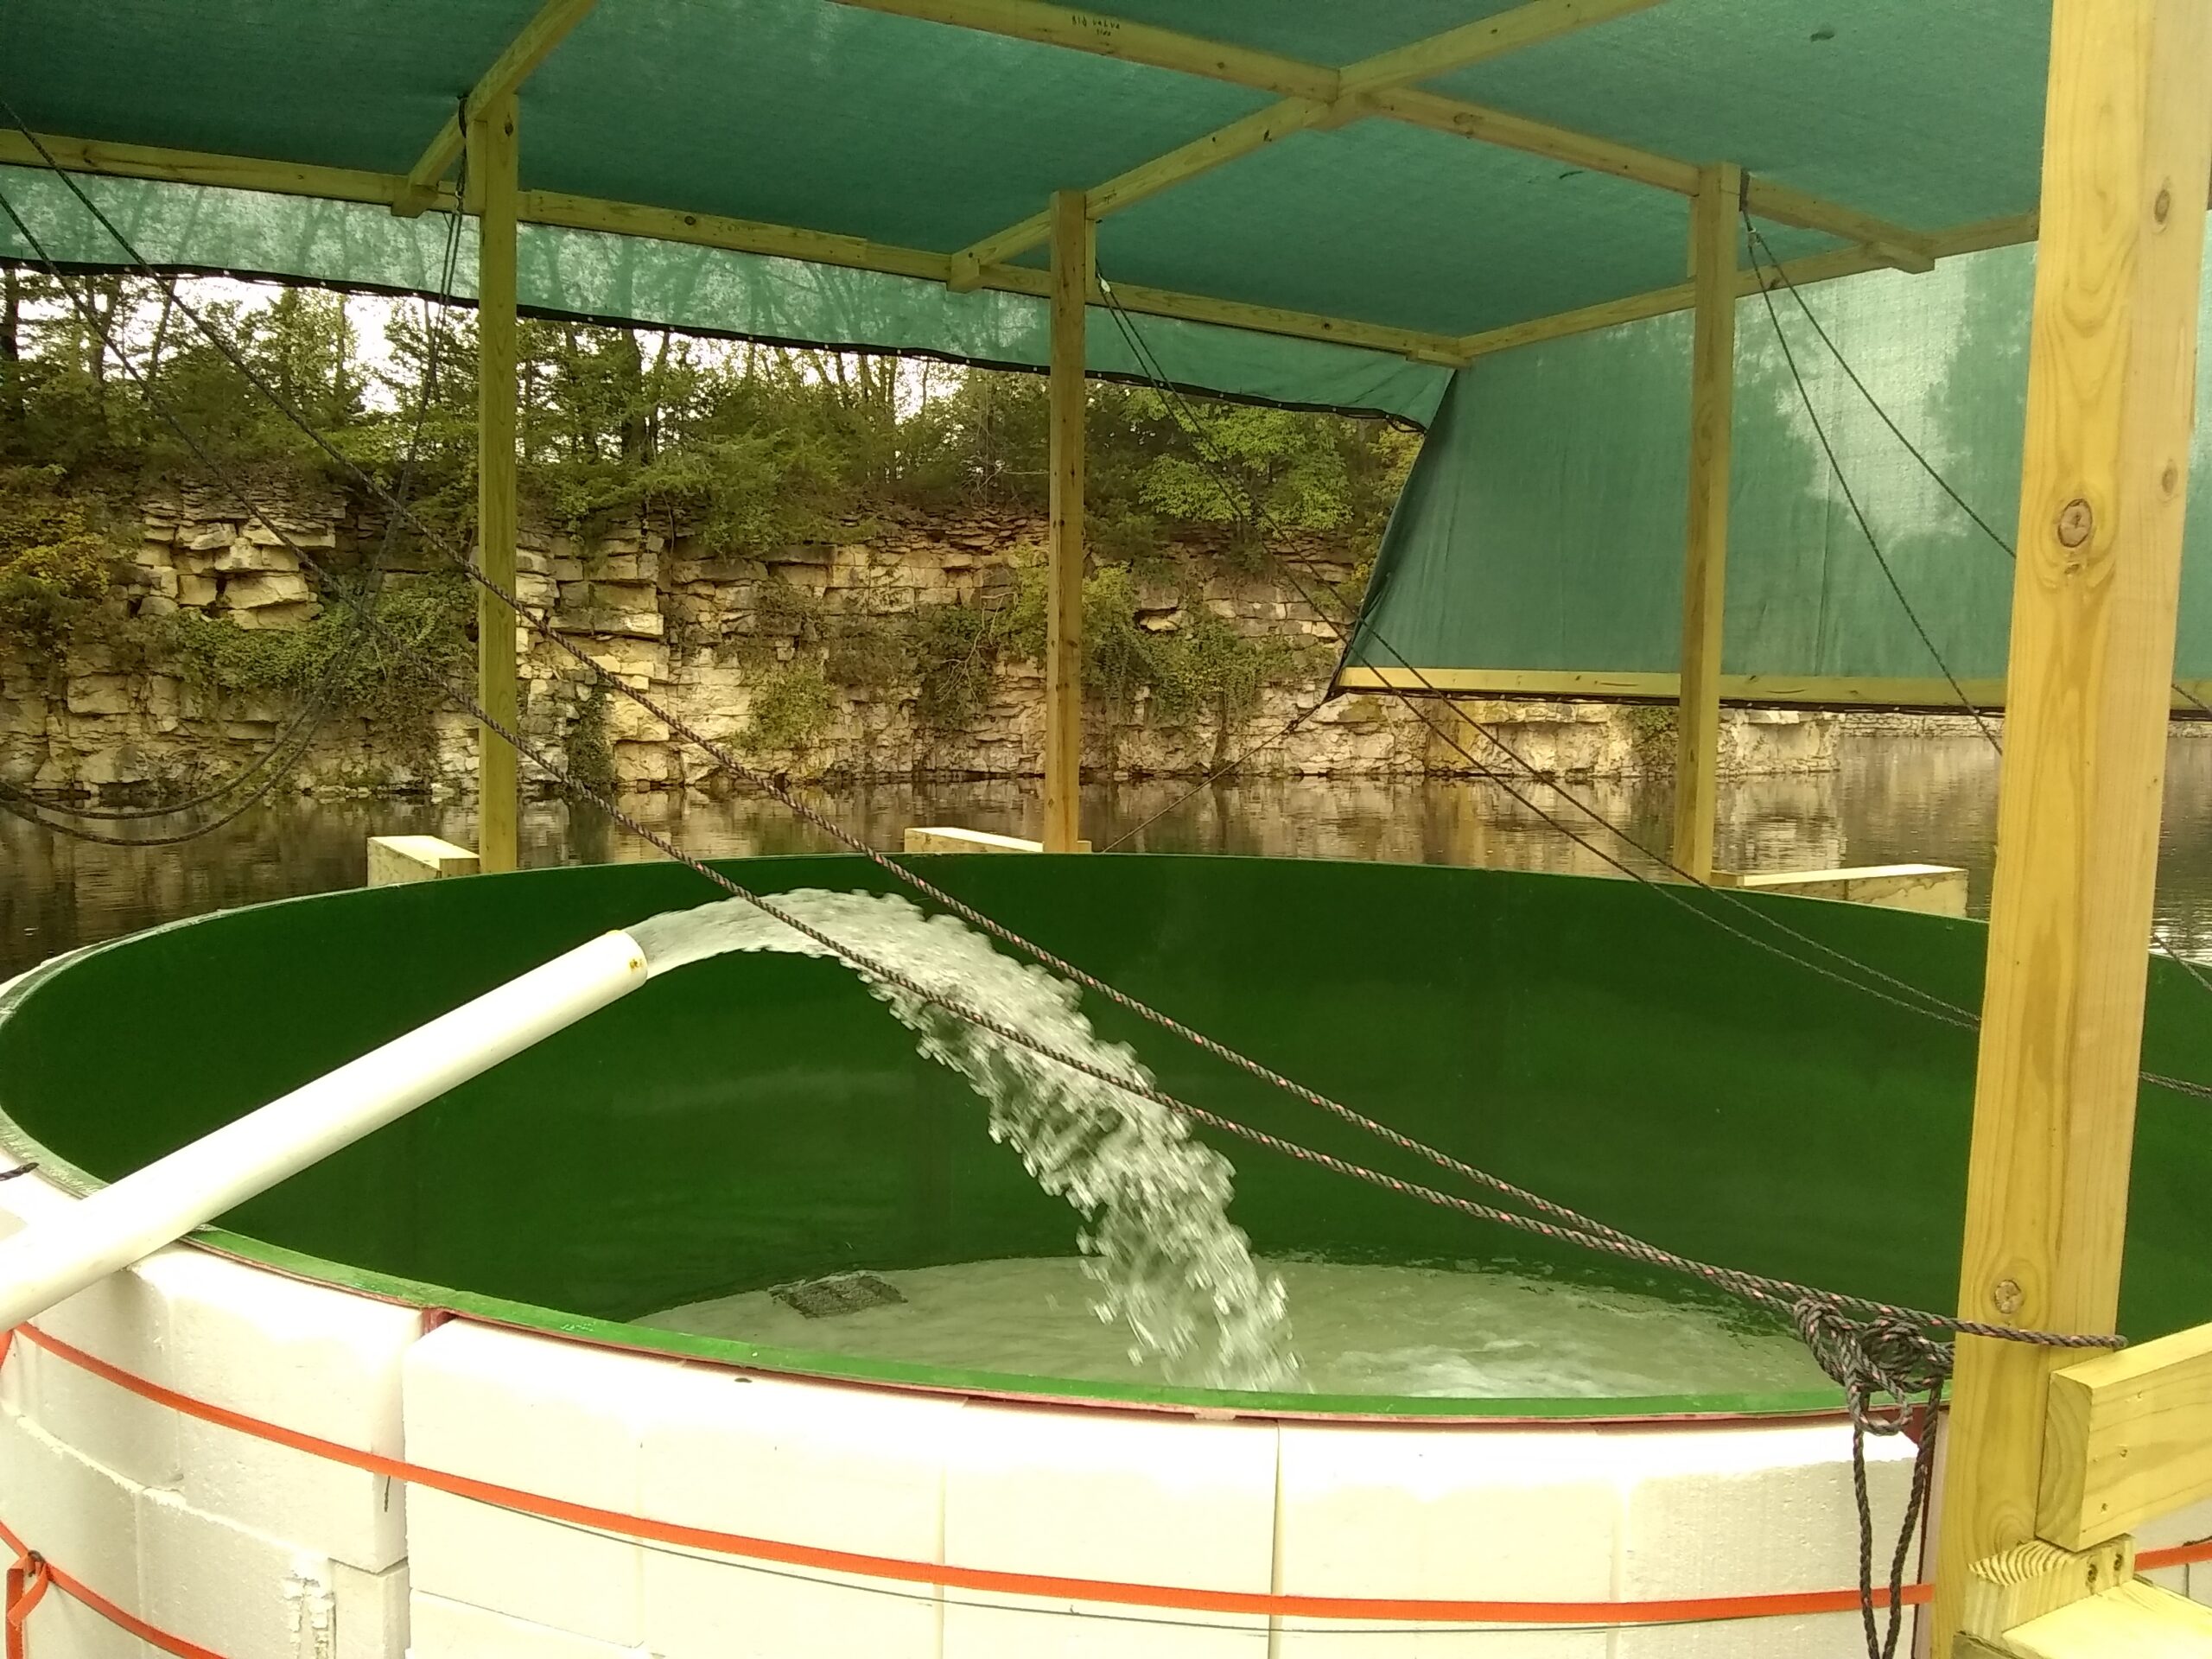
The water on the inside of the tank is 14 ¾ inches higher than the water in the pond. Without this difference, the tank would never rise out of the water on its own.
It was necessary for stabilization to install outriggers and a walkway with additional flotation at the top to compensate when workmen are on the walkway.
There are a few minor adjustments needed which will be done in the spring before tank is refloated. The tank is on dry dock for the winter.
2020 UPDATE, January 19, 2021
In the year 2019, when I received my grant, it took longer to finalize the design and construction of my floating tank than I had anticipated. It also took more of an investment than I had planned. However, at the end of the year, I had mostly all of the construction completed. I had everything put away for the winter, when I received notification that the lease which I had held on the quarry for 26 years would not be renewed. This, of course, was devastating news. We immediately started moving all equipment and fish back to my original ponds on my property. I had placed a cement floor on the bottom of the tank for ballast which increased the weight of the tank dramatically. This made my equipment incapable of moving the tank. I was lucky enough that the company that was going to crush rock helped me move it to my ponds.
In this move and re-establishing my business, I was not able to continue my research on this project. However, I was granted a one-year extension. I have not completed setting up my fish hatchery business, but I hope to be able to complete my research project in 2021.
What I have found so far in my research and development
- Cement on floor for ballast is not needed.
- I tried a keel on the bottom of prototypes and found it would need to be 12’ deep and be several thousand pounds, which would be very difficult to do and severely handicap the usability.
- I found that outriggers were the answer to making the tank set level in the water.
- I can adjust the depth that the tank sinks into the water by adjusting the amount of flotation. The water on the inside of the tank is higher than the water on the outside of the tank.
- When the tank is sunk in the water, while raising fish, instead of having to vacuum the floor, I can flush with a 3” water pump by increasing the amount of water that goes down the overflow just like a whirlpool.
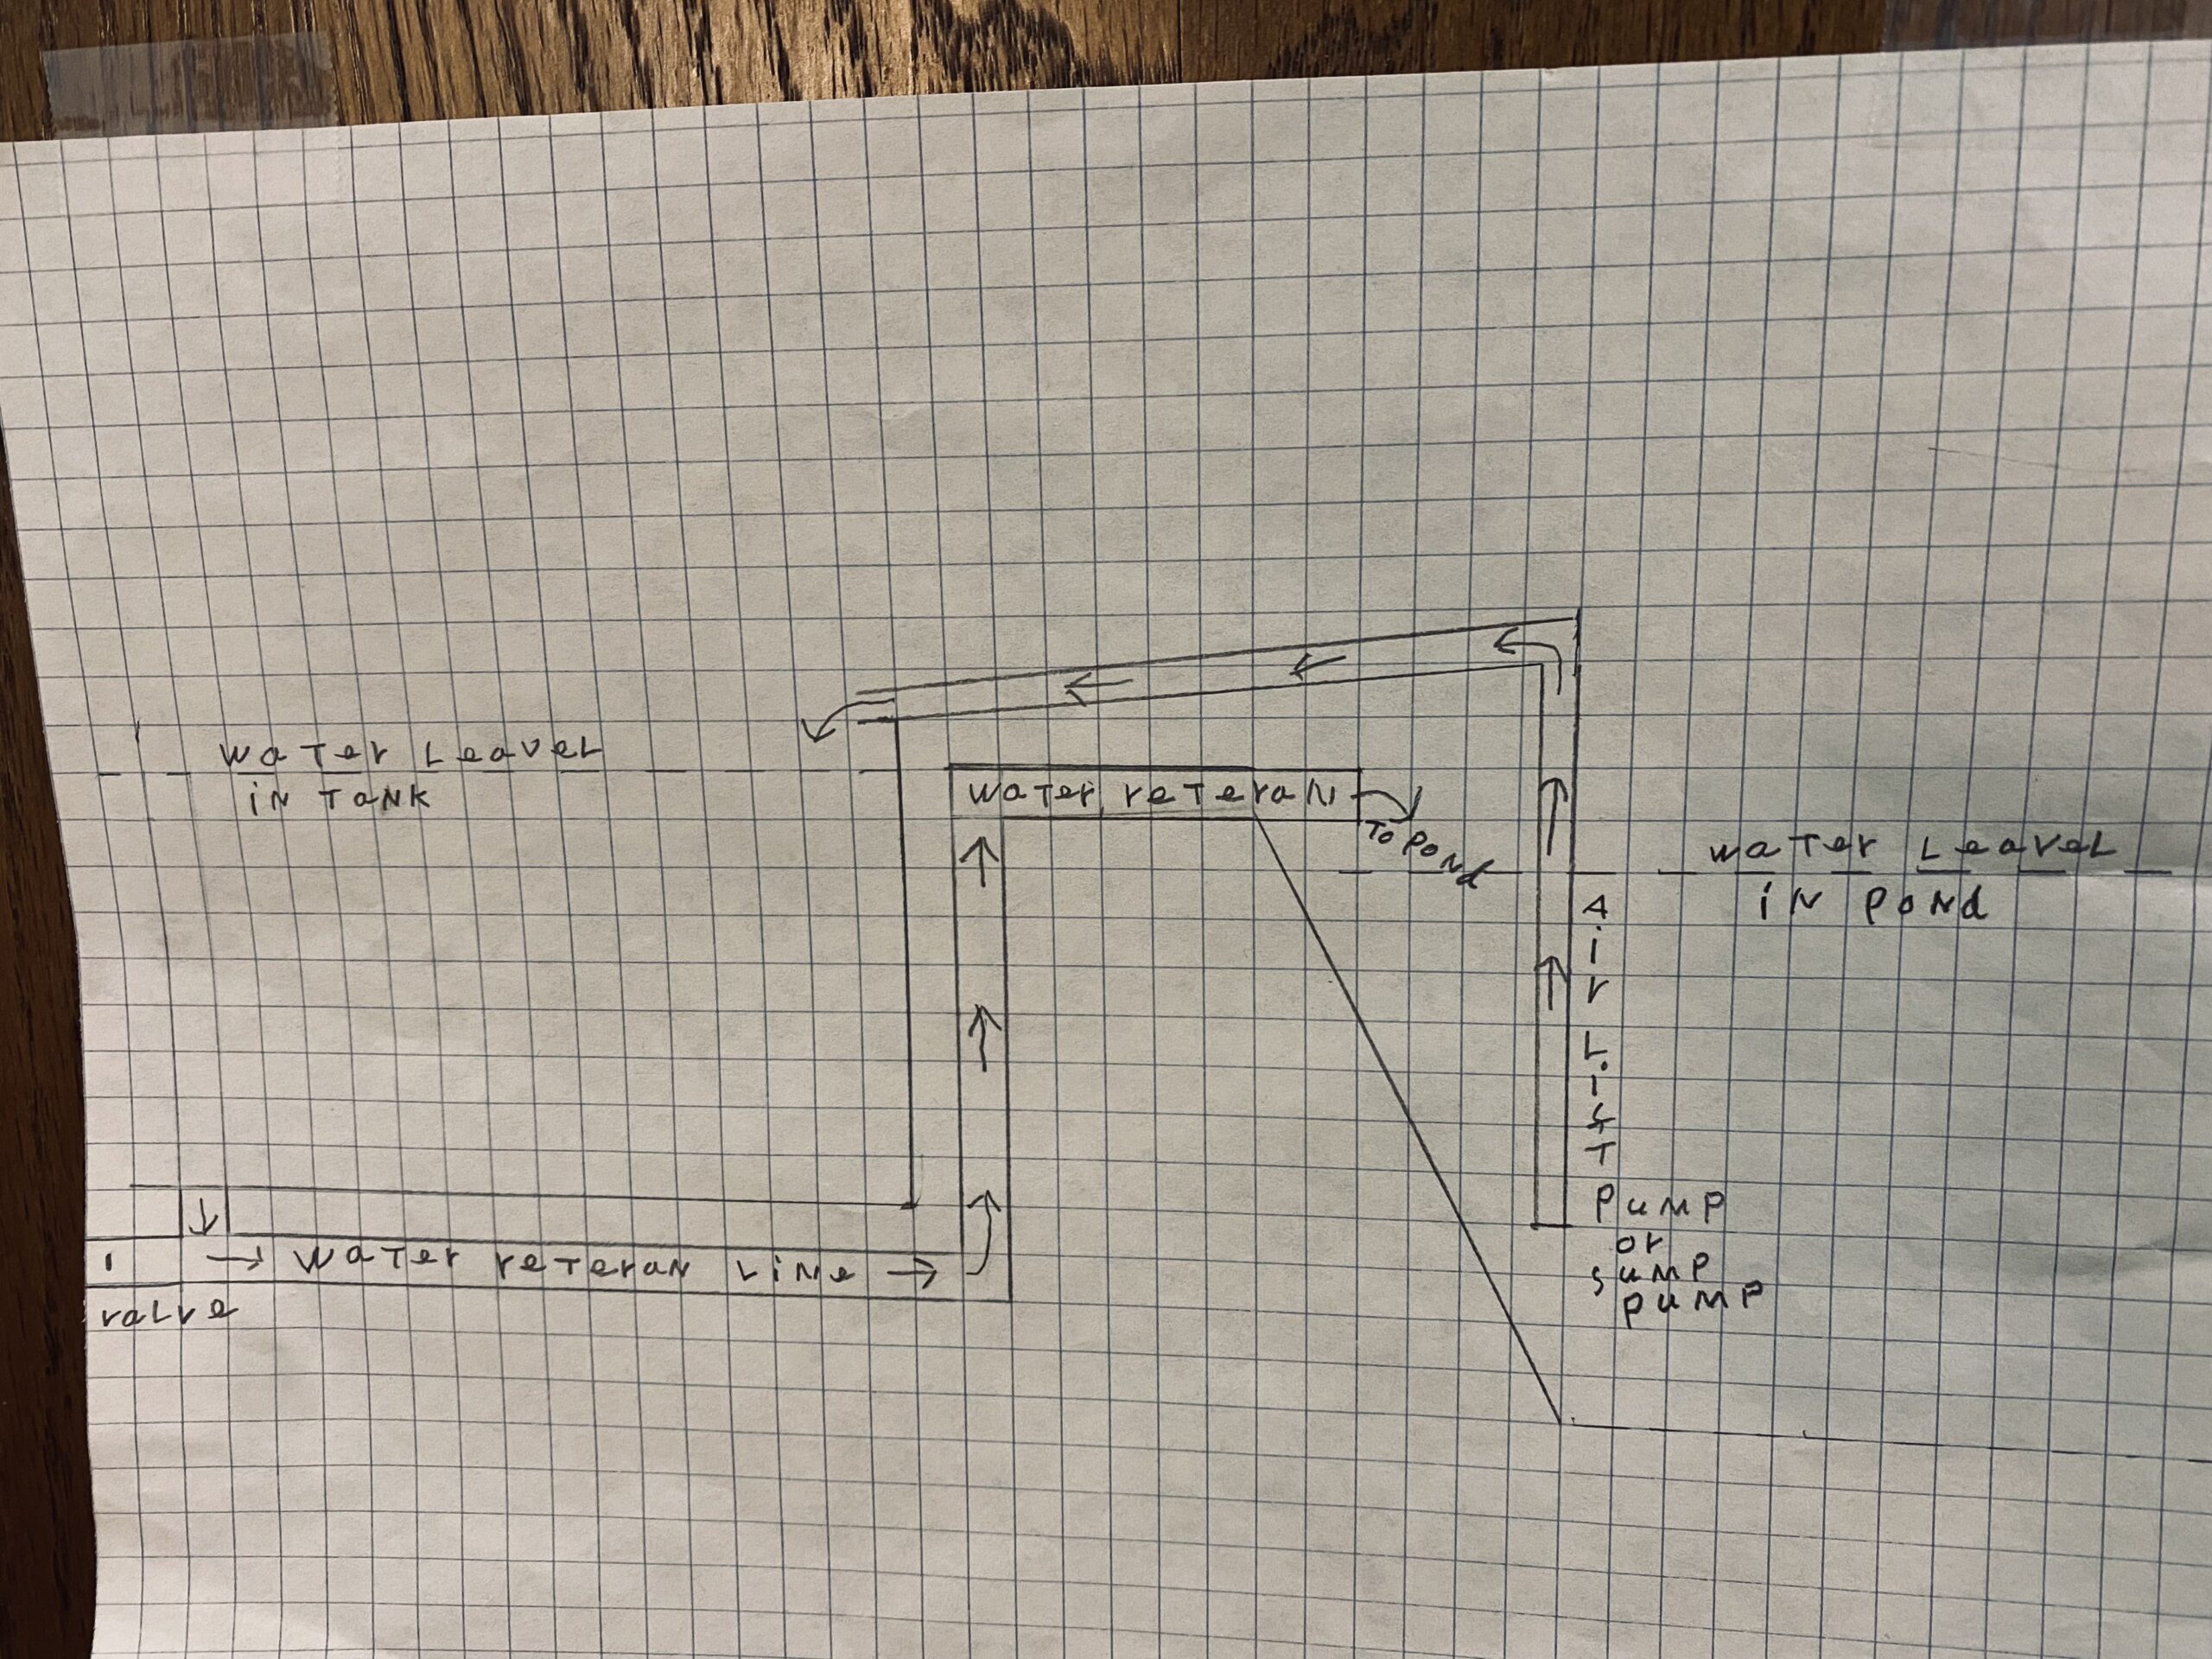
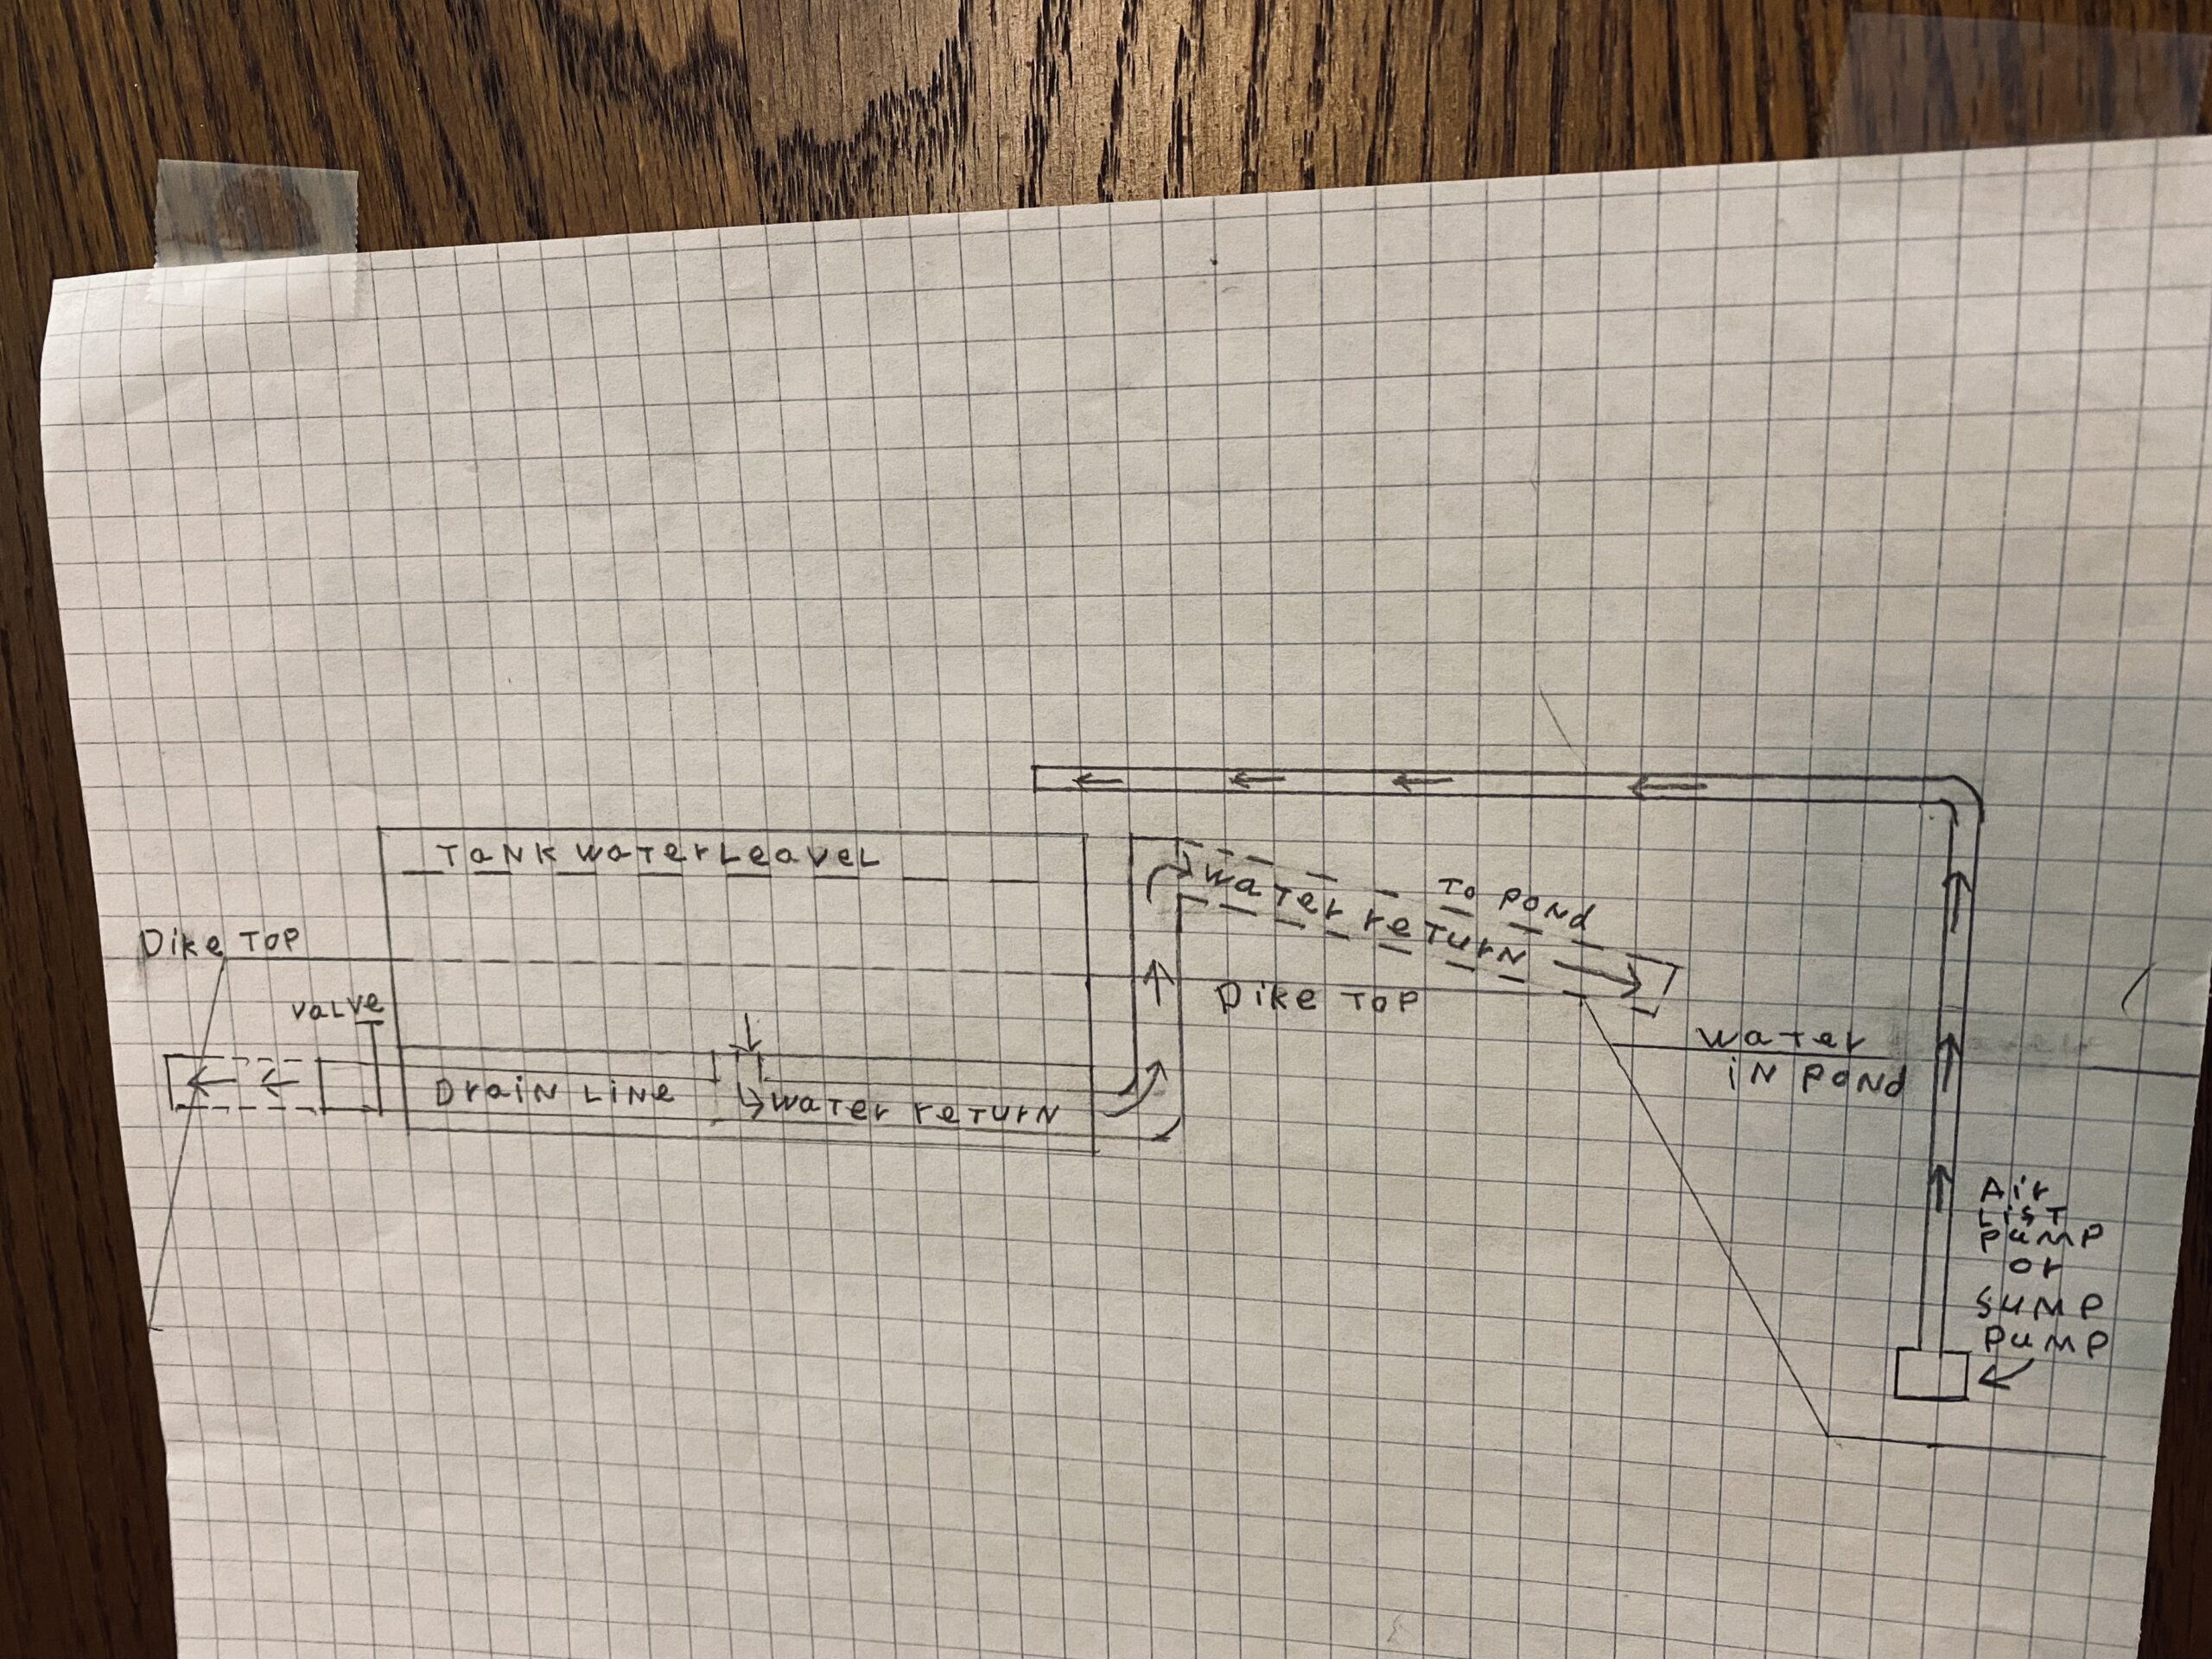
At home it was impractical because of the small size of my ponds to float the tank in the water. Therefore, I devised a way to use my tank outside of the pond while still using the basic principle of the floating tank with water usage and circulation.
I placed the tank in the dike on the outside of the pond at a height of the water and the tank being about 14" higher than the water in the pond. Which was the height of the water in the tank when I had it submerged in the water. This allows for all of the principles to still be used. The tank was partially buried beside the pond to accomplish this and to make it easier to manage. The principle of the floating tank has been proven as well as showing the adaptability of the principle when all things do not go the way you want them to.
Thanks for the help,
Jim Frey
Educational & Outreach Activities
Participation summary:
Dr Joe Morris helped with grant proposal. Dr. Morris’ role in my project was research, computer layout and adviser. During the time of my project, a field day was impossible because of the COVID pandemic did not make it feasible to meet in person. After the in-person meeting ban was lifted this past summer, my tank was no longer in the water.
Some thirty years ago after Dr. Joe Morris sent me a paper describing floating raceways, I built one at my quarry and used it up until my lease was canceled.
We developed and updated our website and dedicated a page to our drainable floating fish tanks found here:
https://www.jimfreyfishhatchery.com/drainable-floating-fish-tank
If others are interested in my floating raceway tanks, they can call me at 563-422-3368, email me at Jimfreyfish@gmail.com or come and visit me in person by appointment.
Learning Outcomes
In addition to what I shared earlier in this report. What I have found so far in my research and development:
- Cement on floor for ballast is not needed.
- I tried a keel on the bottom of prototypes and found it would need to be 12’ deep and be several thousand pounds, which would be very difficult to do and severely handicap the usability.
- I found that outriggers were the answer to making the tank set level in the water.
- I can adjust the depth that the tank sinks into the water by adjusting the amount of flotation. The water on the inside of the tank is higher than the water on the outside of the tank.
- When the tank is sunk in the water, while raising fish, instead of having to vacuum the floor, I can flush with a 3” water pump by increasing the amount of water that goes down the overflow just like a whirlpool.
At home it was impractical because of the small size of my ponds to float the tank in the water. Therefore, I devised a way to use my tank outside of the pond while still using the basic principle of the floating tank with water usage and circulation.
I placed the tank in the dike on the outside of the pond at a height of the water and the tank being about 14" higher than the water in the pond. Which was the height of the water in the tank when I had it submerged in the water. This allows for all of the principles to still be used. The tank was partially buried beside the pond to accomplish this and to make it easier to manage. The principle of the floating tank has been proven as well as showing the adaptability of the principle when all things do not go the way you want them to.
Thanks for the help,
Jim Frey