Final Report for FNC15-1007
Project Information
This project was done to research the effectiveness of cool season and warm season cover crops vs. no cover crop on soil used to produce pumpkins. The project compared soil erosion, disease, weed pressure and pumpkin production.
Introduction:
I was raised on my family's diversified farm. Farming has always been and continues to be my way of life. We have a 135 cow dairy, raise corn, beans and forage crops and raise about 75 Angus cross calves every year. I understand and am comfortable with this type of production because it is what my 4 generation family has always done. When I married my wife we decided to branch out and try to further diversify our farm on our own. By doing so we stepped out of that comfort zone I grew up in and entered uncharted territory. In 2011 we started growing pumpkins. What we thought was going to be something we could do as a small project with the end goal to be to wholesale to the local stores, turned into something completely different. By the middle of our second season we discovered we didn't have anywhere near the man power to move several acres of pumpkins on our own. We quickly discovered that for us the only way to get rid of the pumpkins we produced was to invite the public to come pick them. This was the birth of Red Barn Ranch. That is what we call our U-pick pumpkin patch. As we grew in popularity the pressure to produce quality and a sufficient quantity also grew. It became more and more difficult to grow the amount of pumpkins we needed on ground that has been used to produce pumpkins for multiple years now. The disease and weed pressure along with erosion and pests was really cutting into our bottom line. I started looking for a solution but everyone I talked to simply said that what we were dealing with was just part of pumpkin production. I turned to our local fruit and vegetable production extension staff agent from Lincoln University f0r help to solve some of our problems. He suggested experimenting with a cover crop as they have helped to solve similar problem in other crop production systems. However, when we researched cover crops on pumpkin production we were not able to find any answers or results from anyone who had tried and documented their results anywhere near our area.
After much discussion with extension agents I decided I would try cover crops on part of our farm. I wanted to test at least three different cover crops and compare them to an area with no cover crop. By completing a test plot with multiple modes of action I would be able to gain real life data on what would work with my soil and with my production methods and what would not. I would be able use this data to make decisions on if and how to produce healthier, nicer pumpkins all while using less time and chemical weeding, spraying and checking pumpkins and provide a better visual appeal to my clientele.
Cooperators
Research
 The field showing all four sections just before roller crimping.
 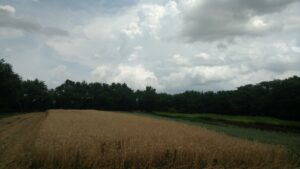 The field showing the outside rounds roller crimped and ready for planting.
 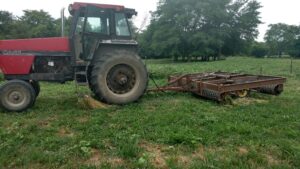 This is the tractor and roller used to flatten the cover crop.
I began my cover crop test plot by thoroughly working the ground after our 2015 pumpkin harvest. I rented and used a large tractor to pull a disk first then a field cultivator and roller to work and smooth the soil. I then divided the field into 4 equal parts. The first section was to be planted at the end of October to a cool season Rye and Hairy Vetch, however due to our busiest year yet at the pumpkin patch and late fall rains we were not able to actually get in to plant until November 16th. We also had problems locally sourcing Hairy Vetch seed at the time it needed to be planted. We were forced to drop the Vetch in order get the Rye planted in a more timely manner. The seed was planted through a drop seeder at the rate of 65 pounds of Rye per acre. We slightly increased our planned rate of Rye because it would not be accompanied by Hairy Vetch. Since each section was roughly one acre, the per acre rate is what was actually planted in total.
After the Rye was planted I waited until late April to plant the remaining three sections. Wet weather again prevented me from getting in the field as early as I had wanted but it did dry out and I was able to resume by the end of the month. I rented a tractor and field cultivator again and prepped the soil for seeding in the remaining sections. The same drop seeder that was used in November was used on April 21st again to plant 65 pounds of Oats and 40 pounds of Field Peas in the second area. The third section was left bare to be used as a check strip for comparison.The fourth and last area was then planted to 10 pounds of Pearl Millet, 10 pounds of Sorghum Sudan and 30 pounds of Field Peas. The field was allowed to grow freely until June 30th. At this time I rented a tractor and roller crimper and flattened all of the standing cover crop. I also used a field cultivator to prep the soil in the check strip and get rid of any weeds that had grown up in the bare soil. Once all rolling and cultivating was complete I began planting in the check strip section first and moved backwards through the sections. I quickly discovered that the ground was significantly wetter under the cover crop sections than in the bare soil and planting through the cover crop sections would need to be delayed a few days until it dried under the cover crop. The cover crops shaded the soil and helped it to retain moisture.
Because of the need to plant through cover crops rather than into bare soil I was unable to use my regular old planter. I needed to make or purchase a no-till planter. Unable to source a no-till planter for anywhere close to my budget I decided to make my own. My planter was made from parts of 3 used planters. The engineering took a lot of planning, a lot of testing and a little luck however, once I finished the planter I was quite impressed. My homemade, one of a kind no-till pumpkin planter will plant seeds through most any residue or soil condition with near precise seed spacing and uniform depth. After I finished testing the planter the soil was almost dry enough to resume planting in the cover crop sections. I chose to plant the majority of the patch at one half inch deep and three feet apart. Although I planted over twenty varieties of pumpkins in total I planted one row each of 8 varieties of jack o lantern size pumpkins including: Solid Gold, Gold Medal, Gold Medallion, Gold Standard, 20K Gold, Hybrid Autumn Gold, Howden, and Connecticut Field in each section to see the effects of the different cover crops on the same varieties of pumpkin plants.
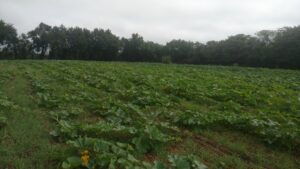 Picture of the pumpkin patch with well established pumpkin plants in the Rye cover crop section.
The pumpkins were monitored and checked daily throughout the growing season. By the end of July and the first part of August it became clear what my results were going to be. The first section with Rye in it had a great stand of pumpkins. Nearly every pumpkin plant that was planted came up and looked very healthy. The ground was also almost completely weed free. Much of the Rye was matured by the time I roller crimped it which caused the seeds in the heads to pop out and reseed and by August had developed into a thin carpet of small growing Rye. This made an ideal surface to walk on, especially in wet weather. This competition did not seem to effect pumpkin production. This section grew an impressive number of healthy pumpkins. We also noticed normal to slightly less than normal pest pressure. We had no disease problems in this section of the patch until late October when the plants had run their course anyway.
The second section was the Oats and Peas. This was the thinnest of all three sections as far as the cover crop goes and therefore the most full of weeds. I am not sure if it was just bad luck, thin initial cover which allowed for natural weed seeding, or contaminated cover crop seed or what but this section had a very large patch of ragweed in the very middle which proved to be a problem the entire season. We tried spot spraying chemicals and mowing the ragweed off but the only thing that seemed effective was simply pulling the weeds by hand. When this problem occurs in traditional tillage methods we use a garden tiller to remove the unwanted weeds at an early stage. Without the tiller option this problem was only solved or lessened by countless hours of hard work by hand. The pumpkin plants in this section were well established though. In the areas of the section that have heavy weed contamination both the pumpkin plant and pumpkin production suffered. Fewer healthy plants meant fewer healthy sizeable pumpkins. On top of all this, the bugs seemed to be naturally attracted to this section. This section suffered 300% more loss from pest damage than any of the other sections when treated for pests with the same method. Along with insect damage we also had small areas in this section where mildew diseases seemed to be a bigger problem than normal years. Towards the end of the season we lost many 25 to 30 pound pumpkins that seemed to be growing perfect one day and rotted on the vine the next day.
The third section was the check strip section of the patch. This section was simply beautiful. This section did have a couple advantages however. First, it was planted a few days earlier than the other sections simply because it was dryer earlier. Second, we had a very wet growing season and this section was able to disperse unneeded water quicker simply because it did not have any dead vegetation holding water in like a sponge. And lastly, I have been growing pumpkins this way for five years. I am getting to where I understand better what to look for, when to spray, when to weed, how to weed, and what needs to be done and what doesn't. All that being said, this section did look very nice. It did have great looking plants and the highest production. However, this section also required the highest amount of work. More time was spent in this section weeding than in any other section. This section also had the second highest concentration of pests. And this was the only section that had no protection from erosion. No erosion was noticed on any of the cover crop sections however this section developed a ditch from water traveling down a tire mark left behind by the planter tractor. The ditch created a tripping hazard and loss of soil. Also without a cover crop to blanket the soil, there was no protection from the mud on wet picking days which did make this part of the patch less desirable on those times. And lastly the disease impact here was very typical to years past. It seems in every year past we could not prevent powdery mildew from taking hold but with the proper use of fungicide we could delay it. That is exactly what happened this year on this section. The mildew here was controlled until the plants were mature and the pumpkins were fully developed.
The last section was the Pearl Millet, Sorghum Sudan and Field Peas. This section was hands down the thickest cover out of all. Thickest, but not the tallest, which turned out to be very difficult to keep down. This section would stand back up after rolling over it every time. I ran the roller over this section four more times that any other section before finally giving up on it laying over and dying naturally. After much frustration and desperation I decided I needed to get the pumpkins in and couldn't justify planting them into a healthy 12-18 inch standing crop so I rented a sprayer and purchased a generic 2.5 gallon jug of Roundup called Makaze and I applied a high recommended dosage and killed the cover crop chemically three days before planting. After planting I was surprised to see a near perfect stand of pumpkin plants emerge. However, a month after their emergence many of the plants remained unchanged or very near to the same size that they had been a month prior. I am not sure if the delay in development in this section was caused by the chemical used to kill the cover, the added compaction from attempting to roller crimp the cover crop flat so many times, poor soil in this section or a combination of everything but this section proved to have the lowest production in my experiment. It was however very weed free, with the exception of one area covered in shatter cane. This section also had very very few pests. It did however suffer from disease pressure. By the time the plants really started to grow, a full month behind the other sections, powdery mildew had started to set in further hindering their progress. With all these problems combined this section produced very very little this year.
Impact of Results/Outcomes
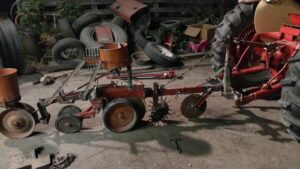 This shows a picture of the home built no-till pumpkin planter right after it was completed in the shop.
Although the trial did have a few problems and had to be adapted a few times I do consider it a success. I now know that by planting a cover crop I can control a percentage of weeds and lessen the amount of weeding I have to do. I also learned that the correct cover crop can actually limit the amount of pests. I discovered that cover crops retain moisture and during a dry year they could be worth their weight in gold for that reason alone. And finally, I learned that the correct cover crop creates a blanket over the soil and that customers are very appreciative of this when rain turns soil into mud.
Another huge accomplishment of this trial for me was the creation of my new planter. This was something that we did not even think about at the time of this grant. While I will admit that it put me in a little bit of a tough position having to design and build a planter with money I had not budgeted for during the prime planting season, it turned out better than I could have expected. Once the planter was finished I took old seeds that had been stored in a deep freezer for 5 years that I quit using at the time of their storage due to poor germination and had assumed were completely dead and used them to conduct field tests in well established grass in my back yard. After spending an afternoon adjusting and tinkering with the planter I was able to get the depth and spacing down to nearly perfect every time. Much to my surprise while mowing my yard a couple weeks later I discovered that literally every seed I sowed into my yard had sprouted and was growing. Even though I had not meant to plant these seeds and have them grow all over my yard I decided to give them a chance. I used no chemical, no fertilizer, no extra water and did not pull or cut a single weed and by October 15th I had nearly 100 twenty to thirty pound pumpkins sprouted from seeds believed to be dead and given zero extra attention, ripe, orange and perfect and ready to sell.
Without this experiment I would have probably never tried anything new. Albert Einstein once said "Insanity is doing the same thing over and over and expecting different results". I was getting very frustrated by having problems that I could not seem to control. I found myself saying "next year will be better" many times but not actually changing anything to make next year better. Now when I say next year will be better I know that from a production, effort and customer comfort level, it actually has a chance to be better.
Educational & Outreach Activities
Participation summary:
We do several tours throughout the growing and harvest seasons here at Red Barn Ranch. We love to educate and share what we learn; both our success stories and our failures. I especially like sharing my failures. This is how we learn after all. While I consider our experiment a success it also had it's share of set backs and failures within the trial that we can learn from. Each and every tour we did this year got to take a trip around our test plot. Those tours ranged from a group of walking/running screaming school kids on foot out in the patch to a group of pumpkin patch owners riding a tour bus around the perimeter of our test plot, to everything in between. While the tour participants varied greatly in age and interest we did our best to tailor an educational and informative explanation of what we did, how we did it and what we learned from it. We also shared our research with many of our more than 6000 visitors who came through the patch this year. We are located between the small town country life and the big city and have visitors who reflect this and generally take great interest in what we do. All of this combined made for a very large audience to share what we learned from this experiment with.
Project Outcomes
Potential Contributions
The research and trials we have conducted will help to open the eyes and spark the imaginations of pumpkin producers of all sizes who are frustrated with growing pumpkins year after year the same way and running into the same problems. I am confident that there is an ideal cover for every location and every producer in this line of business can benefit from some form of cover. There are an unlimited combination of possibilities of cover crops. We only tested three options, however for our application a simple cool season grass seemed to work best. Rye offered some weed control, no negative pest problems, no disease problems and left a blanket of grass that was much more desirable to walk on than mud or bare soil.
Future Recommendations
To anyone interested in experimenting with cover crops in your pumpkin production I fully recommend giving it a try. I would recommend starting simple. Our research showed that the simple cool season Rye cover worked much better than mixing multiple warm season cover crops. This method is also much simpler, more cost effective and for those of you who are involved in grain crop or other vegetable crop production, the time to plant cool season cover crops (late fall) is generally a much less busy time of the year than the time to plant warm season (early spring). Whichever route you decide to go I also recommend you give your cover crops the allotted time and fertilizer recommended for them to grow to their potential and be effective cover. And finally, in my opinion even a perfectly implemented (not that ours was by any means) cover crop is not a silver bullet. It can reduce weed. disease and pest pressure but it does not eliminate any problem completely, and under certain circumstances can make problems worse if not monitored.